# MVC、MVP、MVVM
## MVC 架构
MVC 模式下,软件被划分为视图(View:用户界面)、控制器(Controller:业务逻辑)、模型(Model:数据保存)
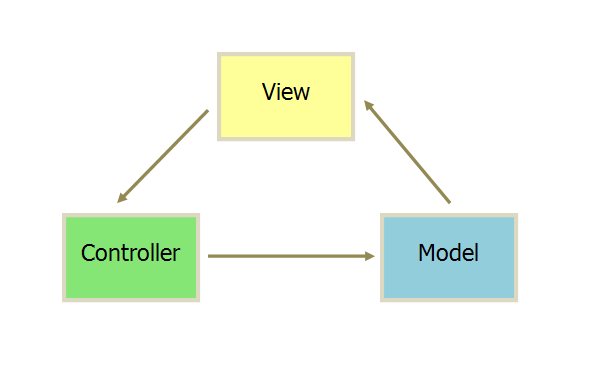
1. 用户操作 View,在 View 上面的事件都将被传递到 Controller 处理
2. Controller 处理事件、请求网络,操作 Model 更新状态
3. Model 将更新后的数据发送到 View,用户得到反馈
所有的通信都是单向的。
### Apple MVC 架构
效果等价于:
 最典型的就是 iOS 侧的 UITableView 的设计:
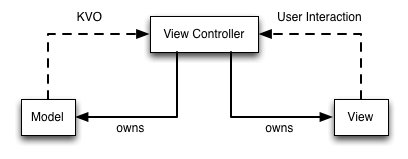
- Controller 感知 View:UIViewController 通过 View 的形式持有 UITableView
- View 事件代理到 Controller:而 View 上的 UI 事件自身不处理,通过代理的形式交给 UIViewController 处理
- Controller 感知 Model:UIViewController 负责从网络或者数据库中拉取数据,持有 Model。在合适的时机上,UIViewController 负责将 Model 数据交给 UIView 去展示(UITableView 的 cellforRow 代理方法中,cell.titleLabel.text = model.title 的形式展示上去) 。也就是说 View 无法感知 Model 的存在。
- Model 的变化通过 Controller 传递到 View 上:View 的点击事件通过代理交给 Controller 处理,往往会涉及 Model 的变化。Model 变化后,还是不直接操作 View。依旧通过 Controller 操作 View 的接口,更新数据
优点:
- View 可以重用。因为 View 不用感知 Model 的存在,View 展示的东西,外部通过访问修改 UI 控件属性的形式去实现。
```objective-c
@interface GoodCell
@property (nonatomic, strong, readonly) UIImageView *goodsImageView;
@property (nonatomic, strong, readonly) UILabel *goodsNameLabel;
@end
// GoodsListViewController
- (UITableViewCell *)tableView:(UITableView *)tableView cellForRowAtIndexPath:(NSIndexPath *)indexPath {
GoodsCell *cell = [tableView dequeueReusableCellWithIdentifier:GoodsCellID forIndexPath:indexPath];
GoodsModel *model = self.goods[indexPath.row];
cell.goodsImageView.image = [UIImage imageNamed:model.iamge];
cell.goodsNameLabel.text = model.name;
return cell;
}
```
- Model 可以重用。Model 也不用感知 View 的存在。
缺点:
- Controller 过于臃肿。因为 View 和 Model 彼此独立,所以读取 Model 然后拼装数据,外部通过访问修改 UI 控件属性,负责展示 UI 的逻辑都放在 Controller 中,所以 Controller 就会很臃肿。
### MVC 架构变种
最典型的就是 iOS 侧的 UITableView 的设计:
- Controller 感知 View:UIViewController 通过 View 的形式持有 UITableView
- View 事件代理到 Controller:而 View 上的 UI 事件自身不处理,通过代理的形式交给 UIViewController 处理
- Controller 感知 Model:UIViewController 负责从网络或者数据库中拉取数据,持有 Model。在合适的时机上,UIViewController 负责将 Model 数据交给 UIView 去展示(UITableView 的 cellforRow 代理方法中,cell.titleLabel.text = model.title 的形式展示上去) 。也就是说 View 无法感知 Model 的存在。
- Model 的变化通过 Controller 传递到 View 上:View 的点击事件通过代理交给 Controller 处理,往往会涉及 Model 的变化。Model 变化后,还是不直接操作 View。依旧通过 Controller 操作 View 的接口,更新数据
优点:
- View 可以重用。因为 View 不用感知 Model 的存在,View 展示的东西,外部通过访问修改 UI 控件属性的形式去实现。
```objective-c
@interface GoodCell
@property (nonatomic, strong, readonly) UIImageView *goodsImageView;
@property (nonatomic, strong, readonly) UILabel *goodsNameLabel;
@end
// GoodsListViewController
- (UITableViewCell *)tableView:(UITableView *)tableView cellForRowAtIndexPath:(NSIndexPath *)indexPath {
GoodsCell *cell = [tableView dequeueReusableCellWithIdentifier:GoodsCellID forIndexPath:indexPath];
GoodsModel *model = self.goods[indexPath.row];
cell.goodsImageView.image = [UIImage imageNamed:model.iamge];
cell.goodsNameLabel.text = model.name;
return cell;
}
```
- Model 可以重用。Model 也不用感知 View 的存在。
缺点:
- Controller 过于臃肿。因为 View 和 Model 彼此独立,所以读取 Model 然后拼装数据,外部通过访问修改 UI 控件属性,负责展示 UI 的逻辑都放在 Controller 中,所以 Controller 就会很臃肿。
### MVC 架构变种
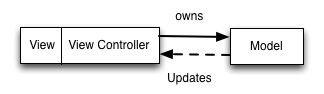
 改变:
- View 可以拥有 Model,感知 Model。一部分之前放在 Controller 里的逻辑,拆分到 View 里面了
优点:
- 对 Controller 进行了瘦身,这符合“单一职责原则”,使 Controller 更专注于协调和业务逻辑。
将 UI 配置逻辑内聚到 View 中,避免了 Controller 中冗长的控件操作代码(如 `cell.imageView.image = model.image;`)
- 将 View 内部的细节进行了隐藏,更具备封装性。外界不知道 View 内部具体的实现(Apple MVC 会暴露 UI 控件,现在不用暴露了),更具封装性
```objective-c
// GoodCell.h
@interface GoodCell
@property (nonatomic, strong) GoodsModel *model;
@end
// GoodCell.m
@interface GoodCell()
@property (nonatomic, strong, readonly) UIImageView *goodsImageView;
@property (nonatomic, strong, readonly) UILabel *goodsNameLabel;
@end
-(void)setModel:(GoodsModel *)model {
_model = model;
self.goodsImageView.image = [UIImage imageNamed:model.iamge];
self.goodsNameLabel.text = model.name;
}
// GoodsListViewController
- (UITableViewCell *)tableView:(UITableView *)tableView cellForRowAtIndexPath:(NSIndexPath *)indexPath {
GoodsCell *cell = [tableView dequeueReusableCellWithIdentifier:GoodsCellID forIndexPath:indexPath];
cell.model = self.goods[indexPath.row];
return cell;
}
```
缺点:
- View 强依赖于 Model。
### 思考:View 强依赖于 Model 真的是缺点吗?
这个缺点就真的是缺点吗?我一个商品的 GoodsView 展示,就需要展示商品图片、商品名称、商品原价、商品折扣价、销量等信息。单独暴露 UI 控件,然后访问的话很灵活也很独立,但工作量很大,为了 UI 的展示,让 View 持有 Model 真的是缺点吗?
要回答是不是缺点,需要回答2个问题:
1. 何时是合理的设计?
- View 与 Model 高度绑定
如果 GoodsCell 仅用于展示 GoodsModel,且2者生命周期一致,这种直接依赖反而合理,此时 View 与 Model 的耦合是**高内聚** 的体现
- 避免过度抽象
强行解耦,为 View 抽象设计出一个通用接口,可能引入不必要的复杂度。比如为 GoodsCell 设计一个 `id` 协议,在仅有一个 Model 的场景下属于过度设计了
2. 何时可能成为问题?
- 复用 View 展示不同 Model
如果希望 GoodsCell 复用展示其他数据(如 `DiscountGoodsModel`),之前那种 GoodsCell 依赖 GoodsModel 的设计,会导致导致代码难以拓展。此时可以考虑 `ViewModel` 模式或者**协议抽象**解耦
- Model 频繁变更
如果 GoodsModel 的字段,比如 image 频繁变更,所有直接依赖它的 View 都需要同步修改,此时可以将 Model 到 View 的映射逻辑,迁移到独立的转换层,比如 `GoodsModelConverter`
怎么样优化?
1. 可将 Model 到 View 的映射逻辑移到 **独立的转换层**,隔离变化
1. `GoodsModel` 结构如下:
```objective-c
// GoodsModel.h
@interface GoodsModel : NSObject
@property (nonatomic, copy) NSString *imageName;
@property (nonatomic, copy) NSString *name;
@property (nonatomic, assign) CGFloat price;
@end
```
现在需要将 `GoodsModel` 转换为 View 可直接使用的数据(如处理价格格式化、图片加载):
实现 GoodsModelConverter
```objective-c
// GoodsModelConverter.h
@interface GoodsModelConverter : NSObject
// 将 GoodsModel 转换为字典(Key-Value 形式)
+ (NSDictionary *)convertToDisplayData:(GoodsModel *)model;
@end
// GoodsModelConverter.m
@implementation GoodsModelConverter
+ (NSDictionary *)convertToDisplayData:(GoodsModel *)model {
// 处理价格格式化
NSString *priceText = [NSString stringWithFormat:@"¥%.2f", model.price];
// 加载图片(假设 imageName 是本地资源名)
UIImage *image = [UIImage imageNamed:model.imageName];
return @{
@"name": model.name,
@"price": priceText,
@"image": image
};
}
@end
```
修改 View 使用转换后的数据
```objective-c
// GoodsCell.h
@interface GoodsCell : UITableViewCell
// 不再直接依赖 GoodsModel,而是通过字典传递数据
- (void)configureWithDisplayData:(NSDictionary *)displayData;
@end
// GoodsCell.m
@implementation GoodsCell {
UIImageView *_goodsImageView;
UILabel *_nameLabel;
UILabel *_priceLabel;
}
- (void)configureWithDisplayData:(NSDictionary *)displayData {
_goodsImageView.image = displayData[@"image"];
_nameLabel.text = displayData[@"name"];
_priceLabel.text = displayData[@"price"];
}
@end
```
Controller 调用
```objective-c
// GoodsListViewController.m
- (UITableViewCell *)tableView:(UITableView *)tableView cellForRowAtIndexPath:(NSIndexPath *)indexPath {
GoodsCell *cell = [tableView dequeueReusableCellWithIdentifier:GoodsCellID forIndexPath:indexPath];
GoodsModel *model = self.goods[indexPath.row];
// 通过 Converter 转换数据
NSDictionary *displayData = [GoodsModelConverter convertToDisplayData:model];
[cell configureWithDisplayData:displayData];
return cell;
}
```
如何应对 Model 的变化?
假设 GoodsModel 的 image 字段变为 remoteImageURL,则不需要每处修改 View 使用的地方,统一在 GoodsModelConverter 即可
```objective-c
// GoodsModelConverter.m
+ (NSDictionary *)convertToDisplayData:(GoodsModel *)model {
// 新增网络图片加载逻辑(伪代码)
UIImage *placeholderImage = [UIImage imageNamed:@"placeholder"];
UIImage *image = placeholderImage;
return @{
@"name": model.name,
@"price": priceText,
@"image": image
};
}
```
View 和 Controller 无需任何修改。
- GoodsCell 仍然接收 displayData 字典,不用关心具体来源
- Controller 仍然调用 convertToDisplayData 方法
更优雅的方案是引入 ViewModel 对象。
2. 使用 ViewModel 模式
将 Model 转换为 View 专用的数据结构,View 仅依赖 ViewModel:
```objective-c
// GoodsCellViewModel.h
@interface GoodsCellViewModel
@property (nonatomic, readonly) UIImage *image;
@property (nonatomic, readonly) NSString *name;
- (instancetype)initWithGoods:(GoodsModel *)goods;
@end
// GoodsCell.h
@interface GoodsCell
@property (nonatomic, strong) GoodsCellViewModel *viewModel;
@end
```
优点:
- View 与 Model 解耦,便于复用
- ViewModel 可以封装数据转换逻辑(比如多语言本地化、图片加载、字符串格式化拼接)
3. 通过抽象协议依赖
定义 View 所需数据的协议,Model 实现该协议。
定义 GoodsDisplayable 协议
```objective-c
// GoodsDisplayable.h
@protocol GoodsDisplayable
@property (nonatomic, readonly) NSString *goodsImageName;
@property (nonatomic, readonly) NSString *goodsName;
@end
// GoodsModel.h
@interface GoodsModel : NSObject
@end
// GoodsCell.h
@interface GoodsCell
@property (nonatomic, strong) id displayData;
@end
```
在正常商品列表页面,Controller 逻辑为:
```objective-c
// GoodsListViewController.m
- (UITableViewCell *)tableView:(UITableView *)tableView cellForRowAtIndexPath:(NSIndexPath *)indexPath {
GoodsCell *cell = [tableView dequeueReusableCellWithIdentifier:GoodsCellID forIndexPath:indexPath];
cell.displayData = self.goods[indexPath.row];
return cell;
}
```
在打折商品列表页面,Controller 逻辑为:
```objective-c
// DiscountGoodsListViewController.m
- (UITableViewCell *)tableView:(UITableView *)tableView cellForRowAtIndexPath:(NSIndexPath *)indexPath {
GoodsCell *cell = [tableView dequeueReusableCellWithIdentifier:GoodsCellID forIndexPath:indexPath];
cell.displayData = self.goods[indexPath.row];
return cell;
}
```
现在我们可以尝试概括性回答该问题了:
**View 持有 Model 是否是缺点,取决于具体场景:**
- **单一用途、无复用需求**:直接依赖 Model 是合理选择,简化代码且无过度设计。
- **需复用或 Model 不稳定**:通过 ViewModel 或协议解耦,提高灵活性。
最终,**没有绝对的最佳实践,只有适合场景的权衡**。Apple 的 MVC 变种在简单场景下有效,但在复杂场景需结合其他模式优化。
## MVP 架构
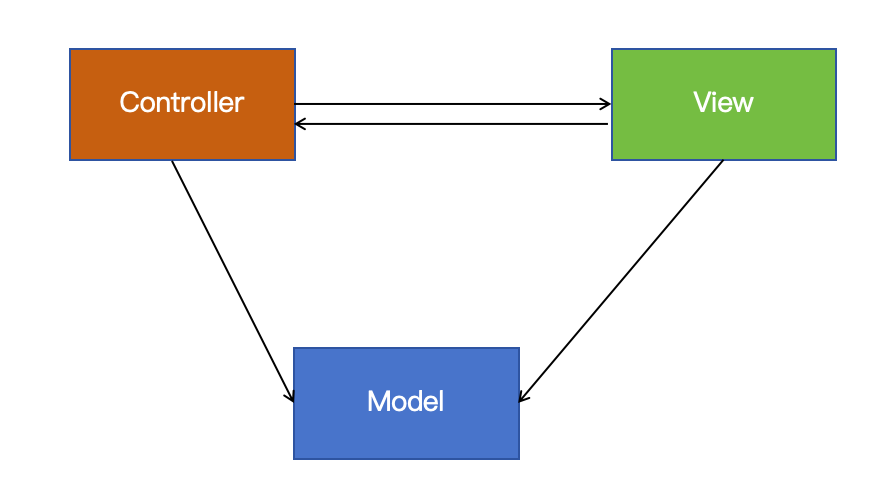
MVP 模式将 Controller 改名为 Presenter,通信改变了通信方向

1. 各部分之间的通信都是双向的
2. Model 与 View 不发生联系,都通过 Presenter 传递
3. View 层非常薄。不部署任何业务逻辑,称为“被动视图(Passive View)”,即没有任何主动性
4. 而 Presenter 非常厚,所有的逻辑都部署在这层。比如在 Presenter 里组装 View 展示到 Controller 的 View 上,加载数据,展示到 View 上。
5. 如果 Presenter 这一层很厚的话,可以继续拆,比如再增加一个 Interactor 的角色,专门处理处理 View UI 响应事件。这样子角色更多,职责也更清晰。维护也方便。
### 错误实现
举个例子:
App 只有一个个人中心 ViewController,其 View 上只有1个展示个人信息的子 View,子 View 上只有1个展示头像 UIImageView 和 1个展示昵称的 UILabel。用 MVP 的思想实现如下
模型为
```objective-c
@interface PersonalInfoModel : NSObject
@property (copy, nonatomic) NSString *name;
@property (copy, nonatomic) NSString *image;
@end
```
关键就是要增加一个 `Presenter` 的角色,负责组装 View 展示到 Controller 的 View 上,加载数据,展示到 View 上。
```objective-c
// PersonInfoPresenter.h
@interface PersonInfoPresenter : NSObject
- (instancetype)initWithController:(UIViewController *)controller;
@end
// PersonInfoPresenter.m
@interface PersonInfoPresenter()
@property (weak, nonatomic) UIViewController *controller;
@end
@implementation PersonInfoPresenter
- (instancetype)initWithController:(UIViewController *)controller
{
if (self = [super init]) {
self.controller = controller;
// 创建View
PersonalInfoView *personalInfoView = [[PersonalInfoView alloc] init];
personalInfoView.frame = CGRectMake(100, 100, 100, 150);
personalInfoView.delegate = self;
[controller.view addSubview:personalInfoView];
// 加载模型数据
PersonalInfoModel *model = [[PersonalInfoModel alloc] init];
model.name = @"杭城小刘";
model.image = @"UnixKernel";
// 赋值数据
[personalInfoView setName:app.name andImage:app.image];
}
return self;
}
#pragma mark - MJAppViewDelegate
- (void)personalInfoViewDidClick:(PersonalInfoView *)personalInfoView
{
NSLog(@"presenter 监听了个人信息 View 的点击事件");
}
```
PersonalInfoView
```objective-c
#import
@class PersonalInfoView;
@protocol PersonalInfoViewDelegate
@optional
- (void)personalInfoViewDidClick:(PersonalInfoView *)personalInfoView;
@end
@interface PersonalInfoView : UIView
- (void)setName:(NSString *)name andImage:(NSString *)image;
@property (weak, nonatomic) id delegate;
@end
@implementation MJAppView
- (instancetype)initWithFrame:(CGRect)frame {
if (self = [super initWithFrame:frame]) {
UIImageView *iconView = [[UIImageView alloc] init];
iconView.frame = CGRectMake(0, 0, 100, 100);
[self addSubview:iconView];
_iconView = iconView;
UILabel *nameLabel = [[UILabel alloc] init];
nameLabel.frame = CGRectMake(0, 100, 100, 30);
nameLabel.textAlignment = NSTextAlignmentCenter;
[self addSubview:nameLabel];
_nameLabel = nameLabel;
}
return self;
}
- (void)setName:(NSString *)name andImage:(NSString *)image {
_iconView.image = [UIImage imageNamed:image];
_nameLabel.text = name;
}
- (void)touchesBegan:(NSSet *)touches withEvent:(UIEvent *)event {
if (self.delegate && [self.delegate respondsToSelector:@selector(personalInfoViewDidClick:)]) {
[self.delegate personalInfoViewDidClick:self];
}
}
@end
```
在 ViewController 的使用
```objective-c
@interface ViewController ()
@property (strong, nonatomic) PersonInfoPresenter *presenter;
@end
@implementation ViewController
- (void)viewDidLoad {
[super viewDidLoad];
self.presenter = [[PersonInfoPresenter alloc] initWithController:self];
}
@end
```
目前实现的效果是:
- Presenter 负责了 View 的创建与展示,同时调用 Model 的能力,从数据库或者网络加载业务数据,然后更新到 View 上。使得 Controller 逻辑更加单一
- 将大部分 View 的组装逻辑从 Controller 中抽离到 Presenter 中,实现了 Controller 的瘦身
- Model 和 View 无法感知对方,也无法直接访问,保证了 Model 和 View 的复用能力
### 正确实现
目前的实现中,Presenter 中拥有了 View,对于 Presenter 的单元测试不好展开,该如何修改?
- View 还是放在 Controller 中创造
- 为了解耦,将 View UI 事件和数据获取抽成对应的协议
- Model 依旧是薄薄的一层,数据获取放在 Service 里进行
定义 View 刷新协议
```objective-c
// PersonalInfoViewProtocol.h
@protocol PersonalInfoViewProtocol
- (void)displayName:(NSString *)name image:(NSString *)image;
@end
```
View 实现协议
```objective-c
// PersonalInfoView.h
@interface PersonalInfoView : UIView
@property (nonatomic, weak) id delegate;
@end
// PersonalInfoView.m
@implementation PersonalInfoView
// 原有代码不变,但实现 displayName:image: 方法
- (void)displayName:(NSString *)name image:(NSString *)image {
_iconView.image = [UIImage imageNamed:image];
_nameLabel.text = name;
}
- (void)didClickProfileView {
if (self.delegate && [self.delegate respondsToSelector:@selector(personalInfoViewDidClick:)]) {
[self.delegate personalInfoViewDidClick:self];
}
}
@en
```
定义数据拉取协议
```objective-c
// PersonalInfoServiceProtocol.h
@protocol PersonalInfoServiceProtocol
- (void)fetchPersonalInfoWithCompletion:(void (^)(PersonalInfoModel *model))completion;
@end
```
定义数据拉取 Services
```objective-c
// PersonalInfoService.h
@interface PersonalInfoService : NSObject
@end
// PersonalInfoService.m
@implementation PersonalInfoService
- (void)fetchPersonalInfoWithCompletion:(void (^)(PersonalInfoModel *))completion {
// 模拟网络请求
dispatch_async(dispatch_get_global_queue(0, 0), ^{
PersonalInfoModel *model = [[PersonalInfoModel alloc] init];
model.name = @"杭城小刘";
model.image = @"UnixKernel";
dispatch_async(dispatch_get_main_queue(), ^{
completion(model);
});
});
}
@end
```
重构 Presenter。loadData 数据加载成功后,调用其 View 的代理方法,刷新 UI
```objective-c
// PersonInfoPresenter.h
@interface PersonInfoPresenter : NSObject
- (instancetype)initWithView:(id)view
service:(id)service;
- (void)loadData;
@end
// PersonInfoPresenter.m
@interface PersonInfoPresenter()
// 重要地方:遵循相应协议的 View 对象
@property (nonatomic, weak) id view;
// 重要地方:遵循相应协议的 Services 对象
@property (nonatomic, strong) id service;
@end
@implementation PersonInfoPresenter
- (instancetype)initWithView:(id)view
service:(id)service {
if (self = [super init]) {
_view = view;
_service = service;
}
return self;
}
- (void)loadData {
[self.service fetchPersonalInfoWithCompletion:^(PersonalInfoModel *model) {
[self.view displayName:model.name image:model.image];
}];
}
#pragma mark - 点击事件处理(可选)
- (void)handleViewClick {
NSLog(@"Presenter 处理点击事件");
}
@end
```
Controller 里组装和创建 Presenter,在 `viewDidLoad` 里面调用 presenter 的 loadData 方法,让其内部的 Services 加载网络数据。
```objc
// ViewController.m
@interface ViewController ()
@property (nonatomic, strong) PersonInfoPresenter *presenter;
@property (nonatomic, strong) PersonalInfoView *infoView;
@end
@implementation ViewController
- (void)viewDidLoad {
[super viewDidLoad];
// 创建 View
self.infoView = [[PersonalInfoView alloc] initWithFrame:CGRectMake(100, 100, 100, 150)];
self.infoView.delegate = self;
[self.view addSubview:self.infoView];
// 注入依赖
id service = [[PersonalInfoService alloc] init];
self.presenter = [[PersonInfoPresenter alloc] initWithView:self.infoView service:service];
// 触发数据加载
[self.presenter loadData];
}
#pragma mark - PersonalInfoViewDelegate
- (void)personalInfoViewDidClick:(PersonalInfoView *)view {
[self.presenter handleViewClick];
}
@end
```
关键改动点:
1. **Presenter 不再持有 View**:通过协议与 View 通信,避免直接依赖具体类。
2. **数据加载抽象为 Service**:Presenter 通过协议调用 Service,便于模拟不同场景。
3. **布局职责回归 View**:Presenter 不再设置 `frame`,保证单一职责。
4. **依赖注入**:Presenter 的 Service 和 View 通过初始化注入,测试时可替换为 Mock。
思考:如何一个复杂的购物车页面包含很多子 View,按照 MVP 模式,该怎么处理?
- **模块化拆分**:每个功能单元独立为 View-Presenter-Service 组合
可以把复杂的购物车 view 拆分为独立的几个 View。比如:
- 商品列表 GoodsListView、商品列表 GoodsListPresenter、商品列表 GoodsListServices
- 商品统计信息 GoodsSummaryInfoView、商品统计信息 GoodsSummaryInfoPresenter、商品统计信息 GoodsSummaryInfoServices
- 营销活动展示 GoodsPromoptionView、营销活动展示 GoodsPromoptionPresenter、营销活动展示 GoodsPromoptionServices
- 每个 View 设计自己对应的 Presenter
- Controller 依旧复杂 View 的组装,和各个 Presenter 的创建工作
- **协调机制**:使用 Coordinator 或响应式编程管理跨模块事件
- 其他流程和单个 View、单个 Presenter 没啥不同。区别在于复杂的业务下,Controller 会存在多个 View、多个 Presenter
## MVVM 架构
MVVM 模式将 Presenter 改名为 ViewModel,基本上与 MVP 模式完全一致。

区别在于:采用双向绑定的模式。View 的改变,自动反应在 ViewModel 上。 ViewModel 的改变会发应在 View 上。
MVC 等到业务逻辑很复杂的时候�被称为 �Massive View Controller (重量级视图控制器)。这样的 Controller 后期维护看着阅读成本很高、不易于测试、维护。当时写这个代码的人离职后,几千行规模的代码在后期添加新功能或者修改 Bug 都是一件折磨人的事情。
看到 View 和 ViewController 是不同的技术组件,但是日常开发中它们总是成对的存在,为什么不考虑将他们的连接正规化呢?
典型的 MVC 存在弊端就是 Controller 层非常复杂,很多逻辑都在里面,包括一些不是逻辑的“表示逻辑”(presentation logic)。用 MVVM 术语来说就是将那些 Model 数据转换为 View 可以呈现的东西。例如将一个 NSDate 格式化为一个“2018-11-17” 这样的 NSString。
上图中缺少一个环节,一个专门�用来处理所有的表示逻辑。称为 “ViewModel”。位于 ViewController 与 Model 之间。

MVVM 就是 MVC 的增强版,将展示层逻辑单独拎出来,即 ViewModel。iOS 使用 MVVM 可以降低 ViewController 的复杂性并使得�表示逻辑易于测试。
- MVVM 兼容当下的 MVC 机构
- MVVM 增加应用的可测试性
- MVVM 配合一个绑定机制效果最好
### **MVVM 核心改造点**
1. **引入 ViewModel**:负责数据转换、业务逻辑,通过数据流驱动 UI 更新
2. **数据双向绑定**:使用 ReactiveCocoa(RAC)建立 View 和 ViewModel 的绑定关系
3. **事件命令化**:用户交互事件封装为 Command,由 ViewModel 处理
改造如下:
定义 ViewModel(核心)
```objc
// PersonalInfoViewModel.h
#import
@class PersonalInfoModel;
@interface PersonalInfoViewModel : NSObject
// 输出属性(供 View 绑定)
@property (nonatomic, strong, readonly) RACSignal *nameSignal;
@property (nonatomic, strong, readonly) RACSignal *imageSignal;
// 输入命令(处理 View 事件)
@property (nonatomic, strong, readonly) RACCommand *viewDidClickCommand;
// 初始化方法(依赖注入)
- (instancetype)initWithService:(id)service;
@end
// PersonalInfoViewModel.m
@interface PersonalInfoViewModel()
@property (nonatomic, strong) id service;
@property (nonatomic, strong) RACSubject *nameSubject;
@property (nonatomic, strong) RACSubject *imageSubject;
@end
@implementation PersonalInfoViewModel
- (instancetype)initWithService:(id)service {
if (self = [super init]) {
_service = service;
_nameSubject = [RACSubject subject];
_imageSubject = [RACSubject subject];
// 暴露信号
_nameSignal = _nameSubject;
_imageSignal = _imageSubject;
// 初始化命令
[self setupCommands];
[self loadData];
}
return self;
}
#pragma mark - 初始化命令
- (void)setupCommands {
@weakify(self);
_viewDidClickCommand = [[RACCommand alloc]
initWithSignalBlock:^RACSignal *(id input) {
@strongify(self);
NSLog(@"ViewModel 处理点击事件");
return [RACSignal empty];
}];
}
#pragma mark - 数据加载
- (void)loadData {
@weakify(self);
[self.service fetchPersonalInfoWithCompletion:^(PersonalInfoModel *model) {
@strongify(self);
// 更新数据流
[self.nameSubject sendNext:model.name];
[self.imageSubject sendNext:[UIImage imageNamed:model.image]];
}];
}
@end
```
改造 View
```objective-c
// PersonalInfoView.h(协议不再需要)
@interface PersonalInfoView : UIView
// 暴露 UI 组件用于绑定
@property (nonatomic, strong) UIImageView *iconView;
@property (nonatomic, strong) UILabel *nameLabel;
// 绑定 ViewModel
- (void)bindViewModel:(PersonalInfoViewModel *)viewModel;
@end
// PersonalInfoView.m
#import
@implementation PersonalInfoView
- (instancetype)initWithFrame:(CGRect)frame {
// ... 原有初始化代码不变 ...
}
- (void)bindViewModel:(PersonalInfoViewModel *)viewModel {
// 绑定数据到 UI
RAC(self.nameLabel, text) = [viewModel.nameSignal deliverOnMainThread];
RAC(self.iconView, image) = [viewModel.imageSignal deliverOnMainThread];
// 绑定点击事件到 Command
@weakify(viewModel);
[self addGestureRecognizer:[[UITapGestureRecognizer alloc]
initWithTarget:self action:@selector(handleTap)]];
[[self rac_signalForSelector:@selector(handleTap)]
subscribeNext:^(id x) {
@strongify(viewModel);
[viewModel.viewDidClickCommand execute:nil];
}];
}
- (void)handleTap {
// 空方法,仅用于触发 RAC 信号
}
@end
```
改造 ViewController(胶水、组装)
```objective-c
// ViewController.m
@interface ViewController ()
@property (nonatomic, strong) PersonalInfoView *infoView;
@property (nonatomic, strong) PersonalInfoViewModel *viewModel;
@end
@implementation ViewController
- (void)viewDidLoad {
[super viewDidLoad];
// 创建 View
self.infoView = [[PersonalInfoView alloc] initWithFrame:CGRectMake(100, 100, 100, 150)];
[self.view addSubview:self.infoView];
// 创建 Service 和 ViewModel
id service = [[PersonalInfoService alloc] init];
self.viewModel = [[PersonalInfoViewModel alloc] initWithService:service];
// 绑定 ViewModel
[self.infoView bindViewModel:self.viewModel];
}
@end
```
## 一个简单的例子
PersonModel
```objective-c
@interface Person : NSObject
- (instancetype)initwithSalutation:(NSString *)salutation firstName:(NSString *)firstName lastName:(NSString *)lastName birthdate:(NSDate *)birthdate;
@property (nonatomic, readonly) NSString *salutation;
@property (nonatomic, readonly) NSString *firstName;
@property (nonatomic, readonly) NSString *lastName;
@property (nonatomic, readonly) NSDate *birthdate;
@end
```
PersonViewController
```objective-c
- (void)viewDidLoad {
[super viewDidLoad];
if (self.model.salutation.length > 0) {
self.nameLabel.text = [NSString stringWithFormat:@"%@ %@ %@", self.model.salutation, self.model.firstName, self.model.lastName];
} else {
self.nameLabel.text = [NSString stringWithFormat:@"%@ %@", self.model.firstName, self.model.lastName];
}
NSDateFormatter *dateFormatter = [[NSDateFormatter alloc] init];
[dateFormatter setDateFormat:@"EEEE MMMM d, yyyy"];
self.birthdateLabel.text = [dateFormatter stringFromDate:model.birthdate];
}
```
上面是标准的 �MVC。现在我们考虑用 ViewModel 增加改进下
PersonViewModel
```objective-c
@interface PersonViewModel : NSObject
- (instancetype)initWithPerson:(Person *)person;
@property (nonatomic, readonly) Person *person;
@property (nonatomic, readonly) NSString *nameText;
@property (nonatomic, readonly) NSString *birthdateText;
- (instancetype)initWithPerson:(Person *)person;
@end
@implementation PersonViewModel
- (instancetype)initWithPerson:(Person *)person {
self = [super init];
if (!self) return nil;
_person = person;
if (person.salutation.length > 0) {
_nameText = [NSString stringWithFormat:@"%@ %@ %@", self.person.salutation, self.person.firstName, self.person.lastName];
} else {
_nameText = [NSString stringWithFormat:@"%@ %@", self.person.firstName, self.person.lastName];
}
NSDateFormatter *dateFormatter = [[NSDateFormatter alloc] init];
[dateFormatter setDateFormat:@"EEEE MMMM d, yyyy"];
_birthdateText = [dateFormatter stringFromDate:person.birthdate];
return self;
}
@end
```
此时,我们的 ViewController 会很轻量
```objective-c
- (void)viewDidLoad {
[super viewDidLoad];
self.nameLabel.text = self.viewModel.nameText;
self.birthdateLabel.text = self.viewModel.birthdateText;
}
```
可测试?View Controller 是出了名的难测试。因为传动的 VC �很重,在 MVVM 的世界里,代码各司其职,测试 View Controller 变得较为容易
```objective-c
SpecBegin(Person)
NSString *salutation = @"Dr.";
NSString *firstName = @"first";
NSString *lastName = @"last";
NSDate *birthdate = [NSDate dateWithTimeIntervalSince1970:0];
it (@"should use the salutation available. ", ^{
Person *person = [[Person alloc] initWithSalutation:salutation firstName:firstName lastName:lastName birthdate:birthdate];
PersonViewModel *viewModel = [[PersonViewModel alloc] initWithPerson:person];
expect(viewModel.nameText).to.equal(@"Dr. first last");
});
it (@"should not use an unavailable salutation. ", ^{
Person *person = [[Person alloc] initWithSalutation:nil firstName:firstName lastName:lastName birthdate:birthdate];
PersonViewModel *viewModel = [[PersonViewModel alloc] initWithPerson:person];
expect(viewModel.nameText).to.equal(@"first last");
});
it (@"should use the correct date format. ", ^{
Person *person = [[Person alloc] initWithSalutation:nil firstName:firstName lastName:lastName birthdate:birthdate];
PersonViewModel *viewModel = [[PersonViewModel alloc] initWithPerson:person];
expect(viewModel.birthdateText).to.equal(@"Thursday January 1, 1970");
});
SpecEnd
```
## VIPER 架构
`View-Interactor-Presenter-Entity-Routing` ,一种基于单一职责原则和清晰的模块界限的架构模式,包含五个主要组成部分:
- View(视图层):负责显示用户界面和接收用户输入。它将用户输入传递给 Presenter
- Presenter(演示者):将从 View 层获取指令转到 Interactor 处理并接收处理后的数据,并将其格式化为适合 View 显示的格式,然后将这些数据传递给 View 去显示更新
- Interactor(交互器):负责处理具体的业务逻辑。它获取数据(可能来自网络、数据库等),处理业务规则和数据,并将结果传递给Presenter
- Entity(实体层):应用的基本数据对象,类似 MVC 架构中的 Model 层,例如数据库对象或网络请求的 JSON 对象等
- Routing(路由层):负责页面之间的导航逻辑跳转
VIPER 架构的优点在于模块职责划分清晰,模块间的耦合度低,特别适合大项目的开发, 其主要缺点是由于层的划分较多,增加了代码复杂性,对于小型项目而言可能会显得过度设计
这么看来 VIPER 很像前端中 Redux 的设计:
- VIPER 相比 Redux 简化了 UI 事件 Action 和 ActionCreator 这个角色
- Interactor 做的事情类似 Reducer ,都会根据对应的事件类型,判断如何处理数据。区别在于前端约定 Reducer 的实现必须是纯函数
除了角色不同外,VIPER 和 Redux 对于 UI 展示和事件响应、处理的整个流程很类似。所以可以理解为「 VIPER 是 Redux 在客户端的简易实现」。
改变:
- View 可以拥有 Model,感知 Model。一部分之前放在 Controller 里的逻辑,拆分到 View 里面了
优点:
- 对 Controller 进行了瘦身,这符合“单一职责原则”,使 Controller 更专注于协调和业务逻辑。
将 UI 配置逻辑内聚到 View 中,避免了 Controller 中冗长的控件操作代码(如 `cell.imageView.image = model.image;`)
- 将 View 内部的细节进行了隐藏,更具备封装性。外界不知道 View 内部具体的实现(Apple MVC 会暴露 UI 控件,现在不用暴露了),更具封装性
```objective-c
// GoodCell.h
@interface GoodCell
@property (nonatomic, strong) GoodsModel *model;
@end
// GoodCell.m
@interface GoodCell()
@property (nonatomic, strong, readonly) UIImageView *goodsImageView;
@property (nonatomic, strong, readonly) UILabel *goodsNameLabel;
@end
-(void)setModel:(GoodsModel *)model {
_model = model;
self.goodsImageView.image = [UIImage imageNamed:model.iamge];
self.goodsNameLabel.text = model.name;
}
// GoodsListViewController
- (UITableViewCell *)tableView:(UITableView *)tableView cellForRowAtIndexPath:(NSIndexPath *)indexPath {
GoodsCell *cell = [tableView dequeueReusableCellWithIdentifier:GoodsCellID forIndexPath:indexPath];
cell.model = self.goods[indexPath.row];
return cell;
}
```
缺点:
- View 强依赖于 Model。
### 思考:View 强依赖于 Model 真的是缺点吗?
这个缺点就真的是缺点吗?我一个商品的 GoodsView 展示,就需要展示商品图片、商品名称、商品原价、商品折扣价、销量等信息。单独暴露 UI 控件,然后访问的话很灵活也很独立,但工作量很大,为了 UI 的展示,让 View 持有 Model 真的是缺点吗?
要回答是不是缺点,需要回答2个问题:
1. 何时是合理的设计?
- View 与 Model 高度绑定
如果 GoodsCell 仅用于展示 GoodsModel,且2者生命周期一致,这种直接依赖反而合理,此时 View 与 Model 的耦合是**高内聚** 的体现
- 避免过度抽象
强行解耦,为 View 抽象设计出一个通用接口,可能引入不必要的复杂度。比如为 GoodsCell 设计一个 `id` 协议,在仅有一个 Model 的场景下属于过度设计了
2. 何时可能成为问题?
- 复用 View 展示不同 Model
如果希望 GoodsCell 复用展示其他数据(如 `DiscountGoodsModel`),之前那种 GoodsCell 依赖 GoodsModel 的设计,会导致导致代码难以拓展。此时可以考虑 `ViewModel` 模式或者**协议抽象**解耦
- Model 频繁变更
如果 GoodsModel 的字段,比如 image 频繁变更,所有直接依赖它的 View 都需要同步修改,此时可以将 Model 到 View 的映射逻辑,迁移到独立的转换层,比如 `GoodsModelConverter`
怎么样优化?
1. 可将 Model 到 View 的映射逻辑移到 **独立的转换层**,隔离变化
1. `GoodsModel` 结构如下:
```objective-c
// GoodsModel.h
@interface GoodsModel : NSObject
@property (nonatomic, copy) NSString *imageName;
@property (nonatomic, copy) NSString *name;
@property (nonatomic, assign) CGFloat price;
@end
```
现在需要将 `GoodsModel` 转换为 View 可直接使用的数据(如处理价格格式化、图片加载):
实现 GoodsModelConverter
```objective-c
// GoodsModelConverter.h
@interface GoodsModelConverter : NSObject
// 将 GoodsModel 转换为字典(Key-Value 形式)
+ (NSDictionary *)convertToDisplayData:(GoodsModel *)model;
@end
// GoodsModelConverter.m
@implementation GoodsModelConverter
+ (NSDictionary *)convertToDisplayData:(GoodsModel *)model {
// 处理价格格式化
NSString *priceText = [NSString stringWithFormat:@"¥%.2f", model.price];
// 加载图片(假设 imageName 是本地资源名)
UIImage *image = [UIImage imageNamed:model.imageName];
return @{
@"name": model.name,
@"price": priceText,
@"image": image
};
}
@end
```
修改 View 使用转换后的数据
```objective-c
// GoodsCell.h
@interface GoodsCell : UITableViewCell
// 不再直接依赖 GoodsModel,而是通过字典传递数据
- (void)configureWithDisplayData:(NSDictionary *)displayData;
@end
// GoodsCell.m
@implementation GoodsCell {
UIImageView *_goodsImageView;
UILabel *_nameLabel;
UILabel *_priceLabel;
}
- (void)configureWithDisplayData:(NSDictionary *)displayData {
_goodsImageView.image = displayData[@"image"];
_nameLabel.text = displayData[@"name"];
_priceLabel.text = displayData[@"price"];
}
@end
```
Controller 调用
```objective-c
// GoodsListViewController.m
- (UITableViewCell *)tableView:(UITableView *)tableView cellForRowAtIndexPath:(NSIndexPath *)indexPath {
GoodsCell *cell = [tableView dequeueReusableCellWithIdentifier:GoodsCellID forIndexPath:indexPath];
GoodsModel *model = self.goods[indexPath.row];
// 通过 Converter 转换数据
NSDictionary *displayData = [GoodsModelConverter convertToDisplayData:model];
[cell configureWithDisplayData:displayData];
return cell;
}
```
如何应对 Model 的变化?
假设 GoodsModel 的 image 字段变为 remoteImageURL,则不需要每处修改 View 使用的地方,统一在 GoodsModelConverter 即可
```objective-c
// GoodsModelConverter.m
+ (NSDictionary *)convertToDisplayData:(GoodsModel *)model {
// 新增网络图片加载逻辑(伪代码)
UIImage *placeholderImage = [UIImage imageNamed:@"placeholder"];
UIImage *image = placeholderImage;
return @{
@"name": model.name,
@"price": priceText,
@"image": image
};
}
```
View 和 Controller 无需任何修改。
- GoodsCell 仍然接收 displayData 字典,不用关心具体来源
- Controller 仍然调用 convertToDisplayData 方法
更优雅的方案是引入 ViewModel 对象。
2. 使用 ViewModel 模式
将 Model 转换为 View 专用的数据结构,View 仅依赖 ViewModel:
```objective-c
// GoodsCellViewModel.h
@interface GoodsCellViewModel
@property (nonatomic, readonly) UIImage *image;
@property (nonatomic, readonly) NSString *name;
- (instancetype)initWithGoods:(GoodsModel *)goods;
@end
// GoodsCell.h
@interface GoodsCell
@property (nonatomic, strong) GoodsCellViewModel *viewModel;
@end
```
优点:
- View 与 Model 解耦,便于复用
- ViewModel 可以封装数据转换逻辑(比如多语言本地化、图片加载、字符串格式化拼接)
3. 通过抽象协议依赖
定义 View 所需数据的协议,Model 实现该协议。
定义 GoodsDisplayable 协议
```objective-c
// GoodsDisplayable.h
@protocol GoodsDisplayable
@property (nonatomic, readonly) NSString *goodsImageName;
@property (nonatomic, readonly) NSString *goodsName;
@end
// GoodsModel.h
@interface GoodsModel : NSObject
@end
// GoodsCell.h
@interface GoodsCell
@property (nonatomic, strong) id displayData;
@end
```
在正常商品列表页面,Controller 逻辑为:
```objective-c
// GoodsListViewController.m
- (UITableViewCell *)tableView:(UITableView *)tableView cellForRowAtIndexPath:(NSIndexPath *)indexPath {
GoodsCell *cell = [tableView dequeueReusableCellWithIdentifier:GoodsCellID forIndexPath:indexPath];
cell.displayData = self.goods[indexPath.row];
return cell;
}
```
在打折商品列表页面,Controller 逻辑为:
```objective-c
// DiscountGoodsListViewController.m
- (UITableViewCell *)tableView:(UITableView *)tableView cellForRowAtIndexPath:(NSIndexPath *)indexPath {
GoodsCell *cell = [tableView dequeueReusableCellWithIdentifier:GoodsCellID forIndexPath:indexPath];
cell.displayData = self.goods[indexPath.row];
return cell;
}
```
现在我们可以尝试概括性回答该问题了:
**View 持有 Model 是否是缺点,取决于具体场景:**
- **单一用途、无复用需求**:直接依赖 Model 是合理选择,简化代码且无过度设计。
- **需复用或 Model 不稳定**:通过 ViewModel 或协议解耦,提高灵活性。
最终,**没有绝对的最佳实践,只有适合场景的权衡**。Apple 的 MVC 变种在简单场景下有效,但在复杂场景需结合其他模式优化。
## MVP 架构
MVP 模式将 Controller 改名为 Presenter,通信改变了通信方向

1. 各部分之间的通信都是双向的
2. Model 与 View 不发生联系,都通过 Presenter 传递
3. View 层非常薄。不部署任何业务逻辑,称为“被动视图(Passive View)”,即没有任何主动性
4. 而 Presenter 非常厚,所有的逻辑都部署在这层。比如在 Presenter 里组装 View 展示到 Controller 的 View 上,加载数据,展示到 View 上。
5. 如果 Presenter 这一层很厚的话,可以继续拆,比如再增加一个 Interactor 的角色,专门处理处理 View UI 响应事件。这样子角色更多,职责也更清晰。维护也方便。
### 错误实现
举个例子:
App 只有一个个人中心 ViewController,其 View 上只有1个展示个人信息的子 View,子 View 上只有1个展示头像 UIImageView 和 1个展示昵称的 UILabel。用 MVP 的思想实现如下
模型为
```objective-c
@interface PersonalInfoModel : NSObject
@property (copy, nonatomic) NSString *name;
@property (copy, nonatomic) NSString *image;
@end
```
关键就是要增加一个 `Presenter` 的角色,负责组装 View 展示到 Controller 的 View 上,加载数据,展示到 View 上。
```objective-c
// PersonInfoPresenter.h
@interface PersonInfoPresenter : NSObject
- (instancetype)initWithController:(UIViewController *)controller;
@end
// PersonInfoPresenter.m
@interface PersonInfoPresenter()
@property (weak, nonatomic) UIViewController *controller;
@end
@implementation PersonInfoPresenter
- (instancetype)initWithController:(UIViewController *)controller
{
if (self = [super init]) {
self.controller = controller;
// 创建View
PersonalInfoView *personalInfoView = [[PersonalInfoView alloc] init];
personalInfoView.frame = CGRectMake(100, 100, 100, 150);
personalInfoView.delegate = self;
[controller.view addSubview:personalInfoView];
// 加载模型数据
PersonalInfoModel *model = [[PersonalInfoModel alloc] init];
model.name = @"杭城小刘";
model.image = @"UnixKernel";
// 赋值数据
[personalInfoView setName:app.name andImage:app.image];
}
return self;
}
#pragma mark - MJAppViewDelegate
- (void)personalInfoViewDidClick:(PersonalInfoView *)personalInfoView
{
NSLog(@"presenter 监听了个人信息 View 的点击事件");
}
```
PersonalInfoView
```objective-c
#import
@class PersonalInfoView;
@protocol PersonalInfoViewDelegate
@optional
- (void)personalInfoViewDidClick:(PersonalInfoView *)personalInfoView;
@end
@interface PersonalInfoView : UIView
- (void)setName:(NSString *)name andImage:(NSString *)image;
@property (weak, nonatomic) id delegate;
@end
@implementation MJAppView
- (instancetype)initWithFrame:(CGRect)frame {
if (self = [super initWithFrame:frame]) {
UIImageView *iconView = [[UIImageView alloc] init];
iconView.frame = CGRectMake(0, 0, 100, 100);
[self addSubview:iconView];
_iconView = iconView;
UILabel *nameLabel = [[UILabel alloc] init];
nameLabel.frame = CGRectMake(0, 100, 100, 30);
nameLabel.textAlignment = NSTextAlignmentCenter;
[self addSubview:nameLabel];
_nameLabel = nameLabel;
}
return self;
}
- (void)setName:(NSString *)name andImage:(NSString *)image {
_iconView.image = [UIImage imageNamed:image];
_nameLabel.text = name;
}
- (void)touchesBegan:(NSSet *)touches withEvent:(UIEvent *)event {
if (self.delegate && [self.delegate respondsToSelector:@selector(personalInfoViewDidClick:)]) {
[self.delegate personalInfoViewDidClick:self];
}
}
@end
```
在 ViewController 的使用
```objective-c
@interface ViewController ()
@property (strong, nonatomic) PersonInfoPresenter *presenter;
@end
@implementation ViewController
- (void)viewDidLoad {
[super viewDidLoad];
self.presenter = [[PersonInfoPresenter alloc] initWithController:self];
}
@end
```
目前实现的效果是:
- Presenter 负责了 View 的创建与展示,同时调用 Model 的能力,从数据库或者网络加载业务数据,然后更新到 View 上。使得 Controller 逻辑更加单一
- 将大部分 View 的组装逻辑从 Controller 中抽离到 Presenter 中,实现了 Controller 的瘦身
- Model 和 View 无法感知对方,也无法直接访问,保证了 Model 和 View 的复用能力
### 正确实现
目前的实现中,Presenter 中拥有了 View,对于 Presenter 的单元测试不好展开,该如何修改?
- View 还是放在 Controller 中创造
- 为了解耦,将 View UI 事件和数据获取抽成对应的协议
- Model 依旧是薄薄的一层,数据获取放在 Service 里进行
定义 View 刷新协议
```objective-c
// PersonalInfoViewProtocol.h
@protocol PersonalInfoViewProtocol
- (void)displayName:(NSString *)name image:(NSString *)image;
@end
```
View 实现协议
```objective-c
// PersonalInfoView.h
@interface PersonalInfoView : UIView
@property (nonatomic, weak) id delegate;
@end
// PersonalInfoView.m
@implementation PersonalInfoView
// 原有代码不变,但实现 displayName:image: 方法
- (void)displayName:(NSString *)name image:(NSString *)image {
_iconView.image = [UIImage imageNamed:image];
_nameLabel.text = name;
}
- (void)didClickProfileView {
if (self.delegate && [self.delegate respondsToSelector:@selector(personalInfoViewDidClick:)]) {
[self.delegate personalInfoViewDidClick:self];
}
}
@en
```
定义数据拉取协议
```objective-c
// PersonalInfoServiceProtocol.h
@protocol PersonalInfoServiceProtocol
- (void)fetchPersonalInfoWithCompletion:(void (^)(PersonalInfoModel *model))completion;
@end
```
定义数据拉取 Services
```objective-c
// PersonalInfoService.h
@interface PersonalInfoService : NSObject
@end
// PersonalInfoService.m
@implementation PersonalInfoService
- (void)fetchPersonalInfoWithCompletion:(void (^)(PersonalInfoModel *))completion {
// 模拟网络请求
dispatch_async(dispatch_get_global_queue(0, 0), ^{
PersonalInfoModel *model = [[PersonalInfoModel alloc] init];
model.name = @"杭城小刘";
model.image = @"UnixKernel";
dispatch_async(dispatch_get_main_queue(), ^{
completion(model);
});
});
}
@end
```
重构 Presenter。loadData 数据加载成功后,调用其 View 的代理方法,刷新 UI
```objective-c
// PersonInfoPresenter.h
@interface PersonInfoPresenter : NSObject
- (instancetype)initWithView:(id)view
service:(id)service;
- (void)loadData;
@end
// PersonInfoPresenter.m
@interface PersonInfoPresenter()
// 重要地方:遵循相应协议的 View 对象
@property (nonatomic, weak) id view;
// 重要地方:遵循相应协议的 Services 对象
@property (nonatomic, strong) id service;
@end
@implementation PersonInfoPresenter
- (instancetype)initWithView:(id)view
service:(id)service {
if (self = [super init]) {
_view = view;
_service = service;
}
return self;
}
- (void)loadData {
[self.service fetchPersonalInfoWithCompletion:^(PersonalInfoModel *model) {
[self.view displayName:model.name image:model.image];
}];
}
#pragma mark - 点击事件处理(可选)
- (void)handleViewClick {
NSLog(@"Presenter 处理点击事件");
}
@end
```
Controller 里组装和创建 Presenter,在 `viewDidLoad` 里面调用 presenter 的 loadData 方法,让其内部的 Services 加载网络数据。
```objc
// ViewController.m
@interface ViewController ()
@property (nonatomic, strong) PersonInfoPresenter *presenter;
@property (nonatomic, strong) PersonalInfoView *infoView;
@end
@implementation ViewController
- (void)viewDidLoad {
[super viewDidLoad];
// 创建 View
self.infoView = [[PersonalInfoView alloc] initWithFrame:CGRectMake(100, 100, 100, 150)];
self.infoView.delegate = self;
[self.view addSubview:self.infoView];
// 注入依赖
id service = [[PersonalInfoService alloc] init];
self.presenter = [[PersonInfoPresenter alloc] initWithView:self.infoView service:service];
// 触发数据加载
[self.presenter loadData];
}
#pragma mark - PersonalInfoViewDelegate
- (void)personalInfoViewDidClick:(PersonalInfoView *)view {
[self.presenter handleViewClick];
}
@end
```
关键改动点:
1. **Presenter 不再持有 View**:通过协议与 View 通信,避免直接依赖具体类。
2. **数据加载抽象为 Service**:Presenter 通过协议调用 Service,便于模拟不同场景。
3. **布局职责回归 View**:Presenter 不再设置 `frame`,保证单一职责。
4. **依赖注入**:Presenter 的 Service 和 View 通过初始化注入,测试时可替换为 Mock。
思考:如何一个复杂的购物车页面包含很多子 View,按照 MVP 模式,该怎么处理?
- **模块化拆分**:每个功能单元独立为 View-Presenter-Service 组合
可以把复杂的购物车 view 拆分为独立的几个 View。比如:
- 商品列表 GoodsListView、商品列表 GoodsListPresenter、商品列表 GoodsListServices
- 商品统计信息 GoodsSummaryInfoView、商品统计信息 GoodsSummaryInfoPresenter、商品统计信息 GoodsSummaryInfoServices
- 营销活动展示 GoodsPromoptionView、营销活动展示 GoodsPromoptionPresenter、营销活动展示 GoodsPromoptionServices
- 每个 View 设计自己对应的 Presenter
- Controller 依旧复杂 View 的组装,和各个 Presenter 的创建工作
- **协调机制**:使用 Coordinator 或响应式编程管理跨模块事件
- 其他流程和单个 View、单个 Presenter 没啥不同。区别在于复杂的业务下,Controller 会存在多个 View、多个 Presenter
## MVVM 架构
MVVM 模式将 Presenter 改名为 ViewModel,基本上与 MVP 模式完全一致。

区别在于:采用双向绑定的模式。View 的改变,自动反应在 ViewModel 上。 ViewModel 的改变会发应在 View 上。
MVC 等到业务逻辑很复杂的时候�被称为 �Massive View Controller (重量级视图控制器)。这样的 Controller 后期维护看着阅读成本很高、不易于测试、维护。当时写这个代码的人离职后,几千行规模的代码在后期添加新功能或者修改 Bug 都是一件折磨人的事情。

看到 View 和 ViewController 是不同的技术组件,但是日常开发中它们总是成对的存在,为什么不考虑将他们的连接正规化呢?

典型的 MVC 存在弊端就是 Controller 层非常复杂,很多逻辑都在里面,包括一些不是逻辑的“表示逻辑”(presentation logic)。用 MVVM 术语来说就是将那些 Model 数据转换为 View 可以呈现的东西。例如将一个 NSDate 格式化为一个“2018-11-17” 这样的 NSString。
上图中缺少一个环节,一个专门�用来处理所有的表示逻辑。称为 “ViewModel”。位于 ViewController 与 Model 之间。

MVVM 就是 MVC 的增强版,将展示层逻辑单独拎出来,即 ViewModel。iOS 使用 MVVM 可以降低 ViewController 的复杂性并使得�表示逻辑易于测试。
- MVVM 兼容当下的 MVC 机构
- MVVM 增加应用的可测试性
- MVVM 配合一个绑定机制效果最好
### **MVVM 核心改造点**
1. **引入 ViewModel**:负责数据转换、业务逻辑,通过数据流驱动 UI 更新
2. **数据双向绑定**:使用 ReactiveCocoa(RAC)建立 View 和 ViewModel 的绑定关系
3. **事件命令化**:用户交互事件封装为 Command,由 ViewModel 处理
改造如下:
定义 ViewModel(核心)
```objc
// PersonalInfoViewModel.h
#import
@class PersonalInfoModel;
@interface PersonalInfoViewModel : NSObject
// 输出属性(供 View 绑定)
@property (nonatomic, strong, readonly) RACSignal *nameSignal;
@property (nonatomic, strong, readonly) RACSignal *imageSignal;
// 输入命令(处理 View 事件)
@property (nonatomic, strong, readonly) RACCommand *viewDidClickCommand;
// 初始化方法(依赖注入)
- (instancetype)initWithService:(id)service;
@end
// PersonalInfoViewModel.m
@interface PersonalInfoViewModel()
@property (nonatomic, strong) id service;
@property (nonatomic, strong) RACSubject *nameSubject;
@property (nonatomic, strong) RACSubject *imageSubject;
@end
@implementation PersonalInfoViewModel
- (instancetype)initWithService:(id)service {
if (self = [super init]) {
_service = service;
_nameSubject = [RACSubject subject];
_imageSubject = [RACSubject subject];
// 暴露信号
_nameSignal = _nameSubject;
_imageSignal = _imageSubject;
// 初始化命令
[self setupCommands];
[self loadData];
}
return self;
}
#pragma mark - 初始化命令
- (void)setupCommands {
@weakify(self);
_viewDidClickCommand = [[RACCommand alloc]
initWithSignalBlock:^RACSignal *(id input) {
@strongify(self);
NSLog(@"ViewModel 处理点击事件");
return [RACSignal empty];
}];
}
#pragma mark - 数据加载
- (void)loadData {
@weakify(self);
[self.service fetchPersonalInfoWithCompletion:^(PersonalInfoModel *model) {
@strongify(self);
// 更新数据流
[self.nameSubject sendNext:model.name];
[self.imageSubject sendNext:[UIImage imageNamed:model.image]];
}];
}
@end
```
改造 View
```objective-c
// PersonalInfoView.h(协议不再需要)
@interface PersonalInfoView : UIView
// 暴露 UI 组件用于绑定
@property (nonatomic, strong) UIImageView *iconView;
@property (nonatomic, strong) UILabel *nameLabel;
// 绑定 ViewModel
- (void)bindViewModel:(PersonalInfoViewModel *)viewModel;
@end
// PersonalInfoView.m
#import
@implementation PersonalInfoView
- (instancetype)initWithFrame:(CGRect)frame {
// ... 原有初始化代码不变 ...
}
- (void)bindViewModel:(PersonalInfoViewModel *)viewModel {
// 绑定数据到 UI
RAC(self.nameLabel, text) = [viewModel.nameSignal deliverOnMainThread];
RAC(self.iconView, image) = [viewModel.imageSignal deliverOnMainThread];
// 绑定点击事件到 Command
@weakify(viewModel);
[self addGestureRecognizer:[[UITapGestureRecognizer alloc]
initWithTarget:self action:@selector(handleTap)]];
[[self rac_signalForSelector:@selector(handleTap)]
subscribeNext:^(id x) {
@strongify(viewModel);
[viewModel.viewDidClickCommand execute:nil];
}];
}
- (void)handleTap {
// 空方法,仅用于触发 RAC 信号
}
@end
```
改造 ViewController(胶水、组装)
```objective-c
// ViewController.m
@interface ViewController ()
@property (nonatomic, strong) PersonalInfoView *infoView;
@property (nonatomic, strong) PersonalInfoViewModel *viewModel;
@end
@implementation ViewController
- (void)viewDidLoad {
[super viewDidLoad];
// 创建 View
self.infoView = [[PersonalInfoView alloc] initWithFrame:CGRectMake(100, 100, 100, 150)];
[self.view addSubview:self.infoView];
// 创建 Service 和 ViewModel
id service = [[PersonalInfoService alloc] init];
self.viewModel = [[PersonalInfoViewModel alloc] initWithService:service];
// 绑定 ViewModel
[self.infoView bindViewModel:self.viewModel];
}
@end
```
## 一个简单的例子
PersonModel
```objective-c
@interface Person : NSObject
- (instancetype)initwithSalutation:(NSString *)salutation firstName:(NSString *)firstName lastName:(NSString *)lastName birthdate:(NSDate *)birthdate;
@property (nonatomic, readonly) NSString *salutation;
@property (nonatomic, readonly) NSString *firstName;
@property (nonatomic, readonly) NSString *lastName;
@property (nonatomic, readonly) NSDate *birthdate;
@end
```
PersonViewController
```objective-c
- (void)viewDidLoad {
[super viewDidLoad];
if (self.model.salutation.length > 0) {
self.nameLabel.text = [NSString stringWithFormat:@"%@ %@ %@", self.model.salutation, self.model.firstName, self.model.lastName];
} else {
self.nameLabel.text = [NSString stringWithFormat:@"%@ %@", self.model.firstName, self.model.lastName];
}
NSDateFormatter *dateFormatter = [[NSDateFormatter alloc] init];
[dateFormatter setDateFormat:@"EEEE MMMM d, yyyy"];
self.birthdateLabel.text = [dateFormatter stringFromDate:model.birthdate];
}
```
上面是标准的 �MVC。现在我们考虑用 ViewModel 增加改进下
PersonViewModel
```objective-c
@interface PersonViewModel : NSObject
- (instancetype)initWithPerson:(Person *)person;
@property (nonatomic, readonly) Person *person;
@property (nonatomic, readonly) NSString *nameText;
@property (nonatomic, readonly) NSString *birthdateText;
- (instancetype)initWithPerson:(Person *)person;
@end
@implementation PersonViewModel
- (instancetype)initWithPerson:(Person *)person {
self = [super init];
if (!self) return nil;
_person = person;
if (person.salutation.length > 0) {
_nameText = [NSString stringWithFormat:@"%@ %@ %@", self.person.salutation, self.person.firstName, self.person.lastName];
} else {
_nameText = [NSString stringWithFormat:@"%@ %@", self.person.firstName, self.person.lastName];
}
NSDateFormatter *dateFormatter = [[NSDateFormatter alloc] init];
[dateFormatter setDateFormat:@"EEEE MMMM d, yyyy"];
_birthdateText = [dateFormatter stringFromDate:person.birthdate];
return self;
}
@end
```
此时,我们的 ViewController 会很轻量
```objective-c
- (void)viewDidLoad {
[super viewDidLoad];
self.nameLabel.text = self.viewModel.nameText;
self.birthdateLabel.text = self.viewModel.birthdateText;
}
```
可测试?View Controller 是出了名的难测试。因为传动的 VC �很重,在 MVVM 的世界里,代码各司其职,测试 View Controller 变得较为容易
```objective-c
SpecBegin(Person)
NSString *salutation = @"Dr.";
NSString *firstName = @"first";
NSString *lastName = @"last";
NSDate *birthdate = [NSDate dateWithTimeIntervalSince1970:0];
it (@"should use the salutation available. ", ^{
Person *person = [[Person alloc] initWithSalutation:salutation firstName:firstName lastName:lastName birthdate:birthdate];
PersonViewModel *viewModel = [[PersonViewModel alloc] initWithPerson:person];
expect(viewModel.nameText).to.equal(@"Dr. first last");
});
it (@"should not use an unavailable salutation. ", ^{
Person *person = [[Person alloc] initWithSalutation:nil firstName:firstName lastName:lastName birthdate:birthdate];
PersonViewModel *viewModel = [[PersonViewModel alloc] initWithPerson:person];
expect(viewModel.nameText).to.equal(@"first last");
});
it (@"should use the correct date format. ", ^{
Person *person = [[Person alloc] initWithSalutation:nil firstName:firstName lastName:lastName birthdate:birthdate];
PersonViewModel *viewModel = [[PersonViewModel alloc] initWithPerson:person];
expect(viewModel.birthdateText).to.equal(@"Thursday January 1, 1970");
});
SpecEnd
```
## VIPER 架构
`View-Interactor-Presenter-Entity-Routing` ,一种基于单一职责原则和清晰的模块界限的架构模式,包含五个主要组成部分:
- View(视图层):负责显示用户界面和接收用户输入。它将用户输入传递给 Presenter
- Presenter(演示者):将从 View 层获取指令转到 Interactor 处理并接收处理后的数据,并将其格式化为适合 View 显示的格式,然后将这些数据传递给 View 去显示更新
- Interactor(交互器):负责处理具体的业务逻辑。它获取数据(可能来自网络、数据库等),处理业务规则和数据,并将结果传递给Presenter
- Entity(实体层):应用的基本数据对象,类似 MVC 架构中的 Model 层,例如数据库对象或网络请求的 JSON 对象等
- Routing(路由层):负责页面之间的导航逻辑跳转
VIPER 架构的优点在于模块职责划分清晰,模块间的耦合度低,特别适合大项目的开发, 其主要缺点是由于层的划分较多,增加了代码复杂性,对于小型项目而言可能会显得过度设计
这么看来 VIPER 很像前端中 Redux 的设计:
- VIPER 相比 Redux 简化了 UI 事件 Action 和 ActionCreator 这个角色
- Interactor 做的事情类似 Reducer ,都会根据对应的事件类型,判断如何处理数据。区别在于前端约定 Reducer 的实现必须是纯函数
除了角色不同外,VIPER 和 Redux 对于 UI 展示和事件响应、处理的整个流程很类似。所以可以理解为「 VIPER 是 Redux 在客户端的简易实现」。