41 KiB
LLVM
LLVM 项目是模块化、可重用的编译器以及工具链技术的集合
The LLVM Project is a collection of modular and reusable compiler and toolchain technologies.
LLVM 不是 low level virtual machine 的缩写,就是项目名称。
结构

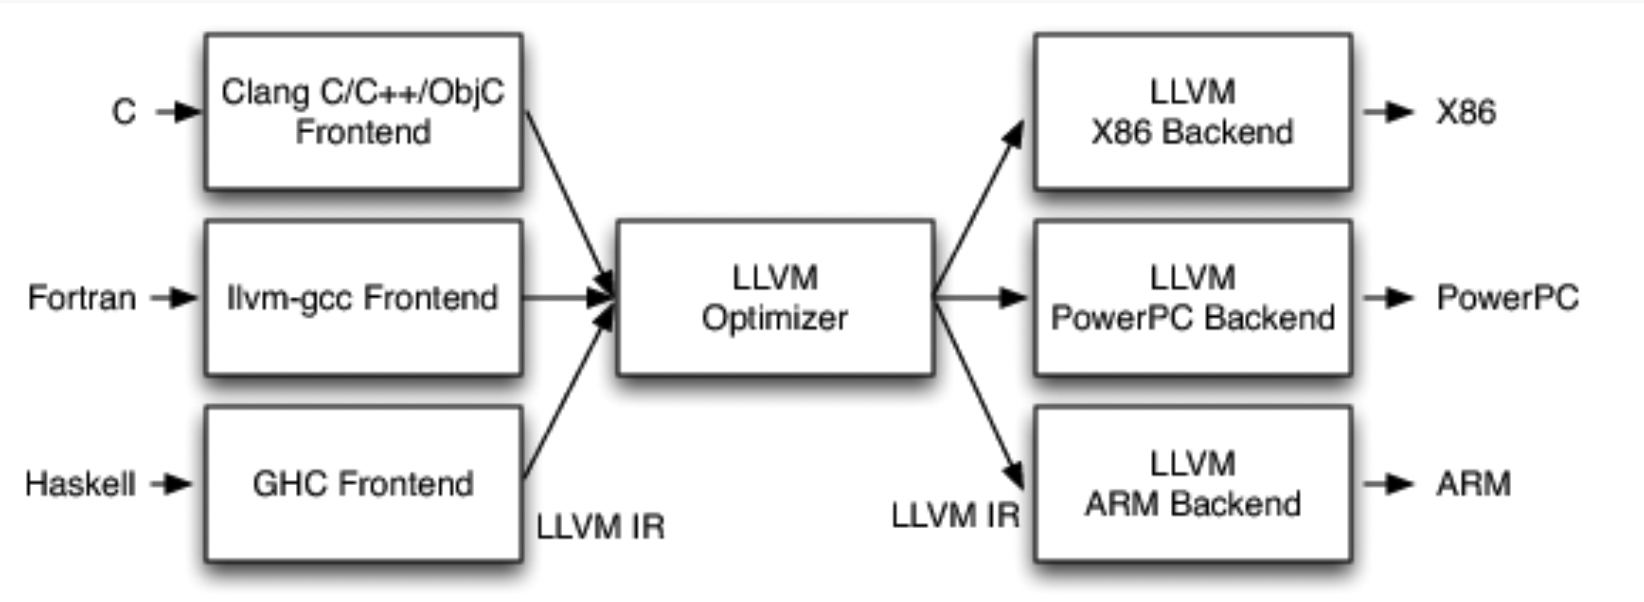
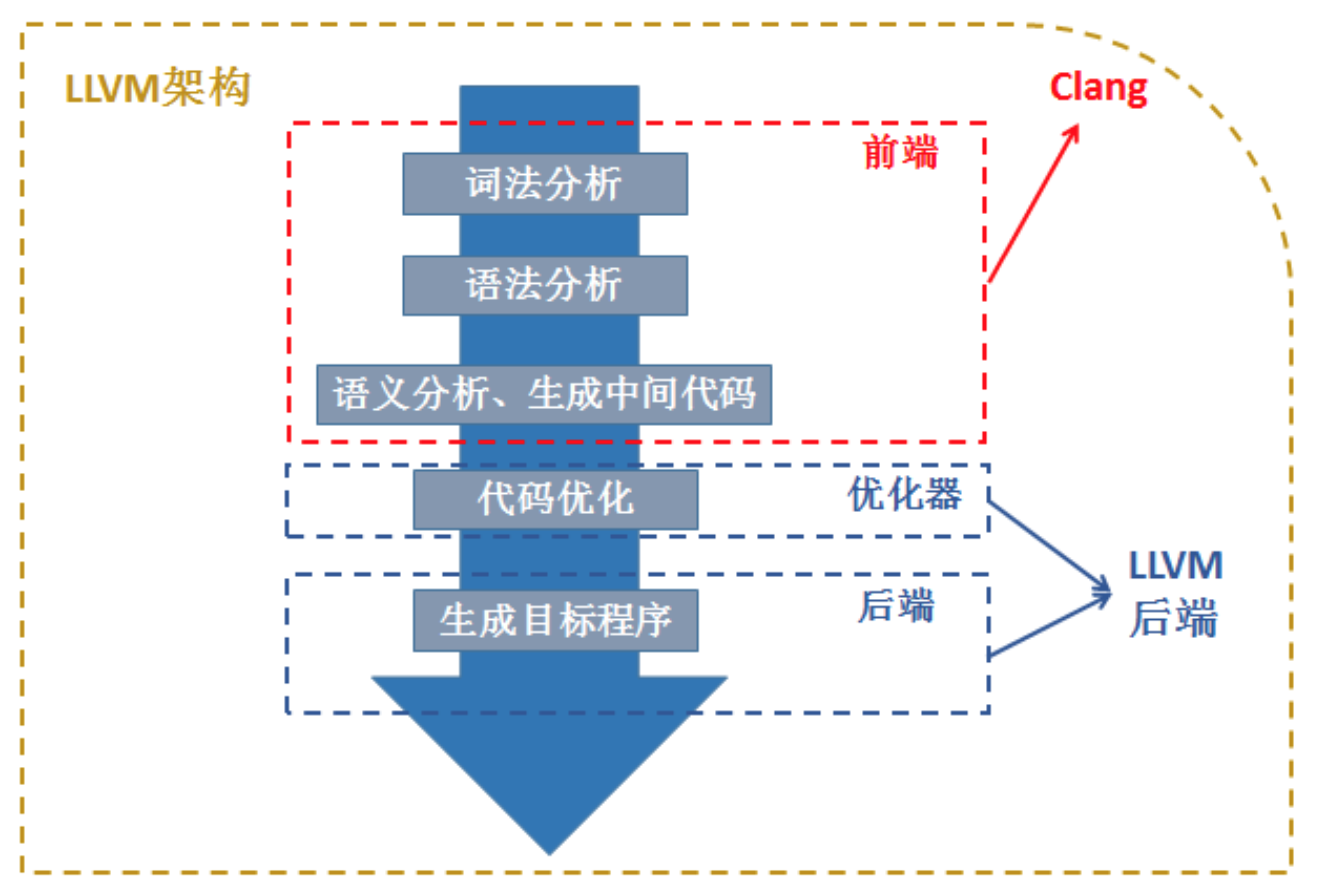
LLVM 由三部分构成:
-
FrontEnd(前端):词法分析、语法分析、语义分析、生成中间代码
-
Optimizer(优化器):优化中间代码
-
Backend(后端):生成目标程序(机器码)。比如编写好的 Swift 代码,在编译后端这一步根据在手机上运行,则生成 arm64 的代码,如果运行在 windows 平台上,则生成 x86_64 的代码。
正是由于这样的设计,使得 LLVM 具备很多有点:
-
不同的前端后端使用统一的中间代码 LLVM Intermediate Representation (LLVM IR)
-
如果需要支持一种新的编程语言,那么只需要实现一个新的前端
-
如果需要支持一种新的硬件设备,那么只需要实现一个新的后端
-
优化阶段是一个通用的阶段,它针对的是统一的 LLVM IR,不论是支持新的编程语言,还是支持新的硬件设备,都不需要对优化阶段做修改
-
相比之下,GCC 的前端和后端没分得太开,前端后端耦合在了一起。所以 GCC 为了支持一门新的语言,或者为了支持一个新的目标平台,就变得特别困难
LLVM 现在被作为实现各种静态和运行时编译语言的通用基础结构(GCC 家族、Java、.NET、Python、Ruby、Scheme、Haskell、D 等)
广义上来讲,LLVM 说的是一种架构。狭义上来讲,LLVM 强调的是偏后端部分,如下图的除了 clang 编译前端外的部分,包括优化器和编译后端,统称为 LLVM 后端。
Clang
Clang 是 LLVM 的一个子项目,基于 LLVM 架构的 c/c++/Objective-C 语言的编译器前端
GCC 是 c/c++ 等的编译器
Clang 相较于 GCC,具备下面优点:
-
编译速度快:在某些平台上,Clang的编译速度显著的快过GCC(Debug模式下编译OC速度比GGC快3倍)
-
占用内存小:Clang 生成的 AST 所占用的内存是 GCC 的五分之一左右
-
模块化设计:Clang 采用基于库的模块化设计,易于 IDE 集成及其他用途的重用
-
诊断信息可读性强:在编译过程中,Clang 创建并保留了大量详细的元数据 (metadata),有利于调试和错误报告
-
设计清晰简单,容易理解,易于扩展增强

各个编译阶段
Demo
#import <stdio.h>
#define AGE 29

int main(int argc, const char * argv[]) {
    int a = 10;
    int b = 20;
    int sum = a + b + AGE;
    return 0;
}
查看 main.m 的整个编译过程
clang -ccc-print-phases main.m
展示如下:
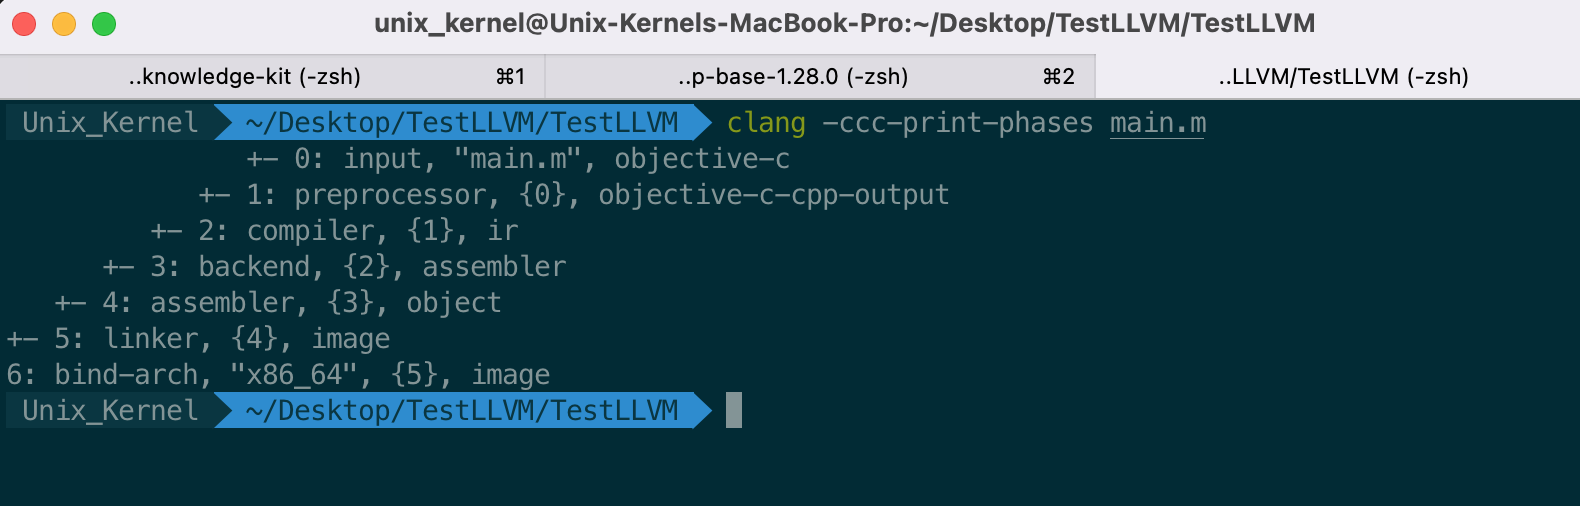
可以看到经历了:输入、预处理、编译、LLVM Backend、汇编、链接、绑定架构7个阶段。
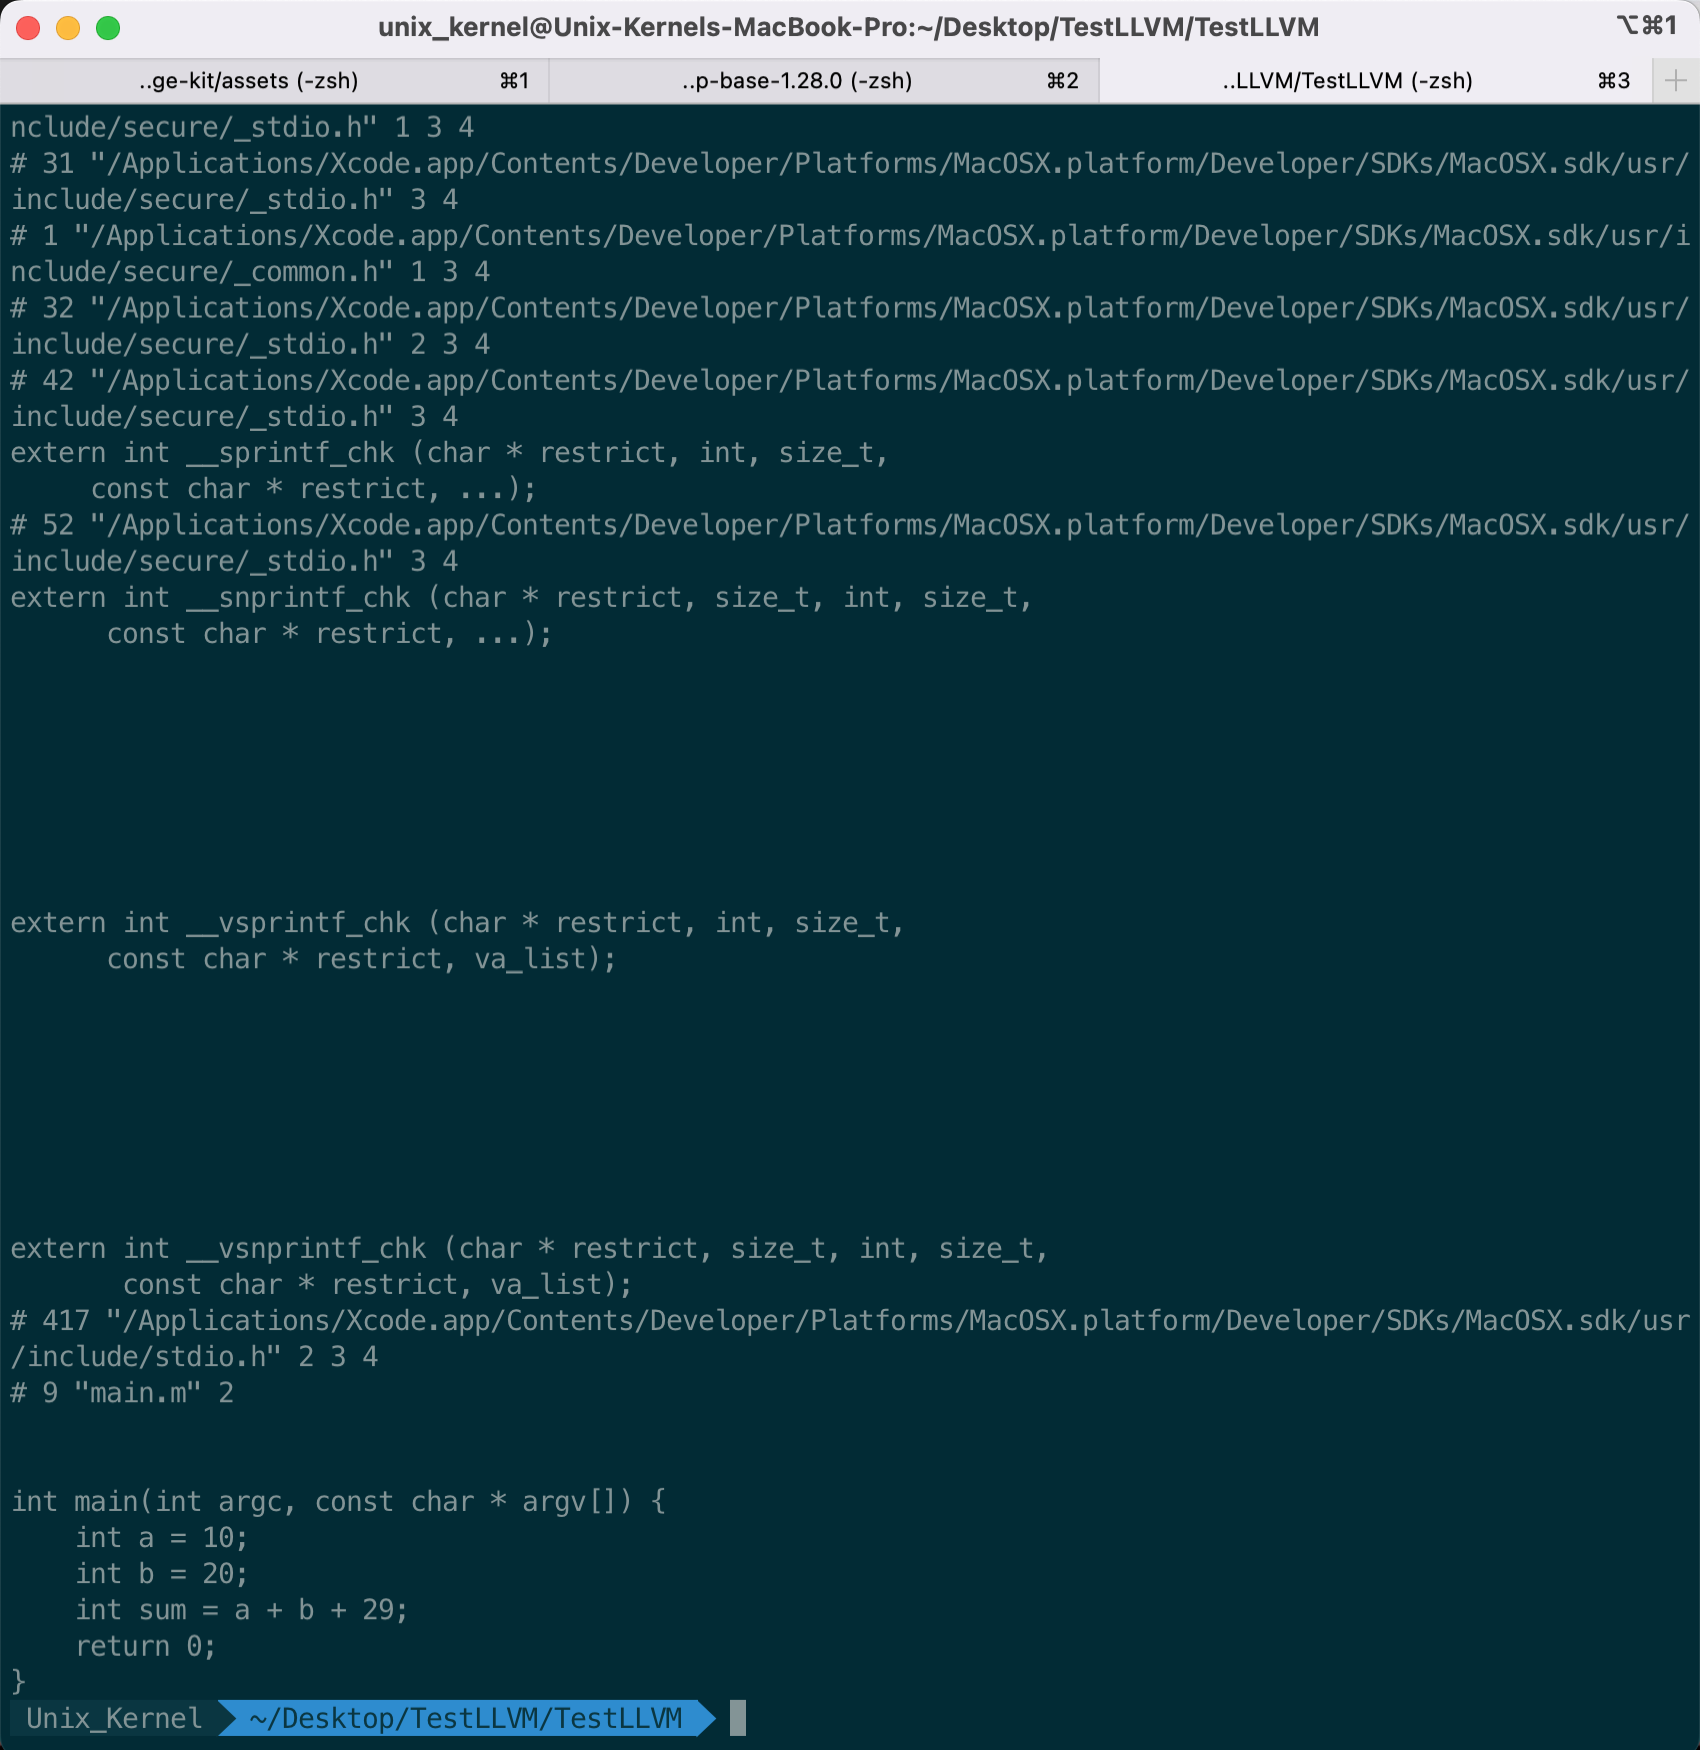
预处理
查看 preprocessor (预处理)的结果:clang -E main.m。预处理主要做的事情就是头文件导入( include、import)、宏定义替换等。展示如下:
词法分析
词法分析阶段,主要生成 Token。使用指令 clang -fmodules -E -Xclang -dump-tokens main.m 查看具体做了什么
语法分析
语法分析阶段,生成语法树(AST,Abstract Syntax Tree)。使用指令 clang -fmodules -fsyntax-only -Xclang -ast-dump main.m 查看
对 main.m 的代码进行改造
#import <stdio.h>
#define AGE 29

int main(int argc, const char * argv[]) {
    int a = 10;
    int b = 20;
    int sum = a + b + AGE;
    return 0;
}

void test(int a, int b) {
    int c = a + b - 4;
}
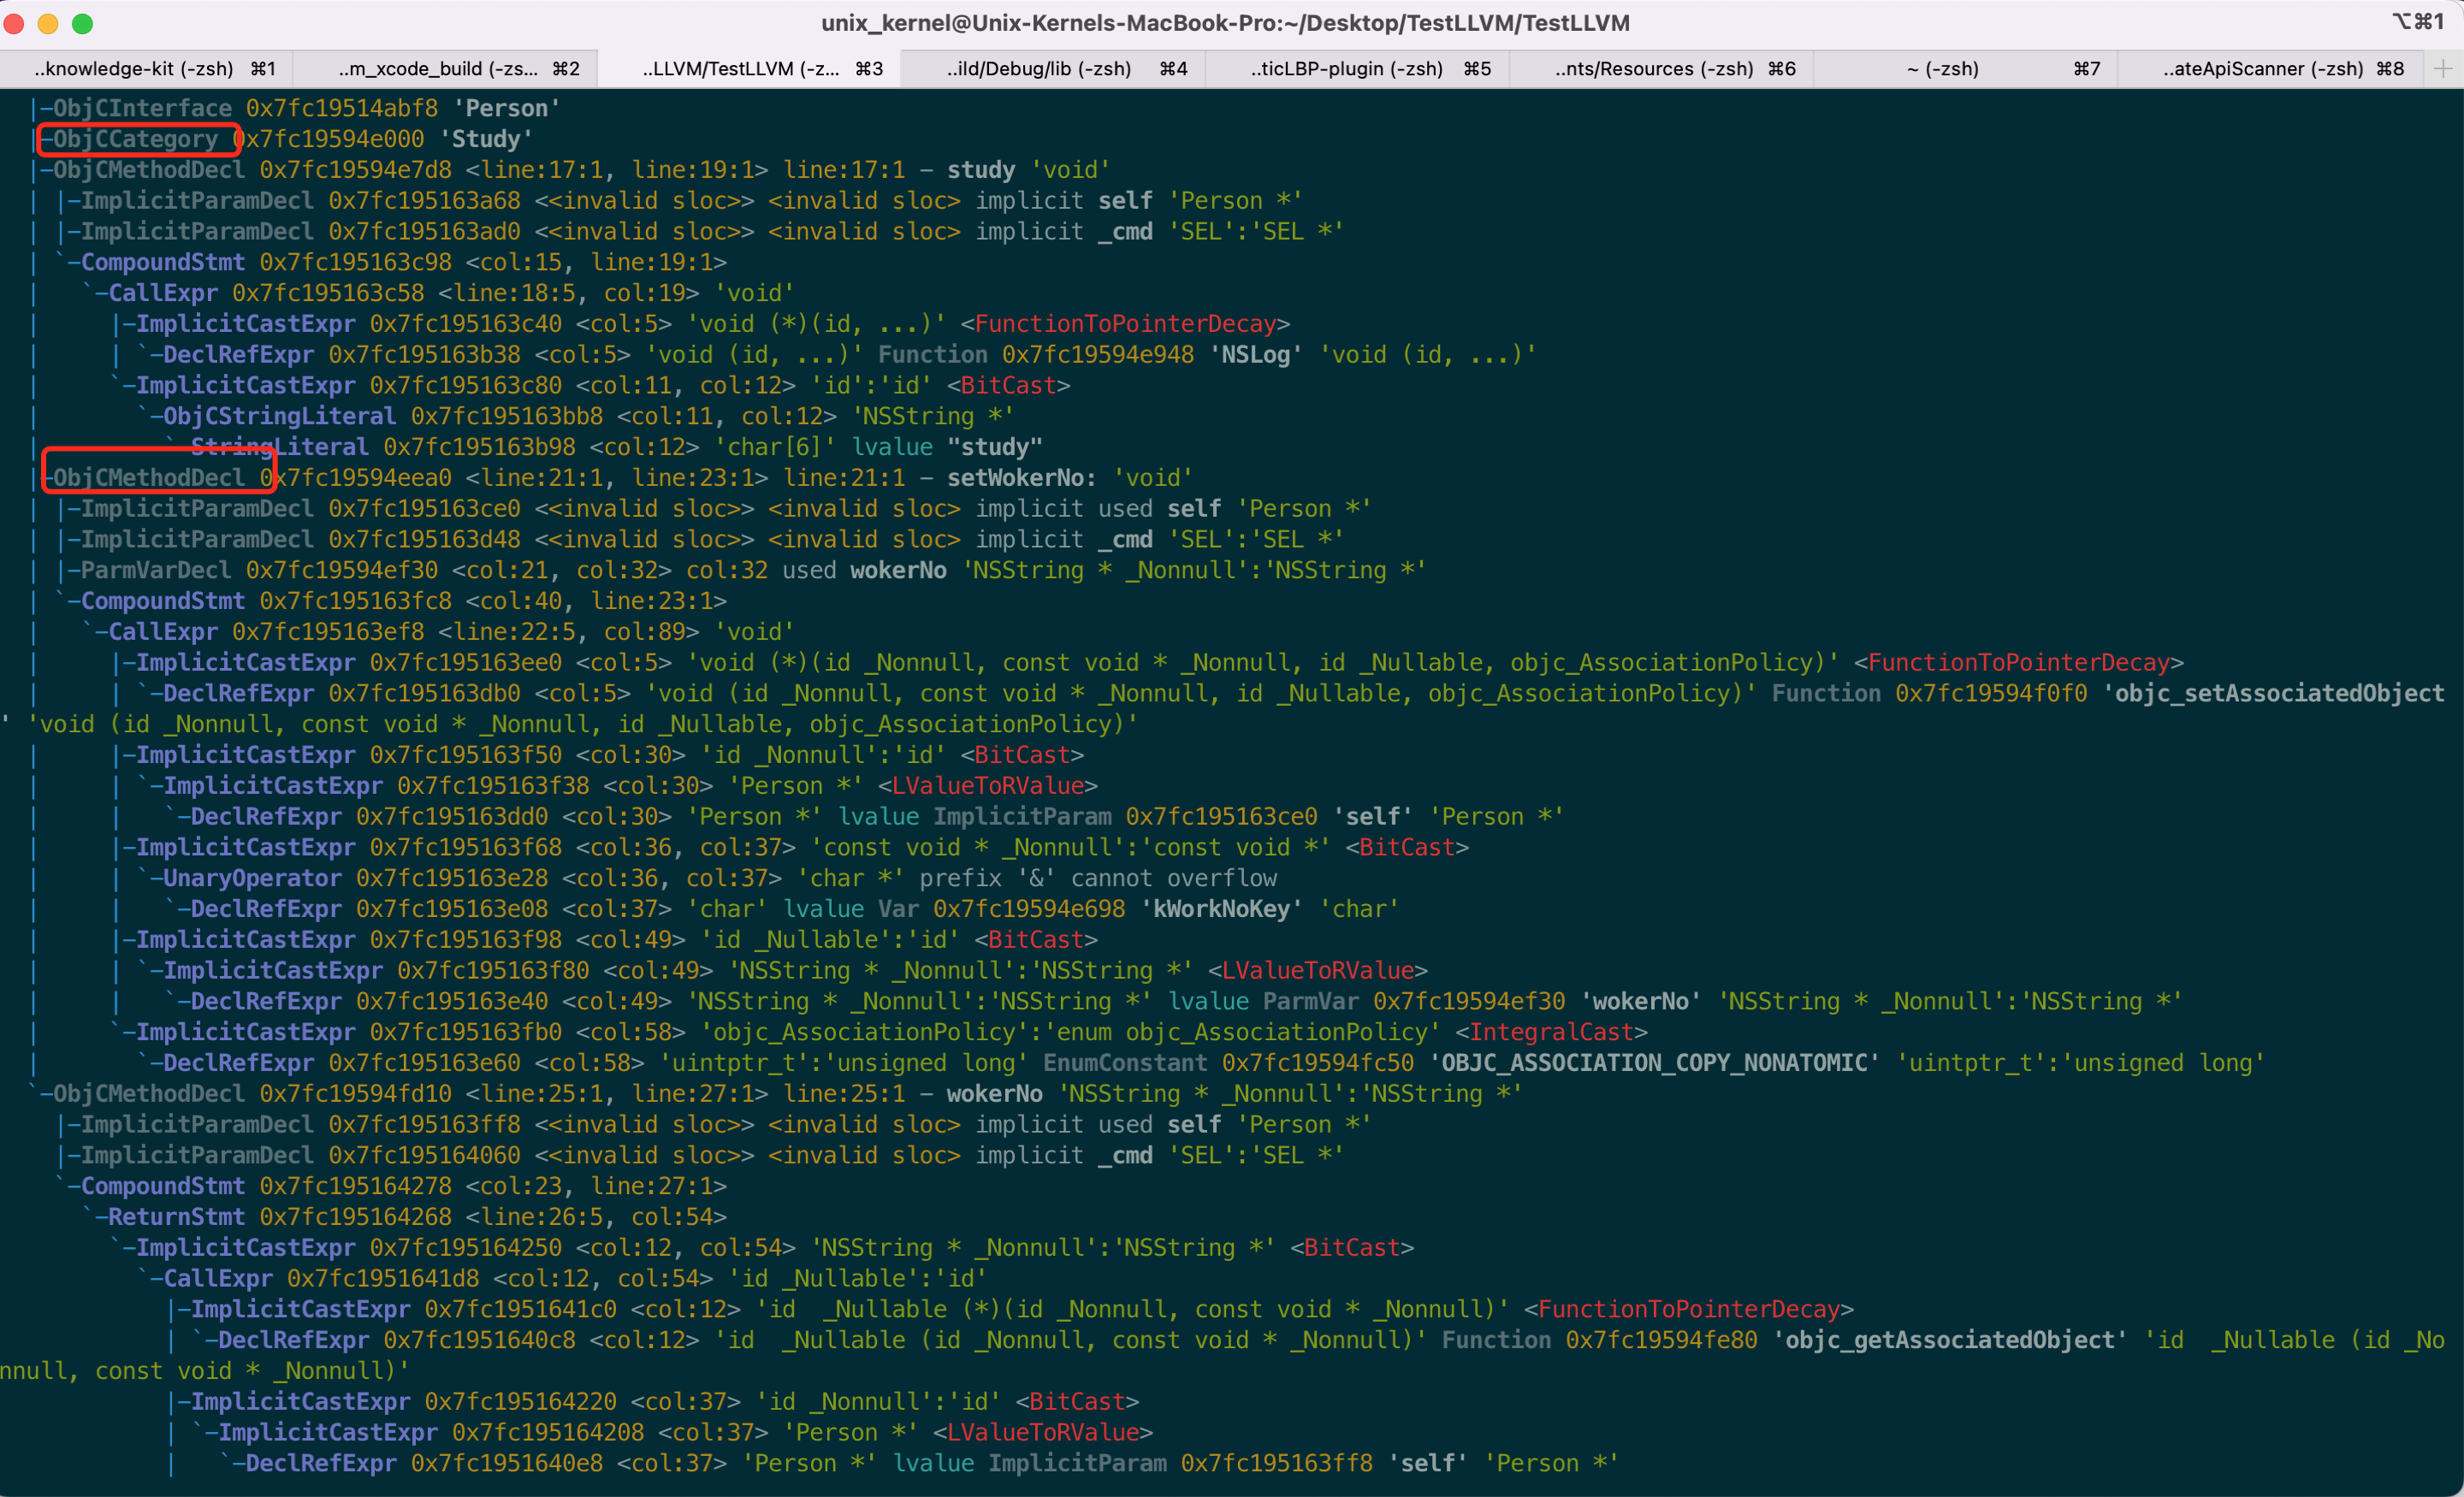
再次查看 AST 可以加深理解
其中:
FunctionDecl节点下存在2个ParamVarDecl和1个CompoundStmt也就是2个参数和1个函数体- 函数体
CompoundStmt内部存在一个变量声明VarDecl -是一个操作符。- 红色框框内的是第一层树形结构。操作符
-有2个参数。首先是最下面的字面量IntegerLiteral4。另一个就是蓝色框内的运算结果 - 蓝色框内操作符
+也有2个DeclRefExpr
也就是先运算蓝色框内的值,然后用结果和红色框内的进行相减。所以这是很标准的树形结构。
LLVM IR
IR 作为中间语言具有语言无关的特性,下面是 IR 中与语言无关的类型信息:
- 语言共有的基础类型(void、bool、signed 等)
- 复杂类型,pointer、array、structure、function
- 弱类型的支持,用 cast 来实现一种类型到另一种任意类型的转换
- 支持地址运算,getelmentptr 指令用于获取结构体子元素,比如 a.b 或 [a b]
LLVM IR 有3种表示格式:
-
text:便于阅读的文本格式,类似于汇编语言,推展名为
.ll。使用指令clang -S -emit-llvm main.m进行转换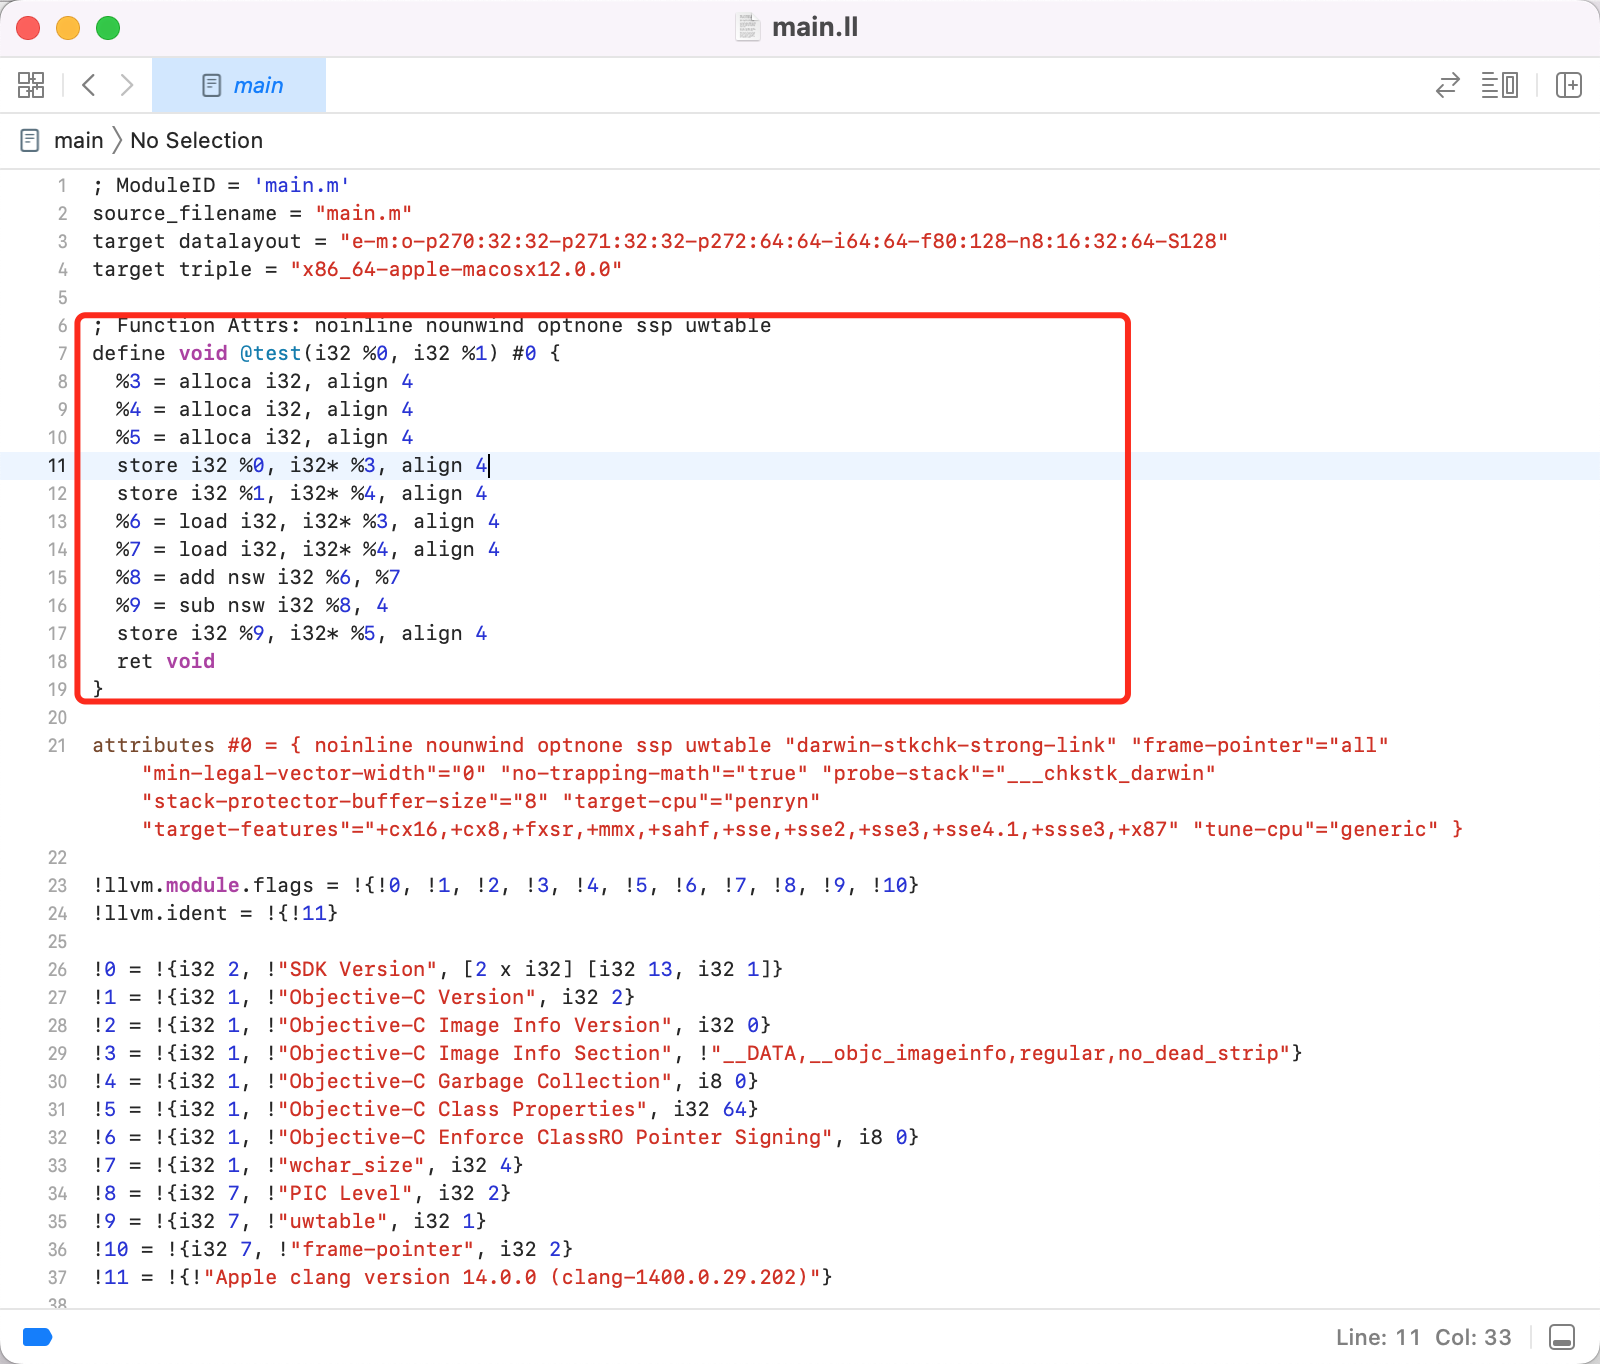
学过 arm64 汇编的话看这段 IR 很眼熟,汇编里
load相关的指令都是从内存中装载数据,比如ldr、ldur、ldp。store相关的指令是往内存中写入数据,比如str、stur、stp一些读 IR 的 tips:
- 注释以分号
;开头 - 全局变量以
@开头 - 局部变量以
%开头 alloca在当前函数栈帧中分配内存,为当前执行的函数分配内存,当该函数执行完毕时自动释放内存i32,表示整数占几位,例如 i32 就代表 32 bit,4个字节的意思align内存对齐。比如单个 int 占4字节,为了对齐,只占1字节的 char 要对齐,就需要占用 4 字节store,写入数据load,读取数据icmp,2个整数值比较,返回布尔值br,选择分支,根据条件跳转到对应的 labellabel,代码标签
更多的可以参考官方文档
- 注释以分号
-
memory 格式:内存格式
-
bitcode:二进制格式,拓展名为
.bc.使用指令clang -c -emit-llvm main.m进行转换。
调试 LLVM
选择 Edit Scheme.


 最后就可以加断点进行 Debug 了。但为了让调试更有意义,类似
 nm -a /Users/unix_kernel/Library/Developer/Xcode/DerivedData/LDExploreDemo-ehvvtxafpkdkubgrswvvsudzhqbb/Build/Products/Debug-iphonesimulator/LDExploreDemo.app/LDExploreDemo 一样可以查看到更有意义的信息,可以在 Edit Scheme 面板中 Run -> Arguments -> Arguments Passed On Launch section 中的 + 点击,添加一些参数,如下图:

最后允许测试。注意:LLVM 项目较大,可以选择顶部 "Product -> Perform Action -> Run Without Building".
用途
LLVM 的一些插件,比如 libclang、libTooling,可以查看官方文档:https://clang.llvm.org/docs/Tooling.html,可以做一些语法树解
析、语言转换等工作。
应用场景分为3大类:
-
Clang 插件开发,可以参考官方文档:
应用场景是:代码检查(命名规范、代码规范)等。
-
Pass 开发,可以参考官方文档:
应用场景是:代码优化、代码混淆、精准测试等
-
libclang、Clang plugins、libTooling 做语法树分析,实现语言转换 OC 转 Swift、JS 等其它语言;字符串加密;开发新的语言,例如 Swift 语言。可以参考博客:
- https://kaleidoscope-llvm-tutorial-zh-cn.readthedocs.io/zh-cn/latest/
- https://llvm-tutorial-cn.readthedocs.io/en/latest/index.html
其中:
libclang 供了一个相对较小的 API,它将用于解析源代码的工具暴露给抽象语法树(AST),加载已经解析的 AST,遍历 AST,将物理源位置与 AST 内的元素相关联。
libclang 是一个稳定的高级 C 语言接口,隔离了编译器底层的复杂设计,拥有更强的 Clang 版本兼容性,以及更好的多语言支持能力,对于大多数分析 AST 的场景来说,libclang 是一个很好入手的选择。
优点
- 可以使用 C++ 之外的语言与 Clang 交互。
- 稳定的交互接口和向后兼容。
- 强大的高级抽象,比如用光标迭代 AST,并且不用学习 Clang AST 的所有细节。
缺点:不能完全控制 Clang AST。
Clang Plugin 允许你在编译过程中对 AST 执行其他操作。Clang Plugin 是动态库,由编译器在运行时加载,并且它们很容易集成到构建环境中。
LibTooling 是一个独立的库,它允许使用者很方便地搭建属于你自己的编译器前端工具,它的优点与缺点一样明显,它基于 C++ 接口,读起来晦涩难懂,但是提供给使用者远比 libclang 强大全面的 AST 解析和控制能力,同时由于它与 Clang 的内核过于接近导致它的版本兼容能力比 libclang 差得多,Clang 的变动很容易影响到 LibTooling。libTooling 还提供了完整的参数解析方案,可以很方便的构建一个独立的命令行工具。这是 libclang 所不具备的能力。一般来说,如果你只需要语法分析或者做代码补全这类功能,libclang 将是你避免掉坑的最佳的选择。
编写 Xcode 插件
比如检查类名的合法性,Xcode 默认认为类名带有下划线或者小写开头的类名是合法的。但是这个不符合团队代码规范,使用 LLVM 就可以编写 Xcode 插件,来检查类名的合法性。
判断类名是否合法,这肯定是编译前端做的事情。搞清楚这点,就好办了
接下来就一步步实现该功能。
下载
创建文件夹 llvm_explore ,shell 进入到文件夹执行指令 git clone https://github.com/llvm/llvm-project.git
编译
用 brew 安装 cmake 和 ninja:brew install cmake 、brew install ninja
Tips:ninja 如果安装失败,可以直接从 github 获取 release 版放入/usr/local/bin中
编译方式有2种:
-
ninja 编译
在 LLVM 源码同层目录下创建一个
llvm_build目录,最终会在llvm_build目录下生成build.ninjacd llvm_build cmake -G Ninja ../llvm -DCMAKE_INSTALL_PREFIX=LLVM的安装路径然后执行编译指令,使用
ninja再执行安装指令,使用
ninja install -
Xcode 编译
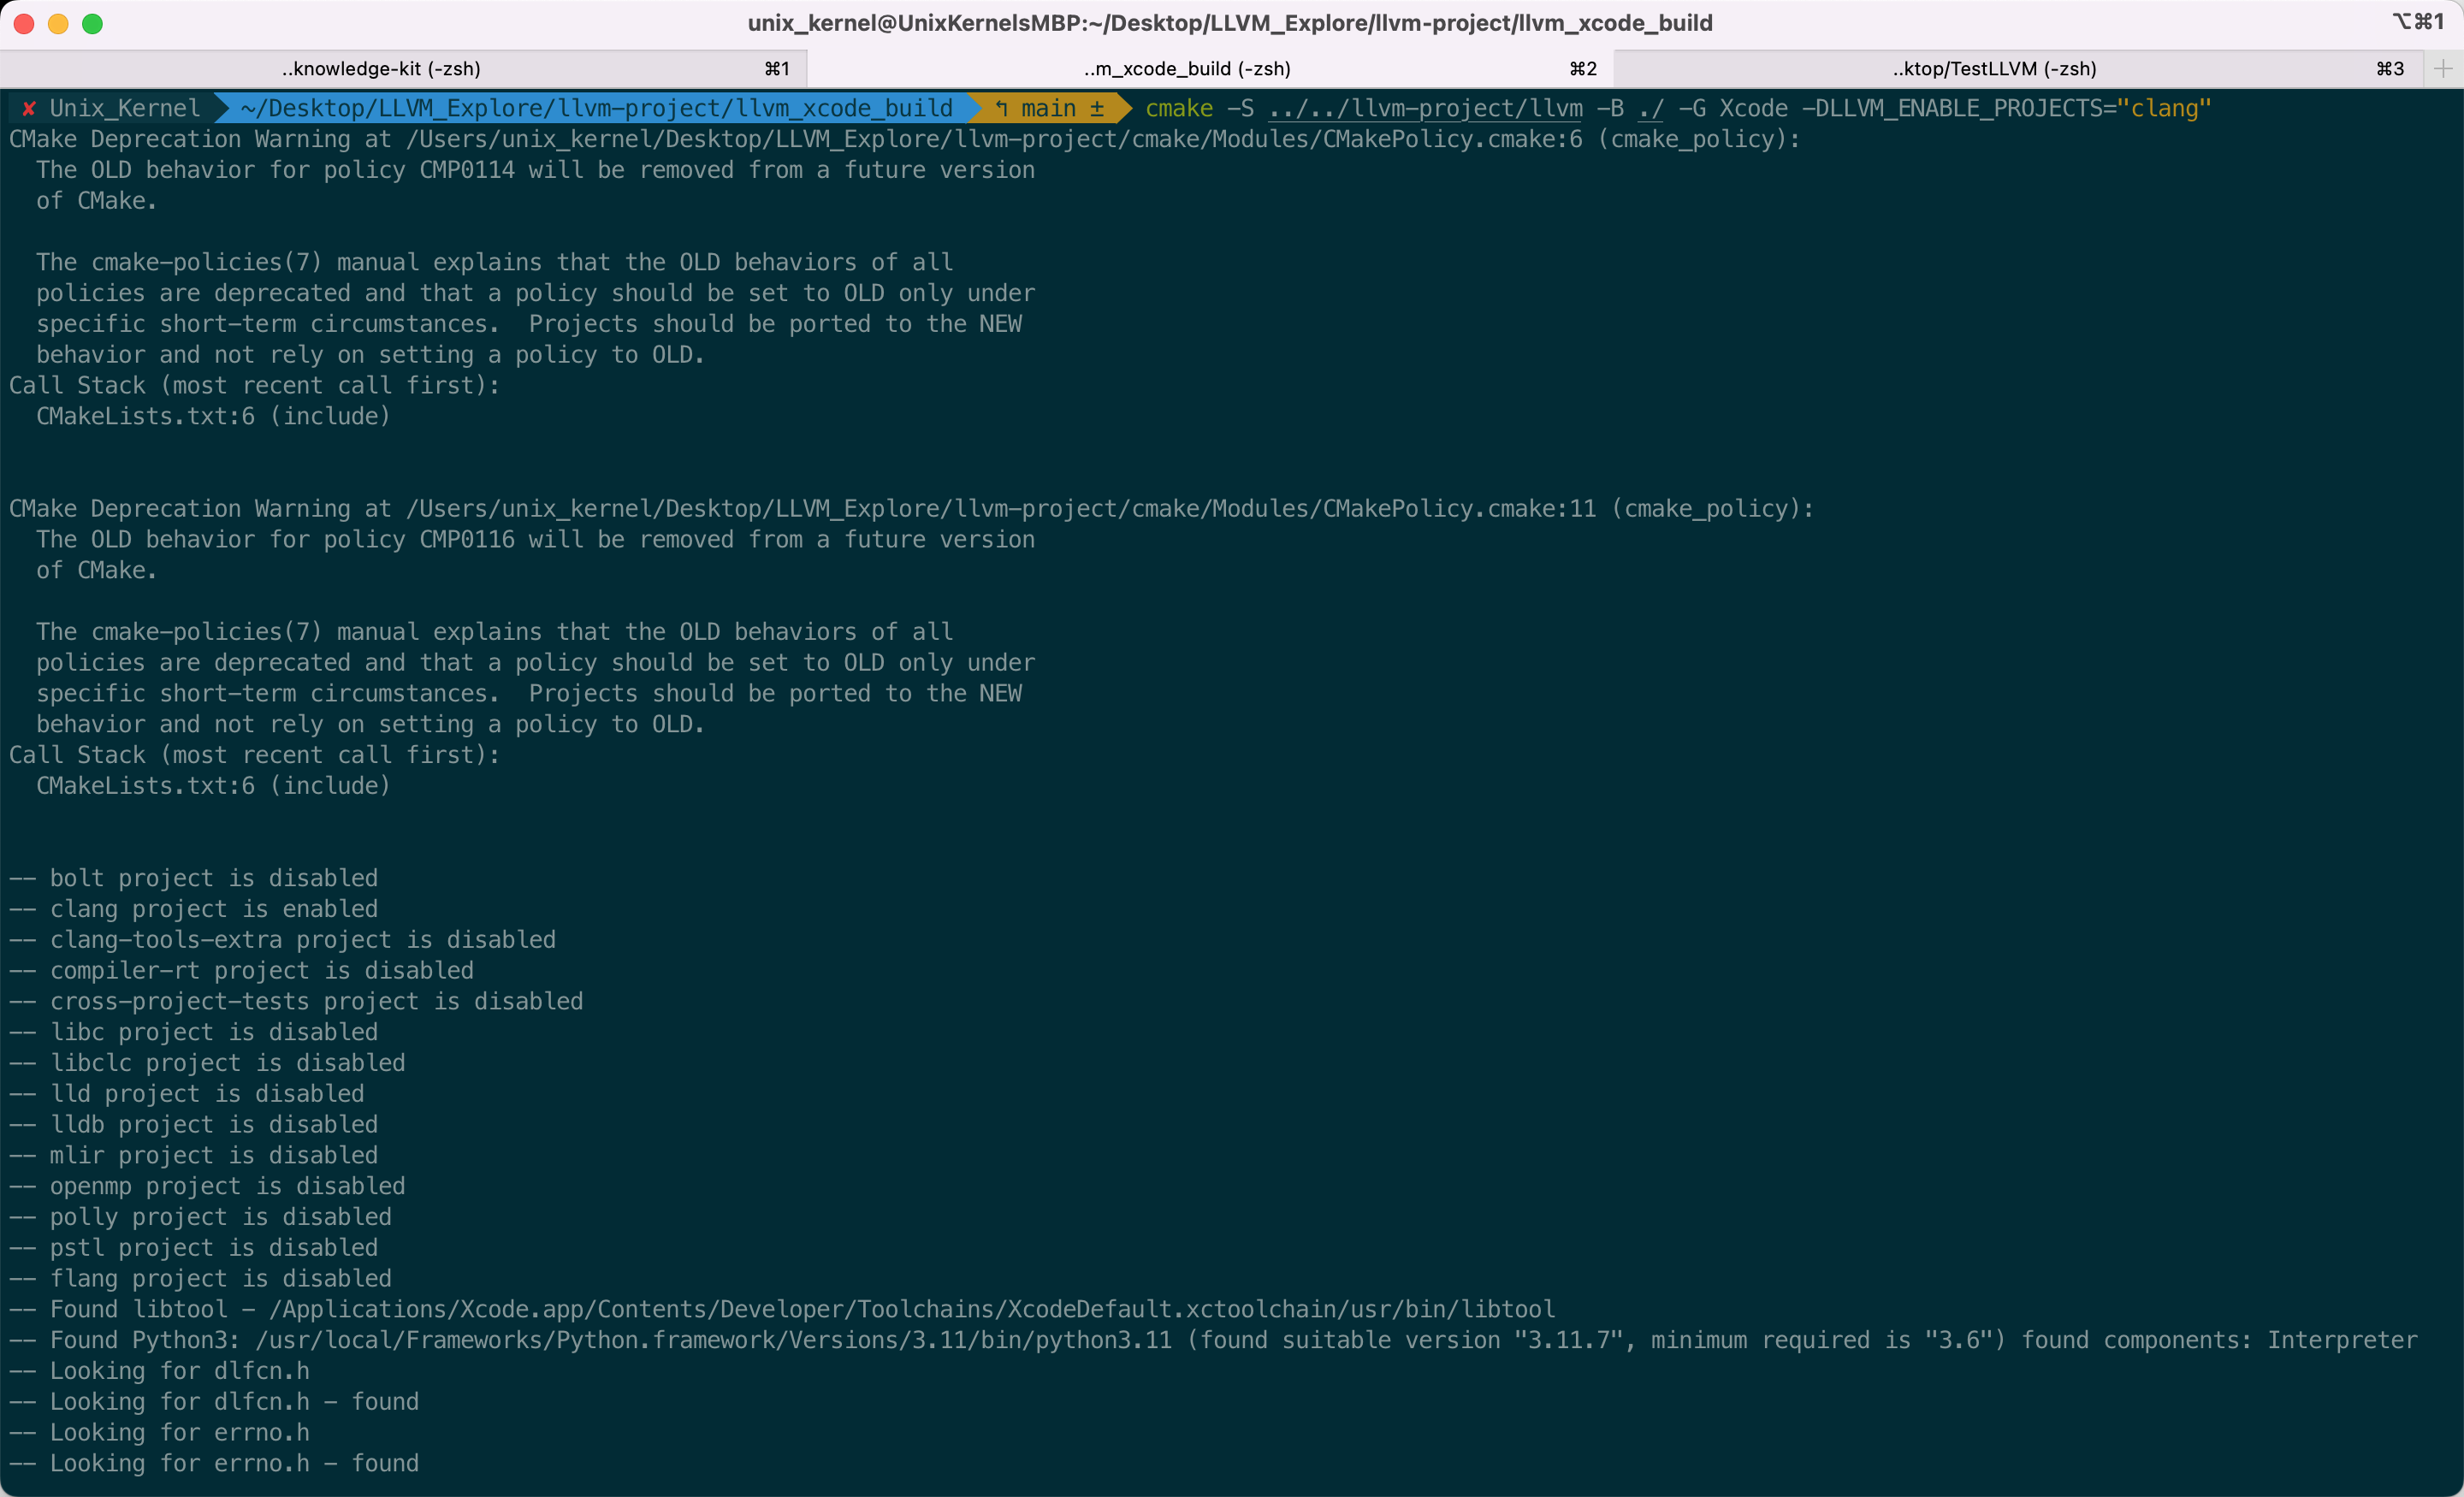
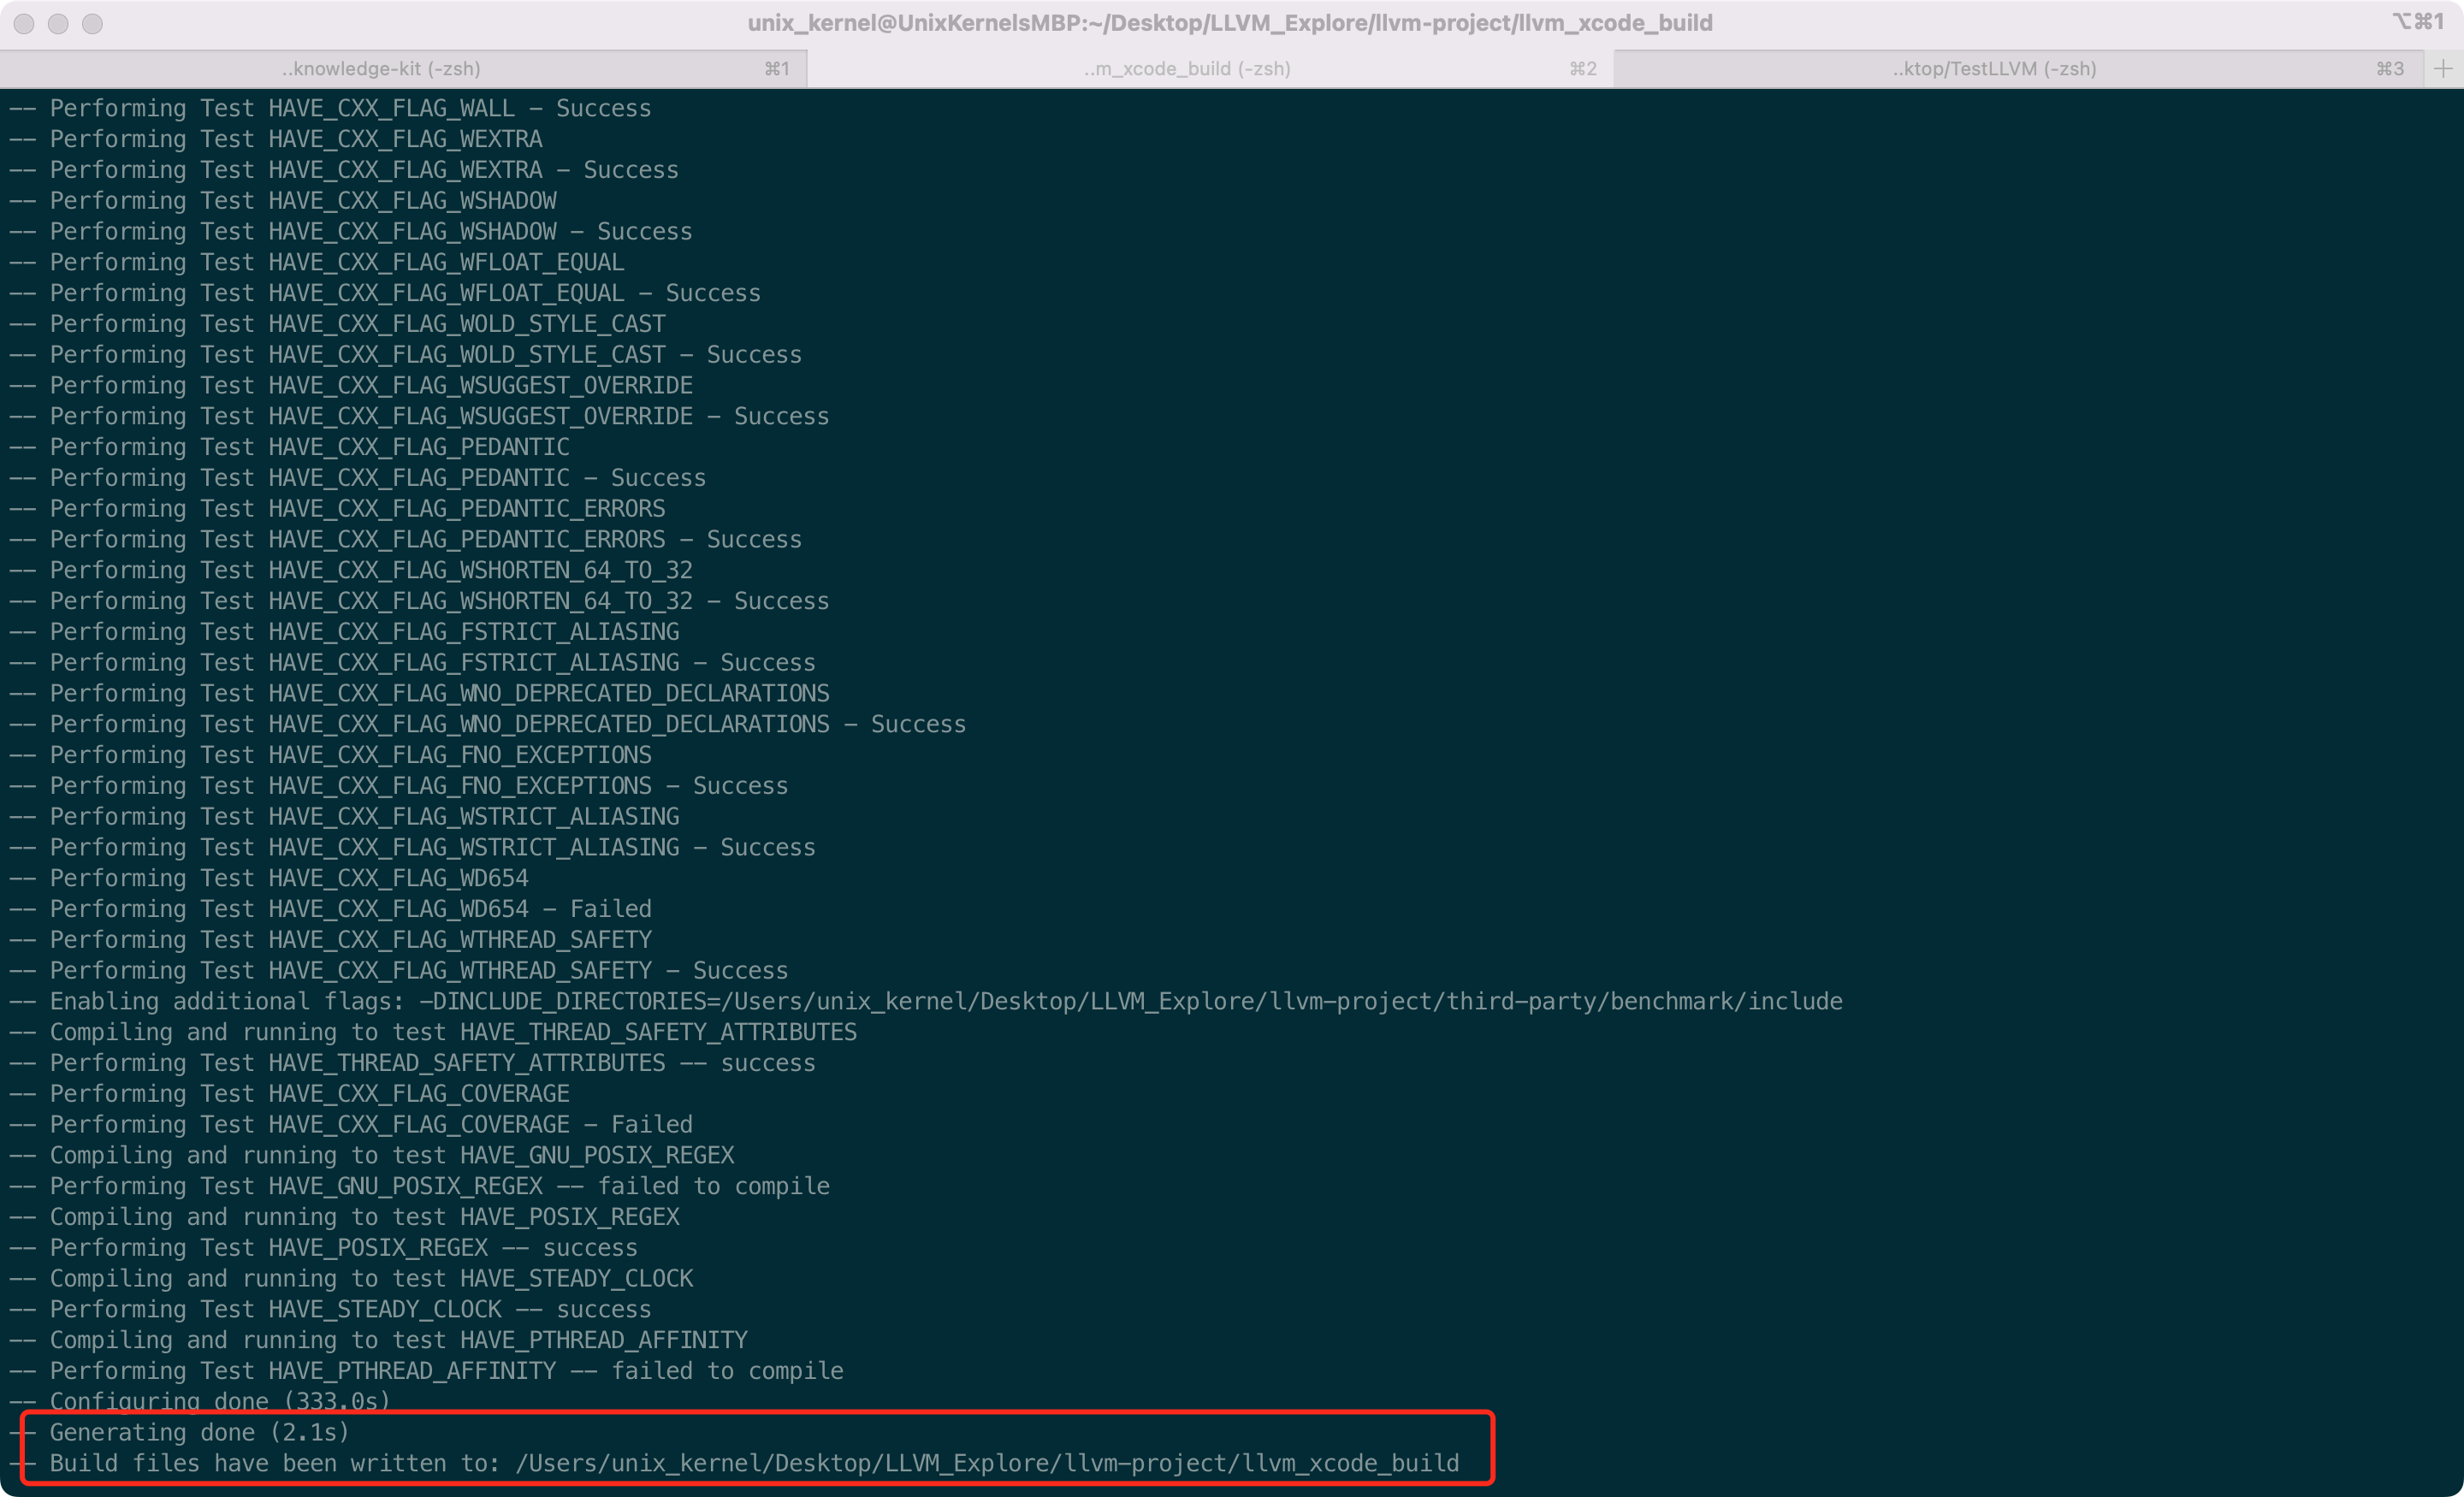
在 LLVM 源码同层目录下创建一个
llvm_xcode_build目录mkdir llvm_xcode_build cd llvm_xcode_build cmake -S .https://raw.githubusercontent.com/FantasticLBP/knowledge-kit/master/llvm-project/llvm -B ./ -G Xcode -DLLVM_ENABLE_PROJECTS="clang"
因为要编写 Clang 插件,是 c++ 代码,所以需要借助 IDE 的能力,我们选用 Xcode 进行编译。如下图所示,代表编译成功
LLVM 角色说明
- LLVM Core:包含一个现在的源代码/目标设备无关的优化器,一集一个针对很多主流(甚至于一些非主流)的 CPU 的汇编代码生成支持。
- Clang:一个 C/C++/Objective-C 编译器,致力于提供令人惊讶的快速编译,极其有用的错误和警告信息,提供一个可用于构建很棒的源代码级别的工具
- dragonegg: gcc 插件,可将 GCC 的优化和代码生成器替换为 LLVM 的相应工具。
- LLDB:基于 LLVM 提供的库和 Clang 构建的优秀的本地调试器。
- libc++、libc++ ABI:符合标准的,高性能的 C++ 标准库实现,以及对 C++11 的完整支持
- compiler-rt:针对 __fixunsdfdi 和其他目标机器上没有一个核心 IR(intermediate representation) 对应的短原生指令序列时,提供高度调优过的底层代码生成支持
- OpenMP:Clang 中对多平台并行编程的 runtime 支持
- vmkit:基于 LLVM 的 Java 和 .NET 虚拟机
- polly: 支持高级别的循环和数据本地化优化支持的 LLVM 框架。
- libclc: OpenCL 标准库的实现
- klee:基于L LVM 编译基础设施的符号化虚拟机
- SAFECode:内存安全的 C/C++ 编译器
- lld: clang/llvm 内置的链接器
添加插件目录
进入目录 /Users/unix_kernel/Desktop/LLVM_Explore/llvm-project/clang/tools:
-
先创建一个插件文件夹
code-style-validate-plugin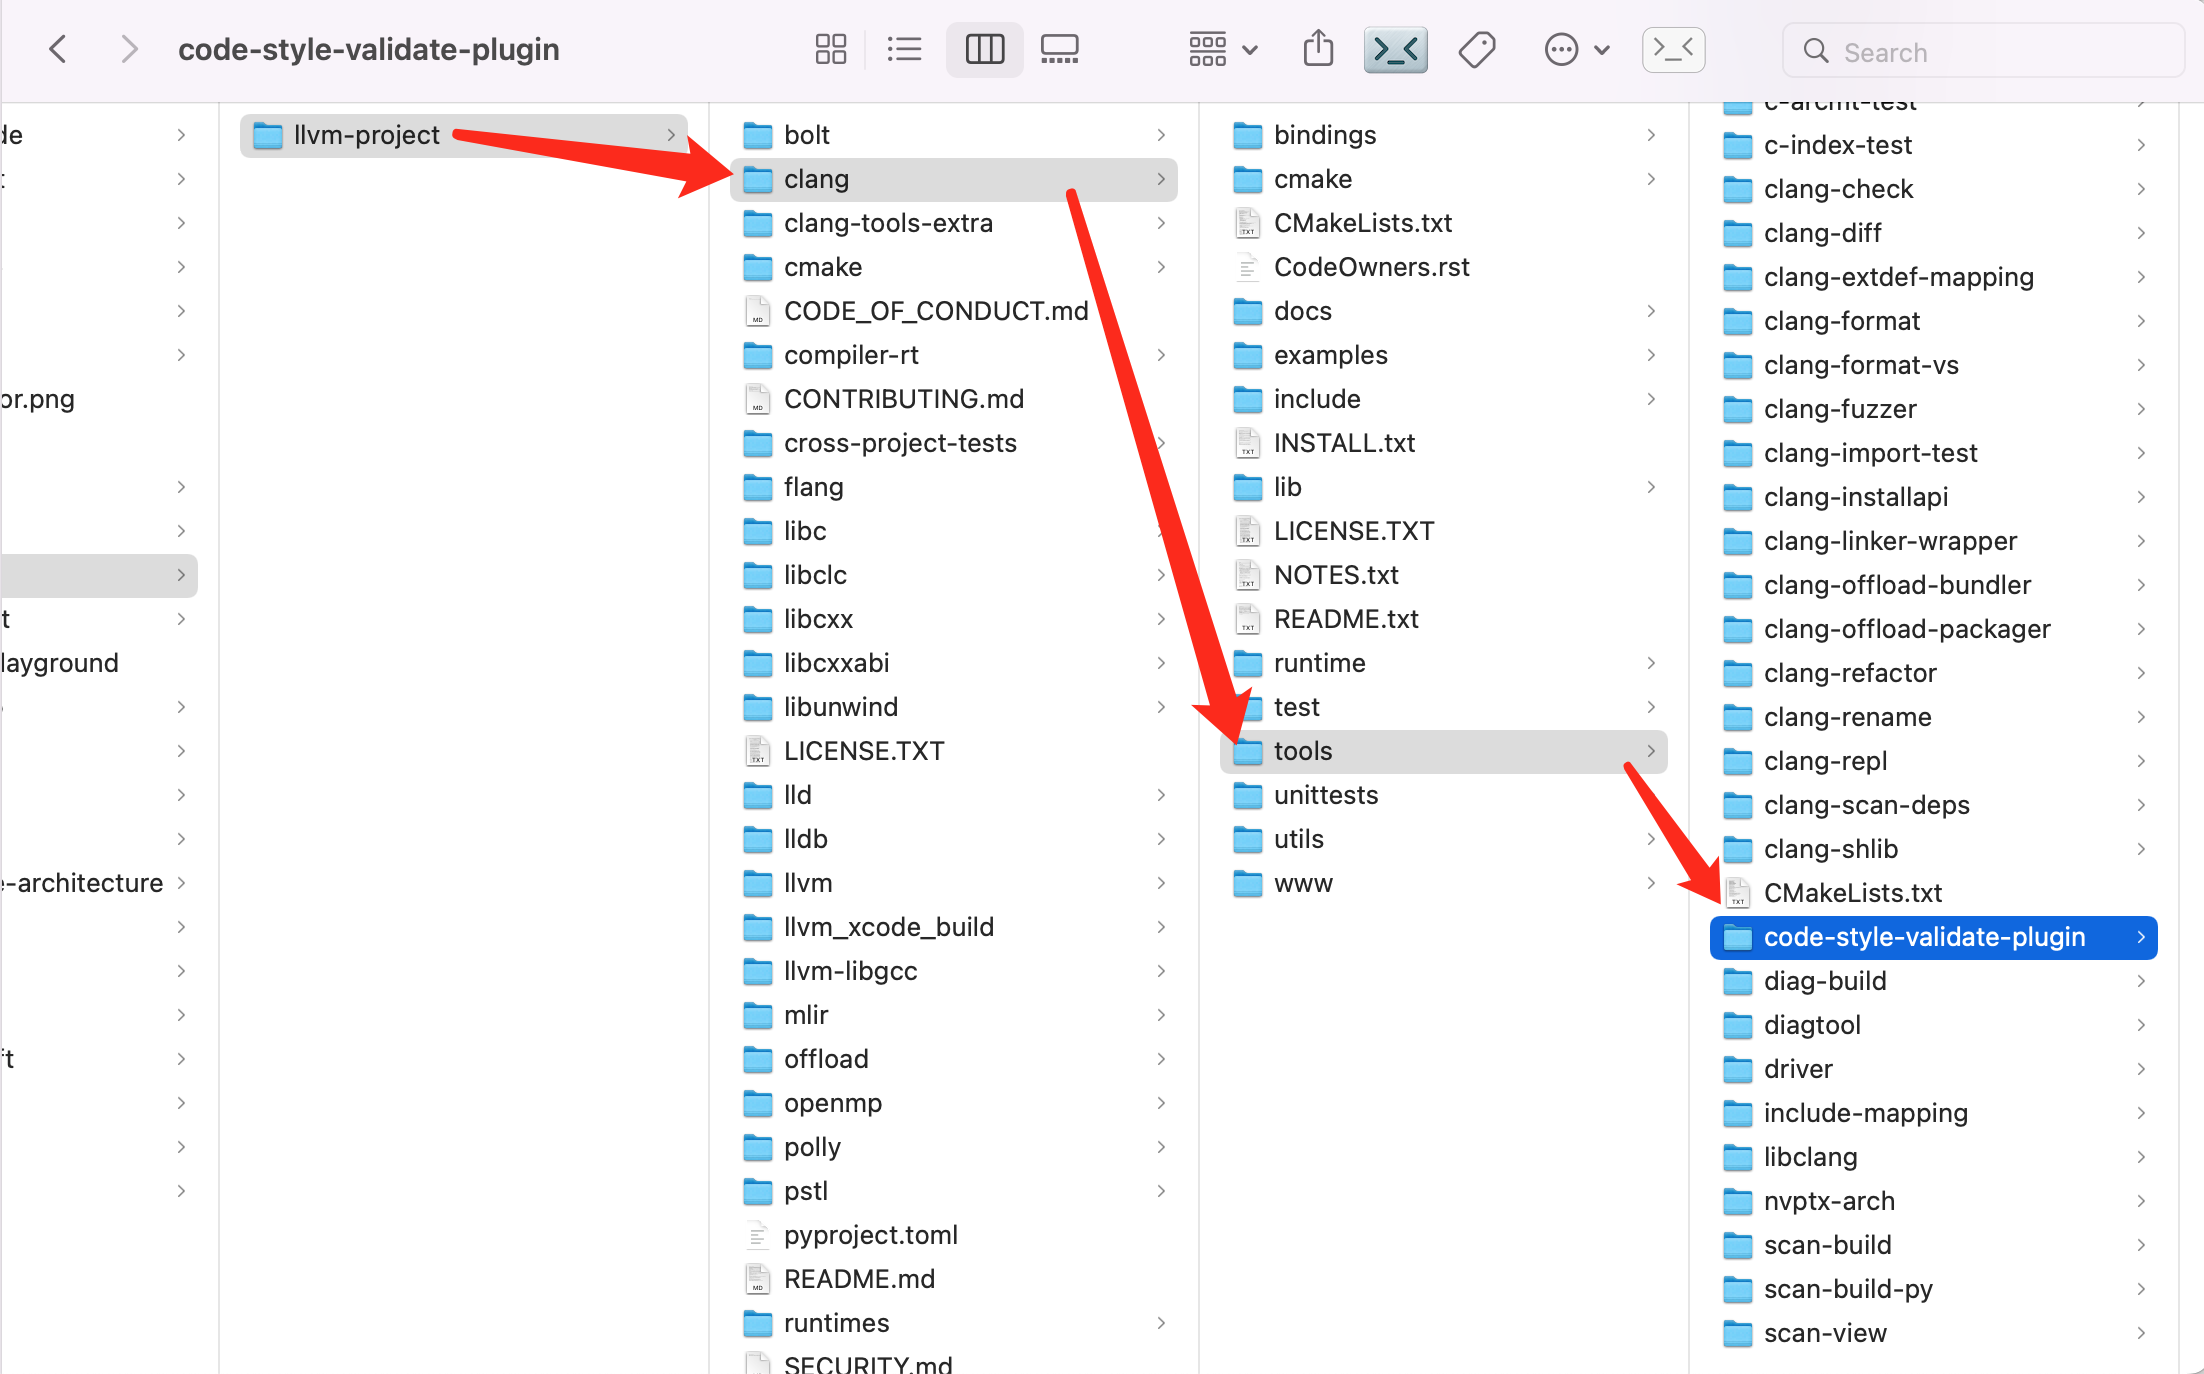
-
编辑
CMakeLists.txt文件,在最后添加add_clang_subdirectory(code-style-validate-plugin)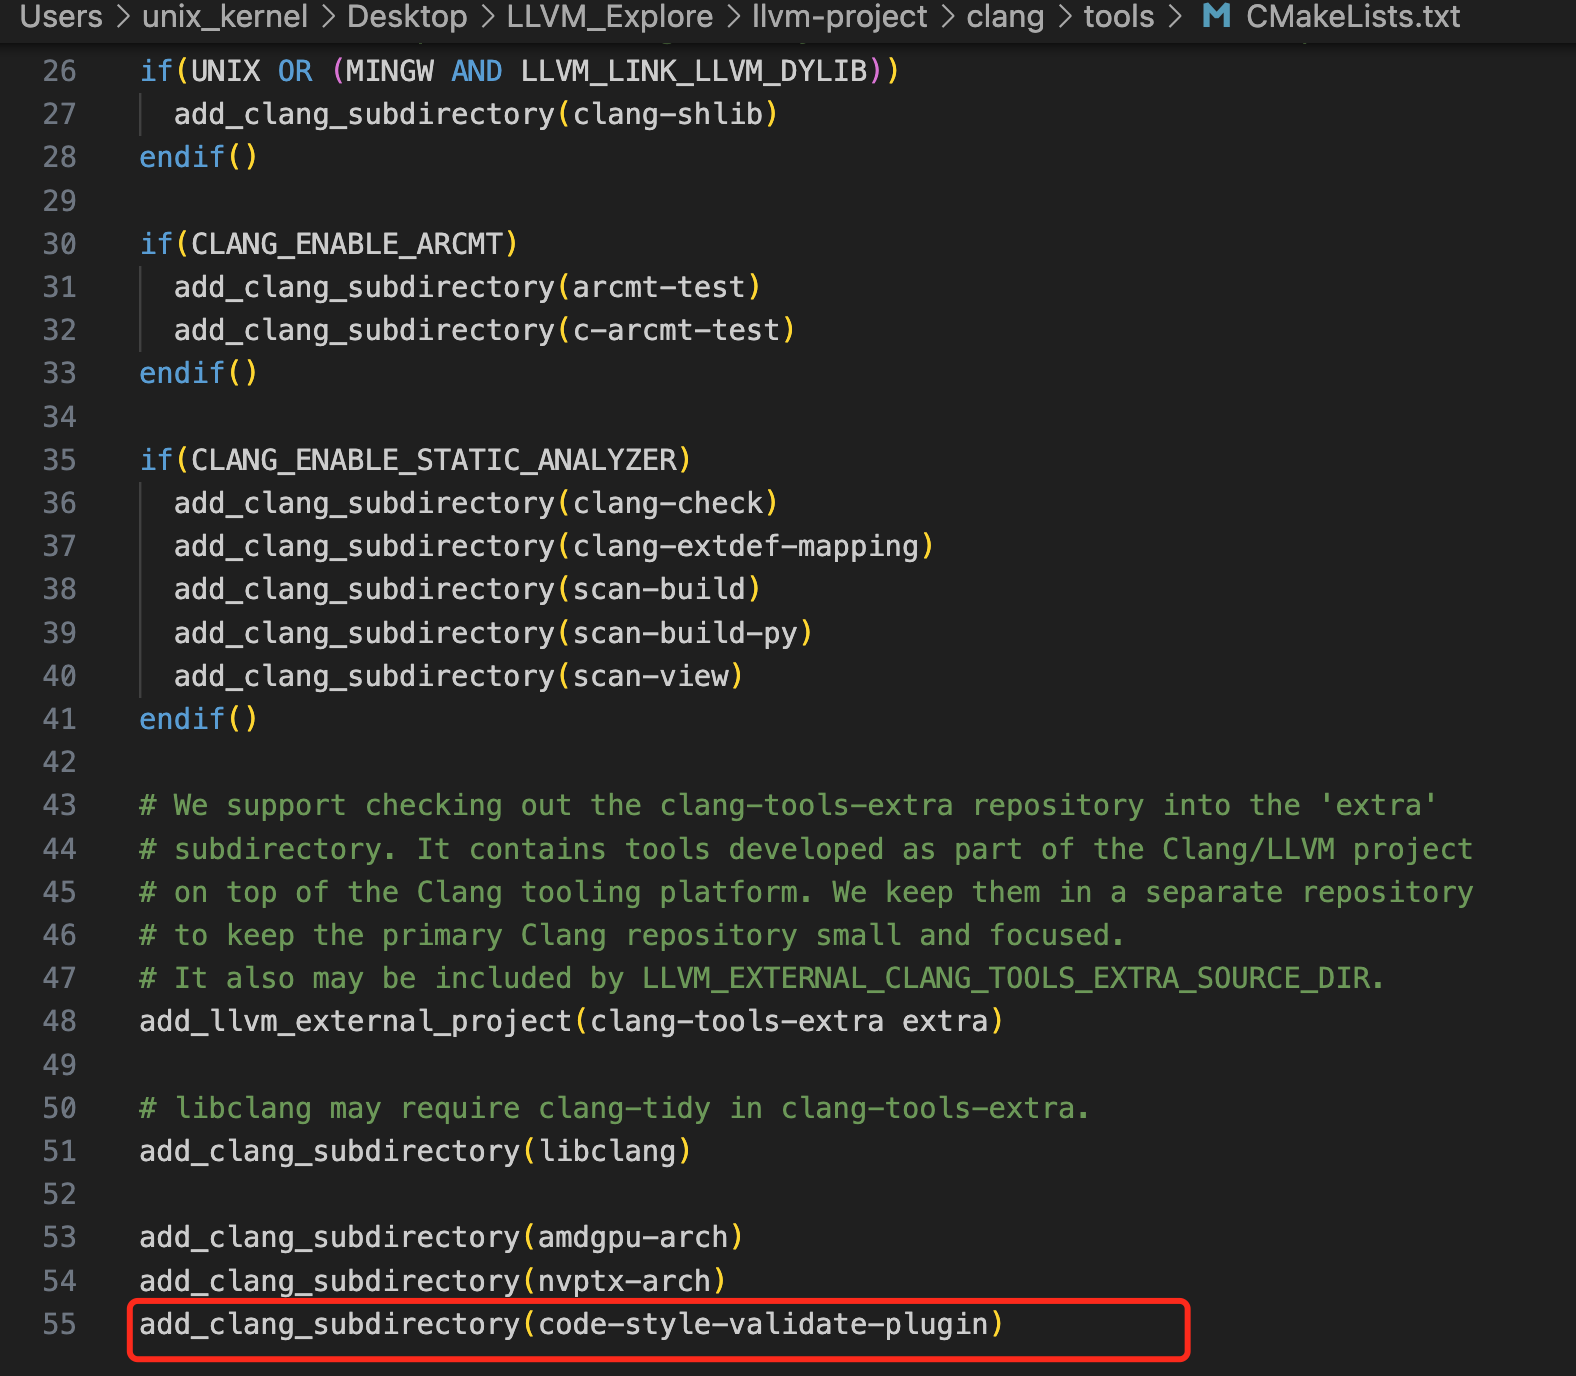
配置插件
在上一步创建的 code-style-validate-plugin 文件夹下:
-
创建插件代码文件
CodeStyleValidatePlugin.cpp -
创建
CMakeLists.txt,添加配置代码,其中FANPlugin是插件名,CodeStyleValidatePlugin 是插件源码文件名add_llvm_library(CodeStyleValidatePlugin MODULE BUILDTREE_ONLY CodeStyleValidatePlugin.cpp )
由于新做了配置,并且要开发 CodeStyleValidatePlugin.cpp ,所以重新生成 cmake -S .https://raw.githubusercontent.com/FantasticLBP/knowledge-kit/master/llvm-project/llvm -B ./ -G Xcode -DLLVM_ENABLE_PROJECTS="clang"
编写插件代码
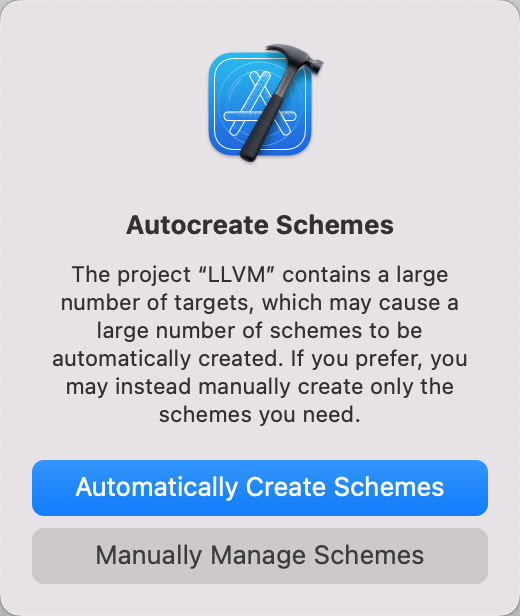
Xcode 打开项目,选择自动创建 Schemes
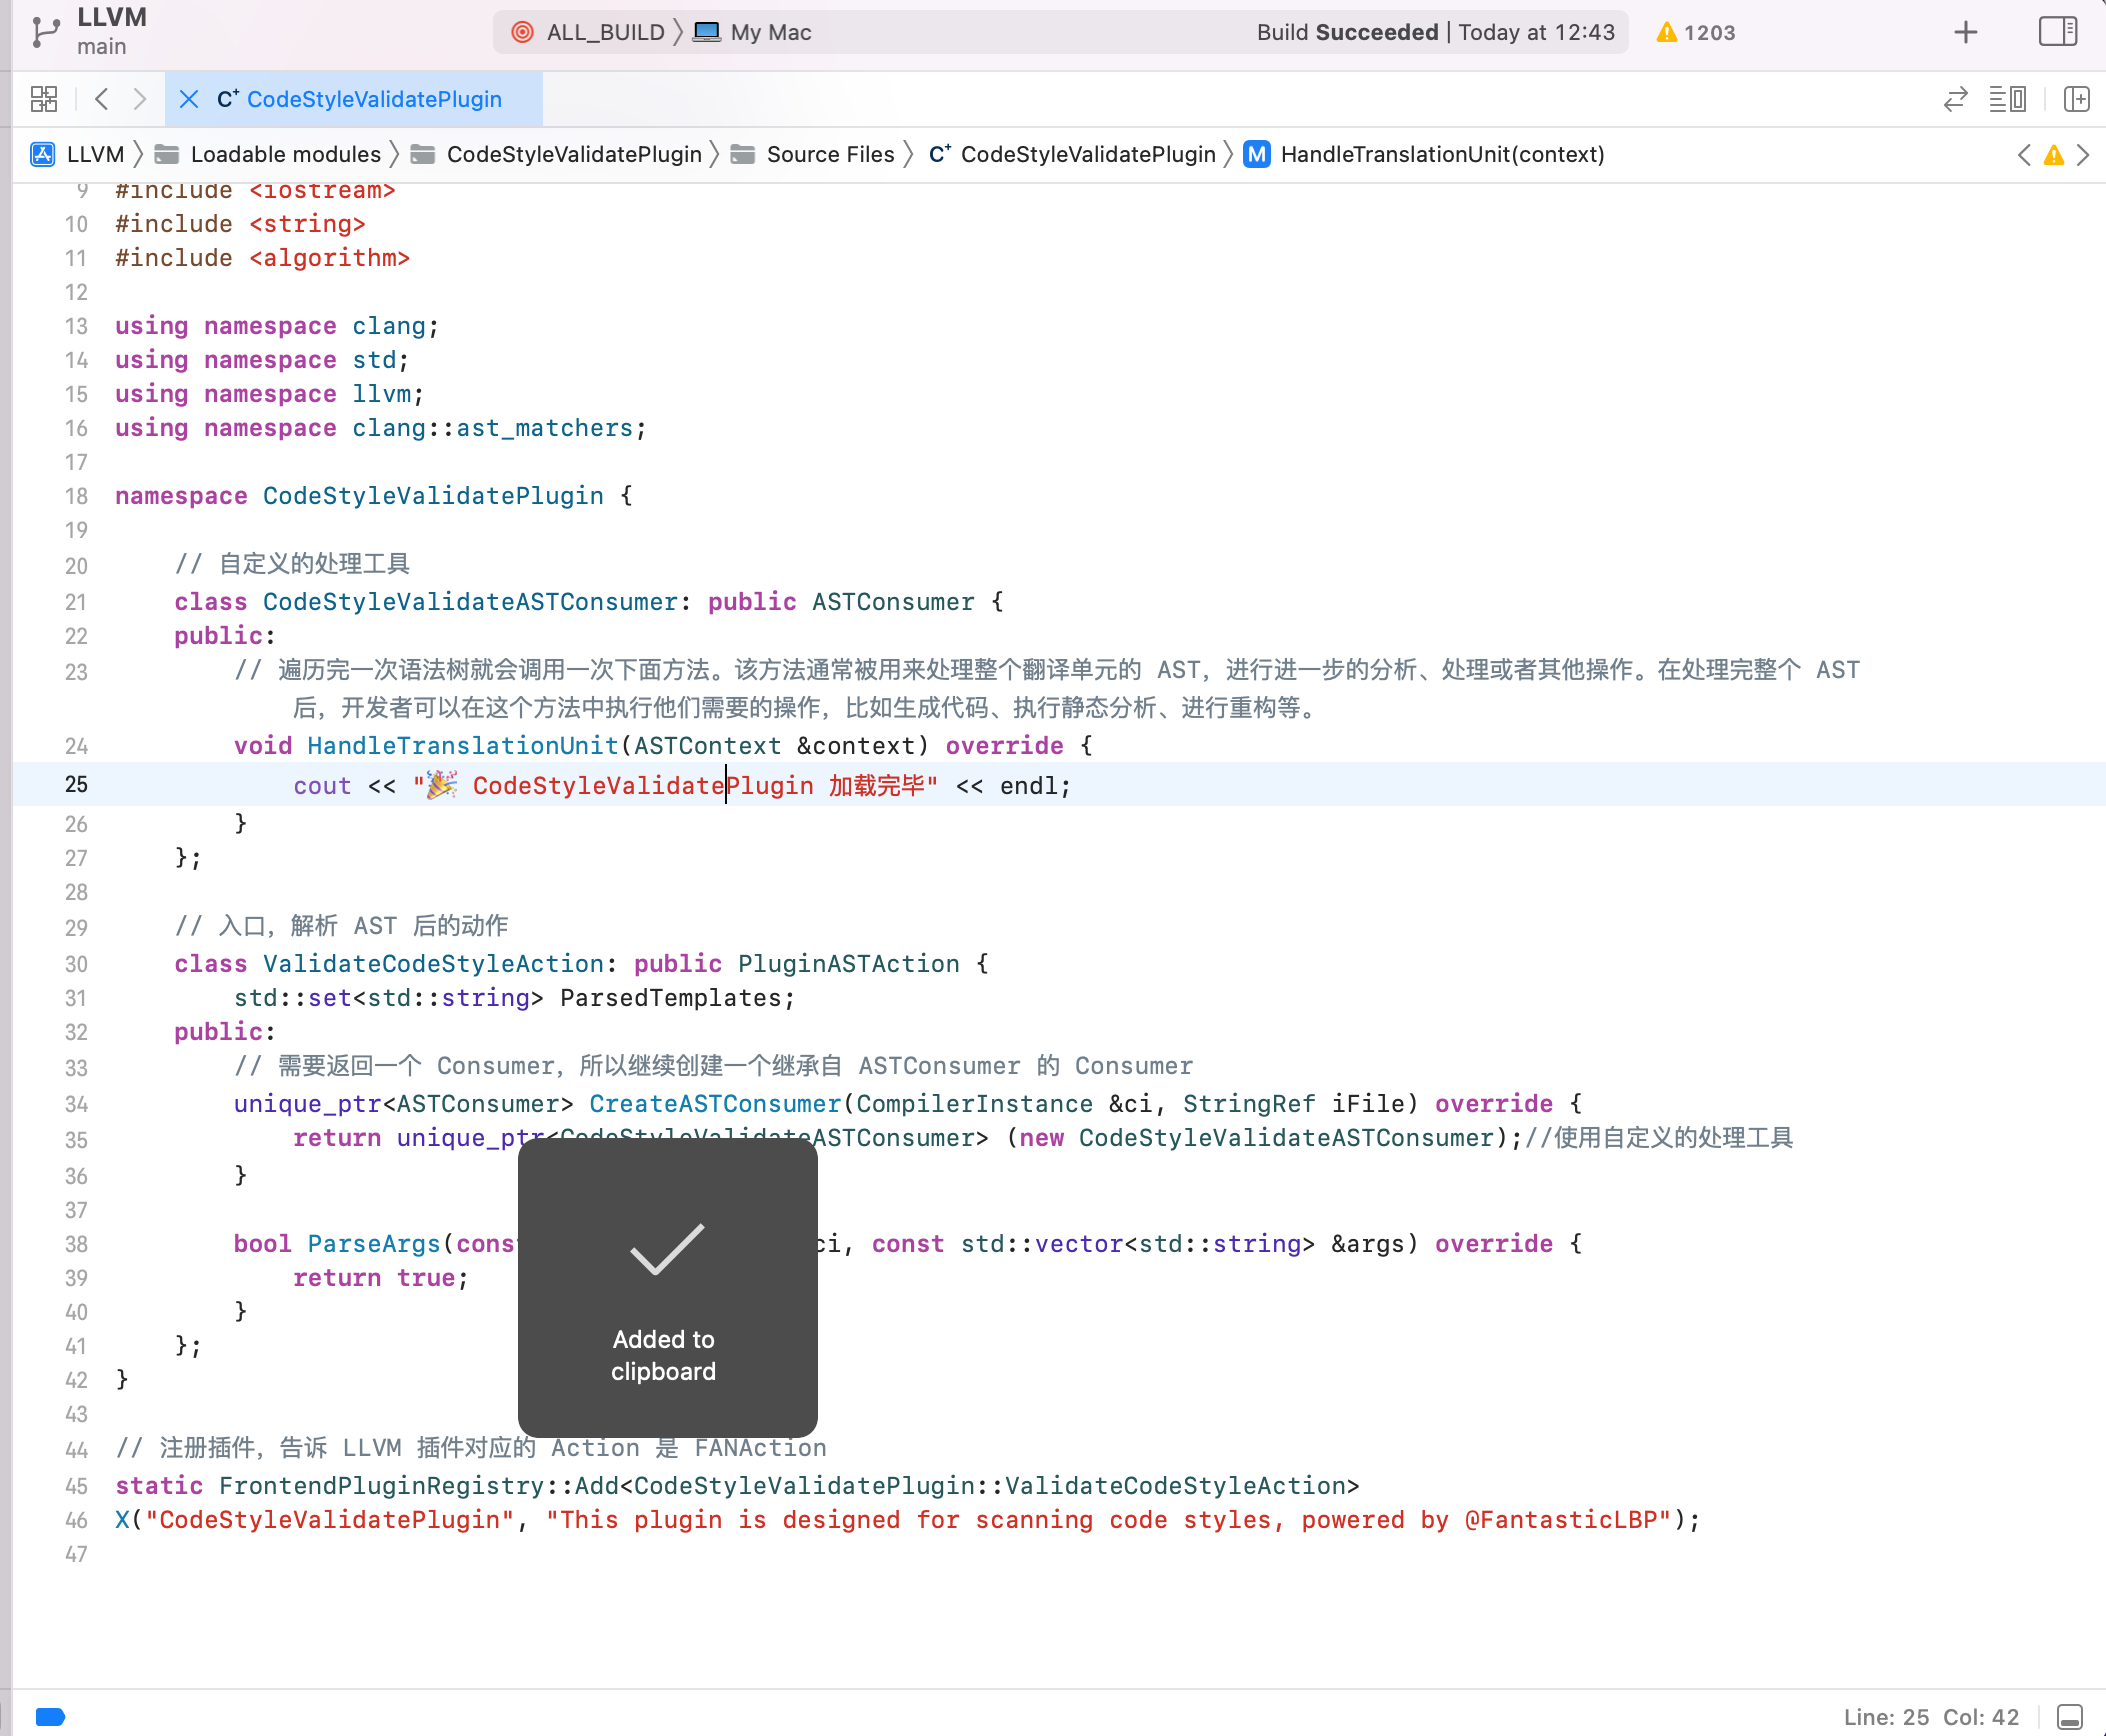
选择 Target 为 CodeStyleValidatePlugin,源代码所在文件夹为 Sources/Loadable modules,然后选中 CodeStyleValidatePlugin.cpp` 文件进行编写逻辑
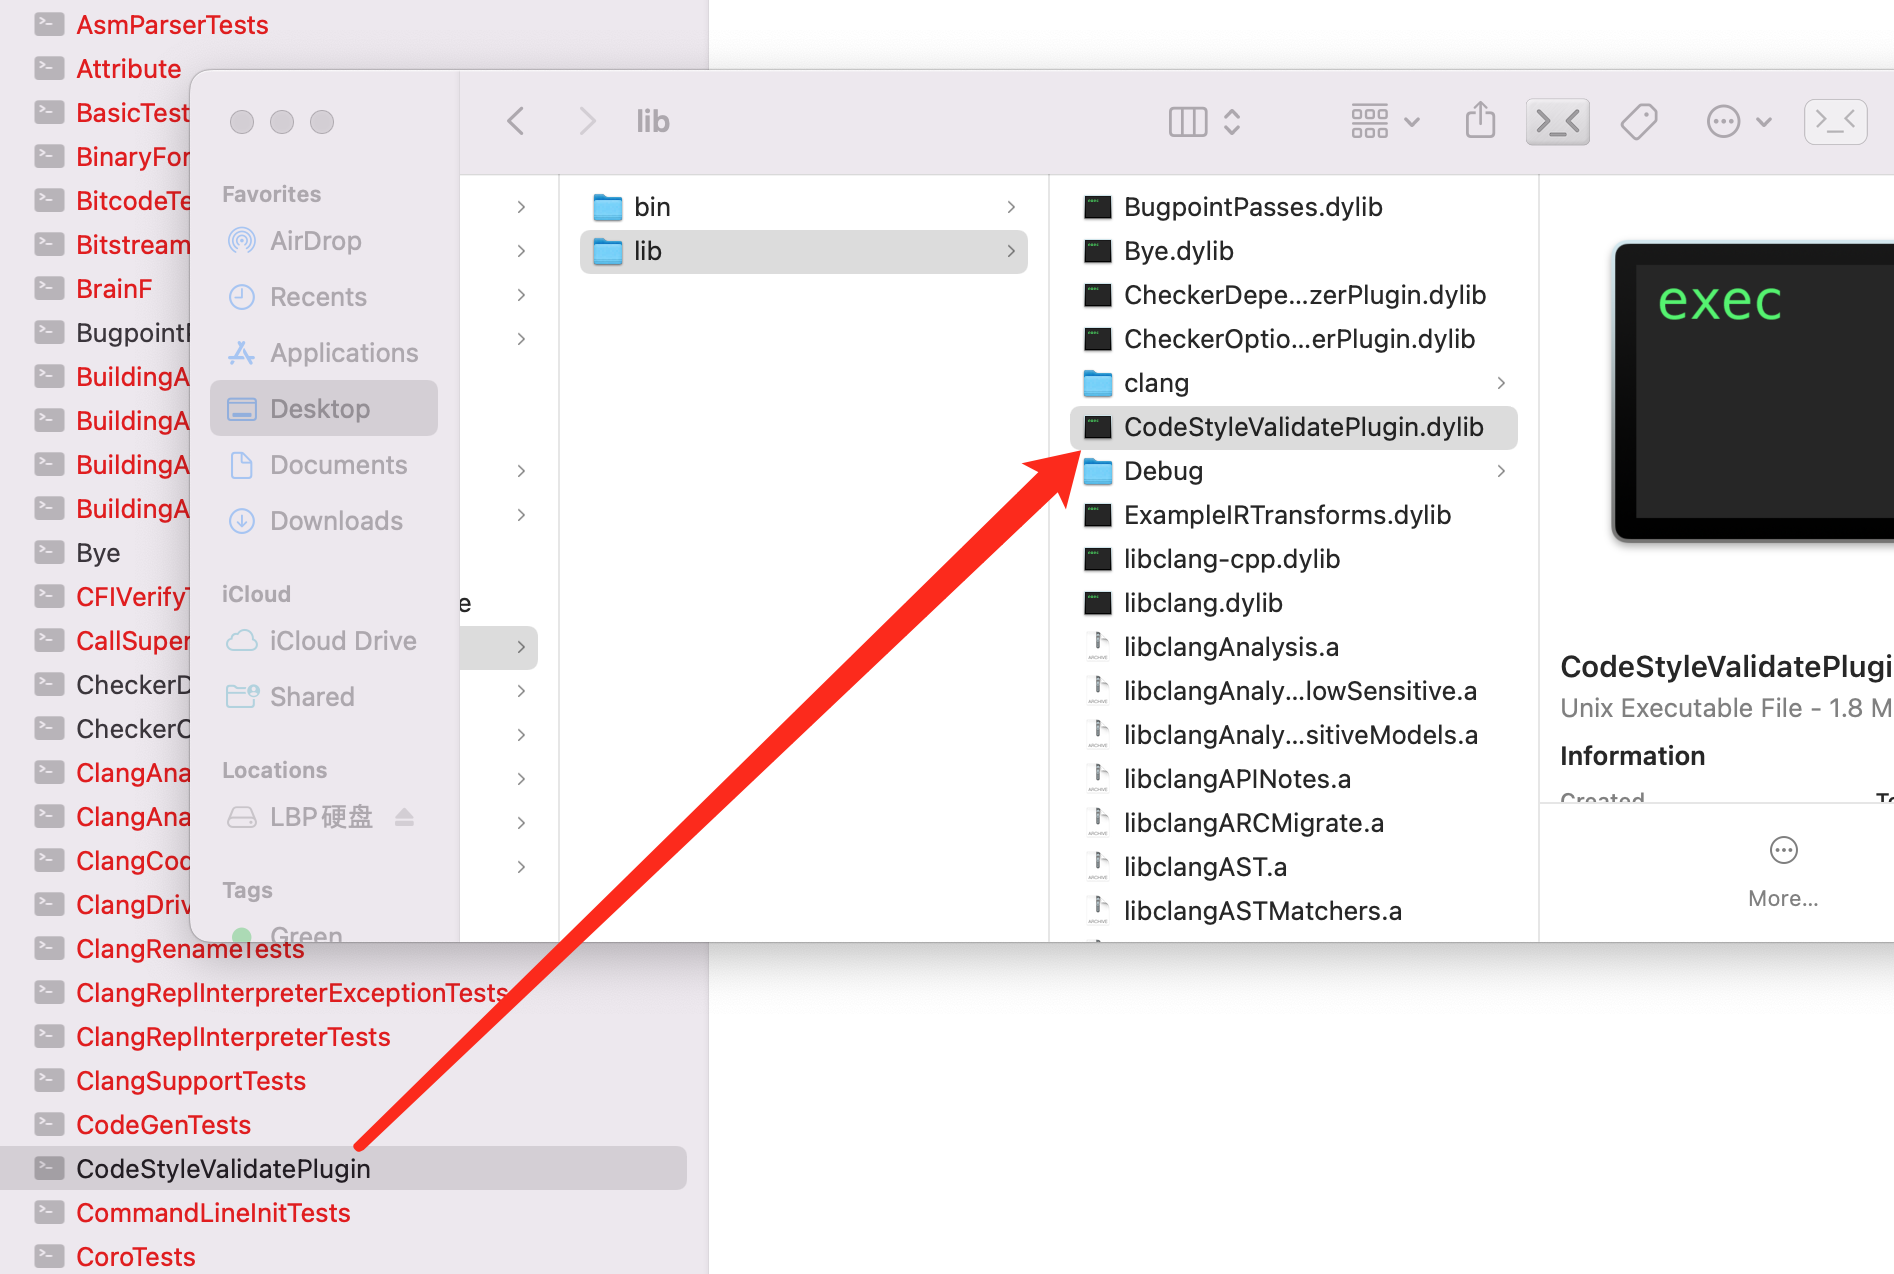
初步编写后 Command + B 进行编译,在 Products 下可以看到编译产物:CodeStyleValidatePlugin.dylib 动态库。
编译 clang/clang++
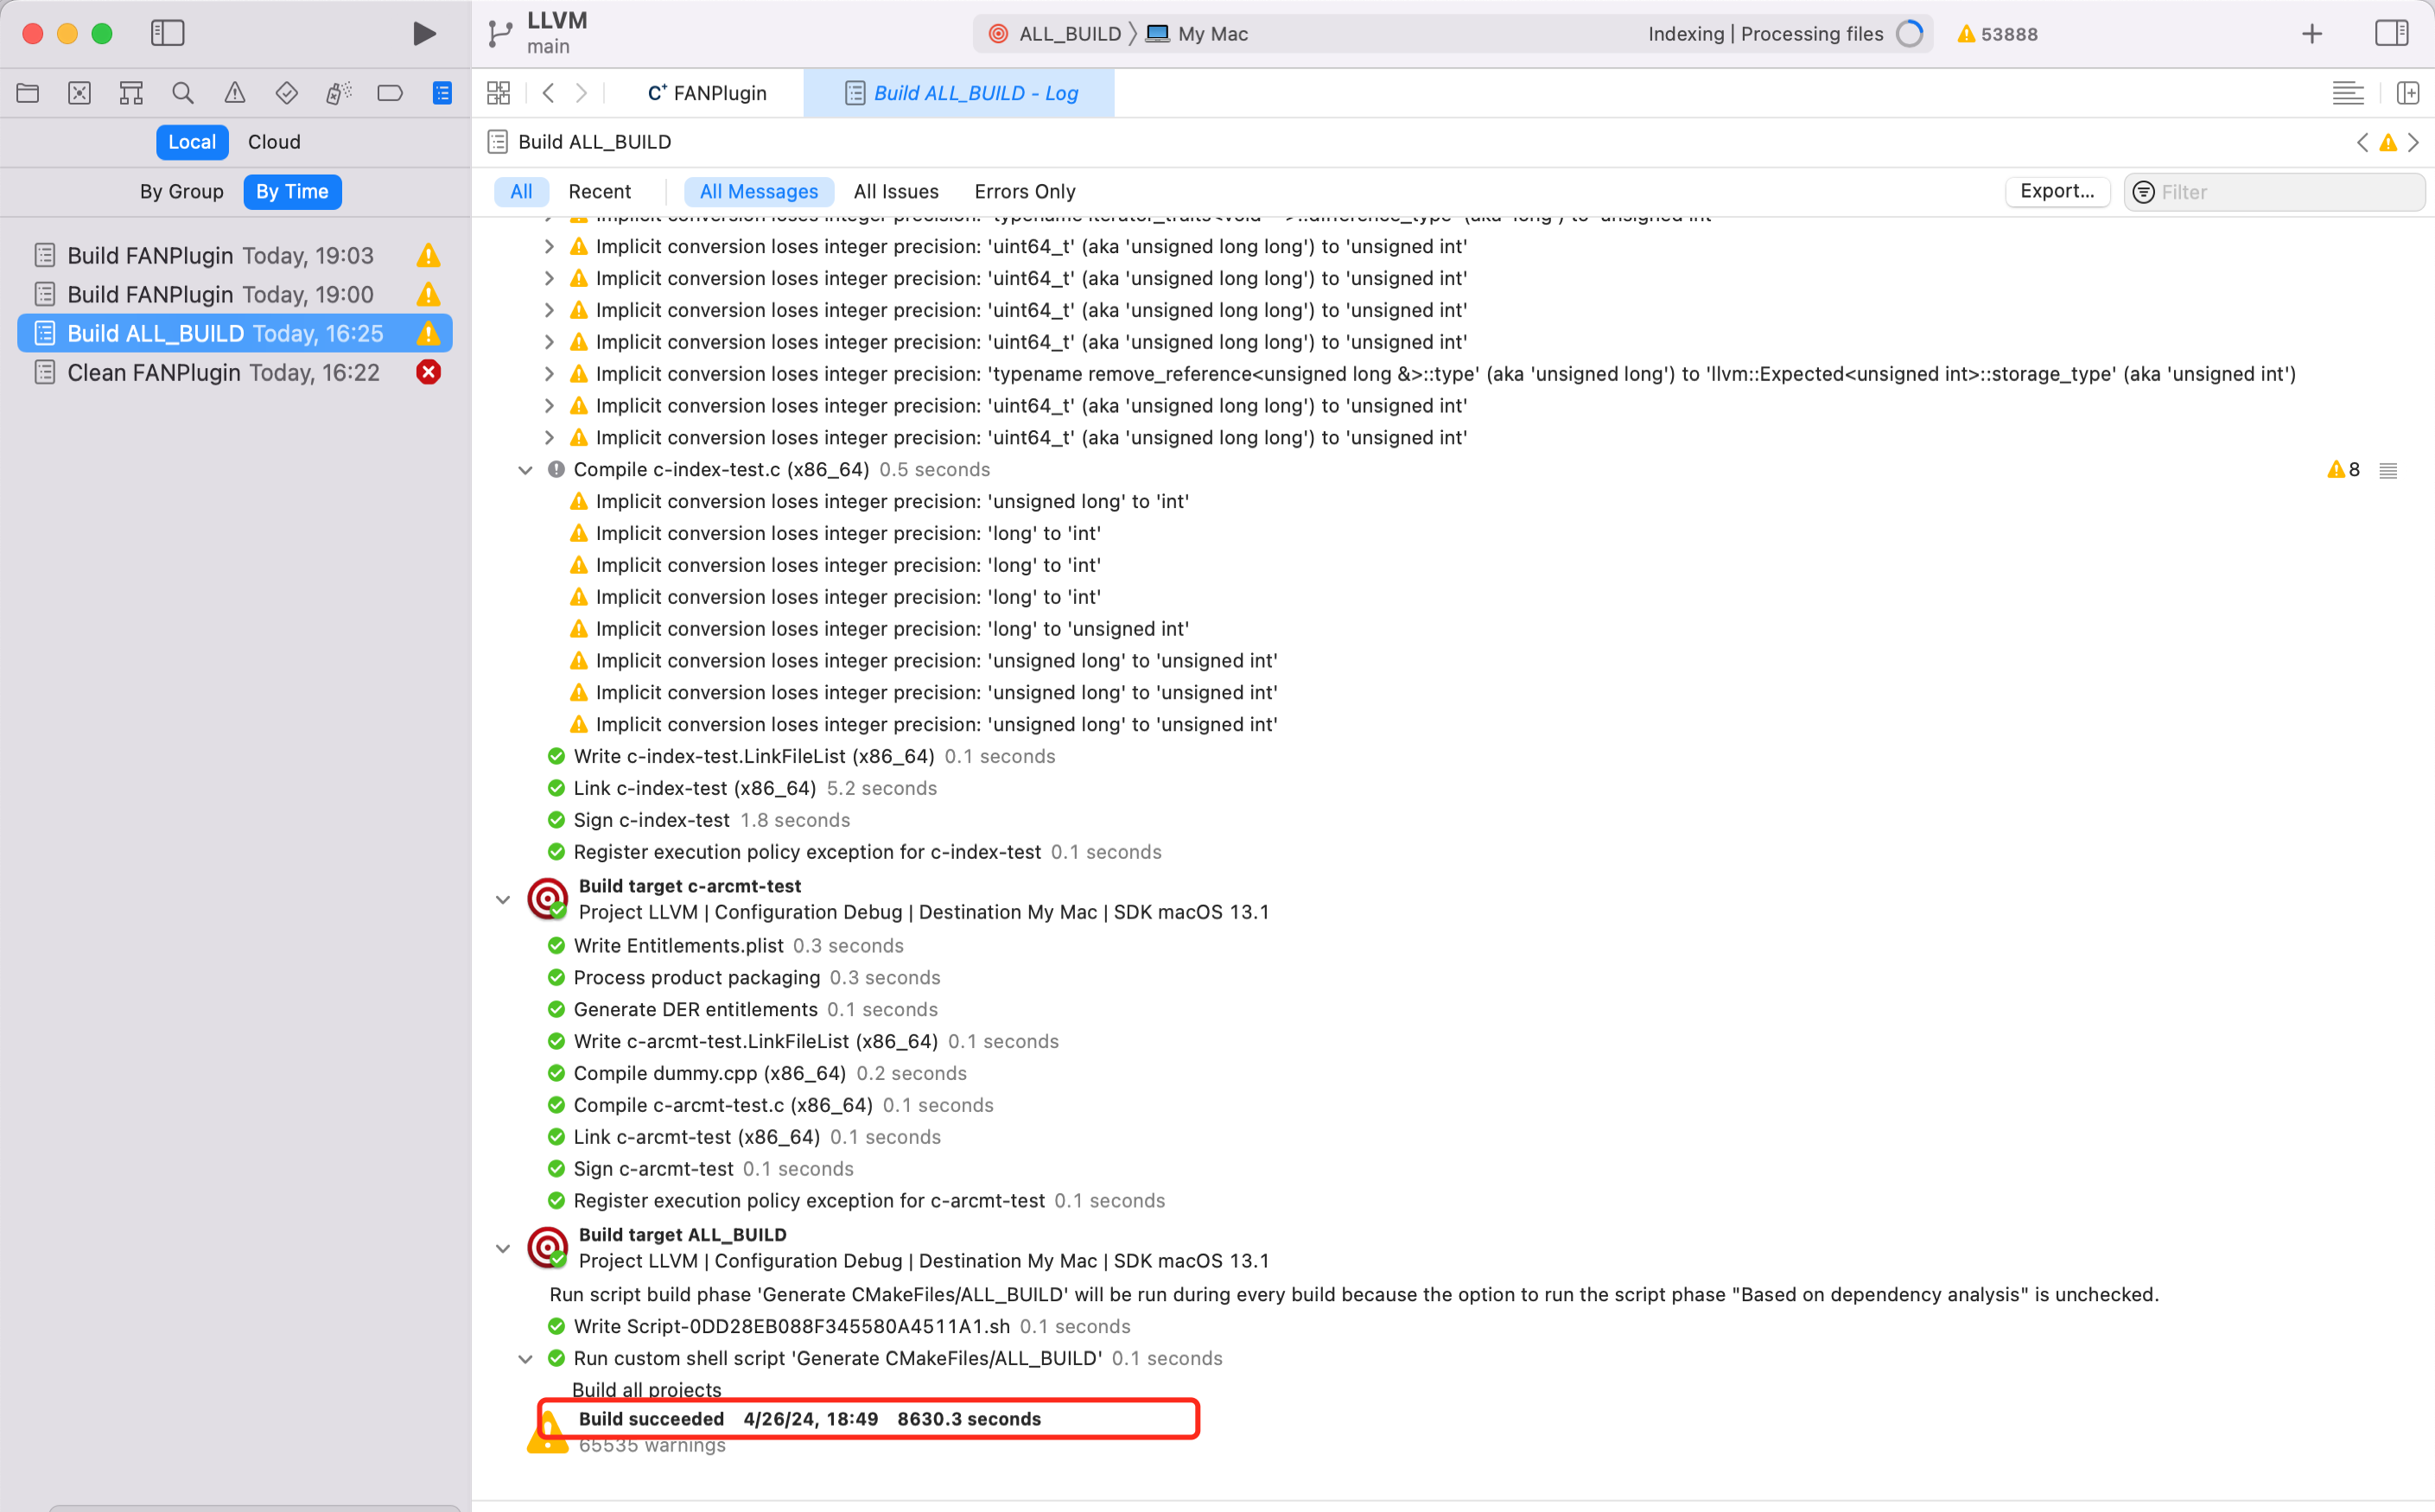
此步骤前需要做一步编译 Clang 的动作。Xcode 打开 LLVM 项目,选中 ALL_BUILD target,进行编译,此过程耗时较长(1h+)
此步骤的目的是:在 testLLVM 项目中,加载 CodeStyleValidatePlugin.dylib 插件可以成功。因为默认的 Xcode 使用的 clang/clang++ 编译器和编译 CodeStyleValidatePlugin.dylib 动态库不是一个版本。不做修改的话,Xcode 加载 CodeStyleValidatePlugin.dylib 会报错。所以需要先编译出同一个 LLVM 版本的 clang/clang++。
Xcode 加载插件
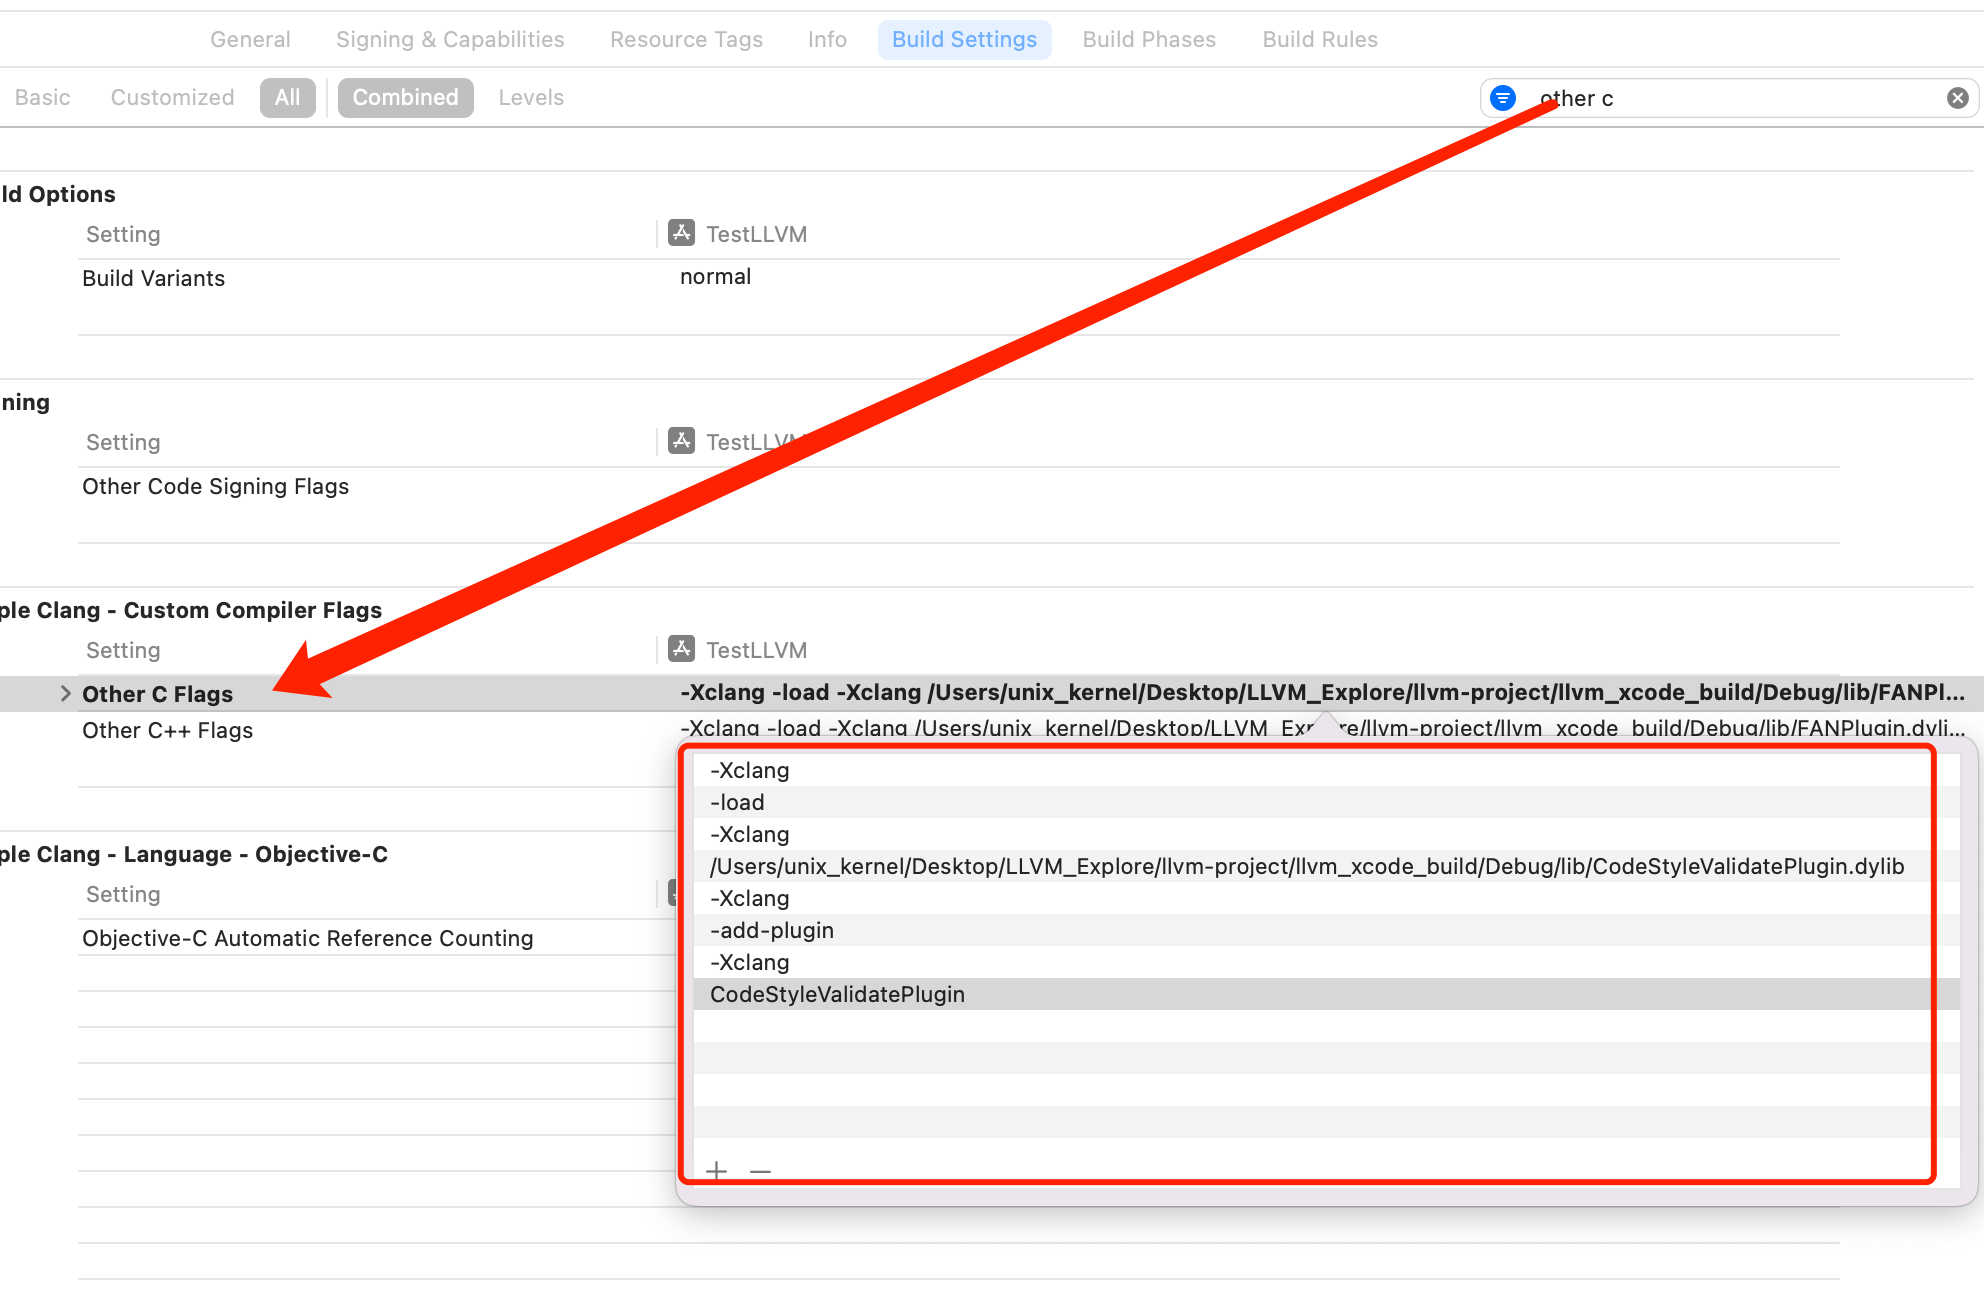
新建一个名字叫做 TestLLVM 的 Xcode 项目。要在 Xcode 中加载指定的动态库,需要修改 Build Settings 配置,操作路径为:Build Settings -> Other C Flags。
添加:
-Xclang-load-Xclang- 动态库路径
-Xclang-add-plugin-Xclang- 插件名称
设置编译器
在新创建的 TestLLVM Xcode 项目中加载创建的 CodeStyleValidatePlugin.dylib 会报错。原因是:由于 Clang 插件需要使用对应的版本去加载,如果版本不一致则会导致编译错误。如下所示:
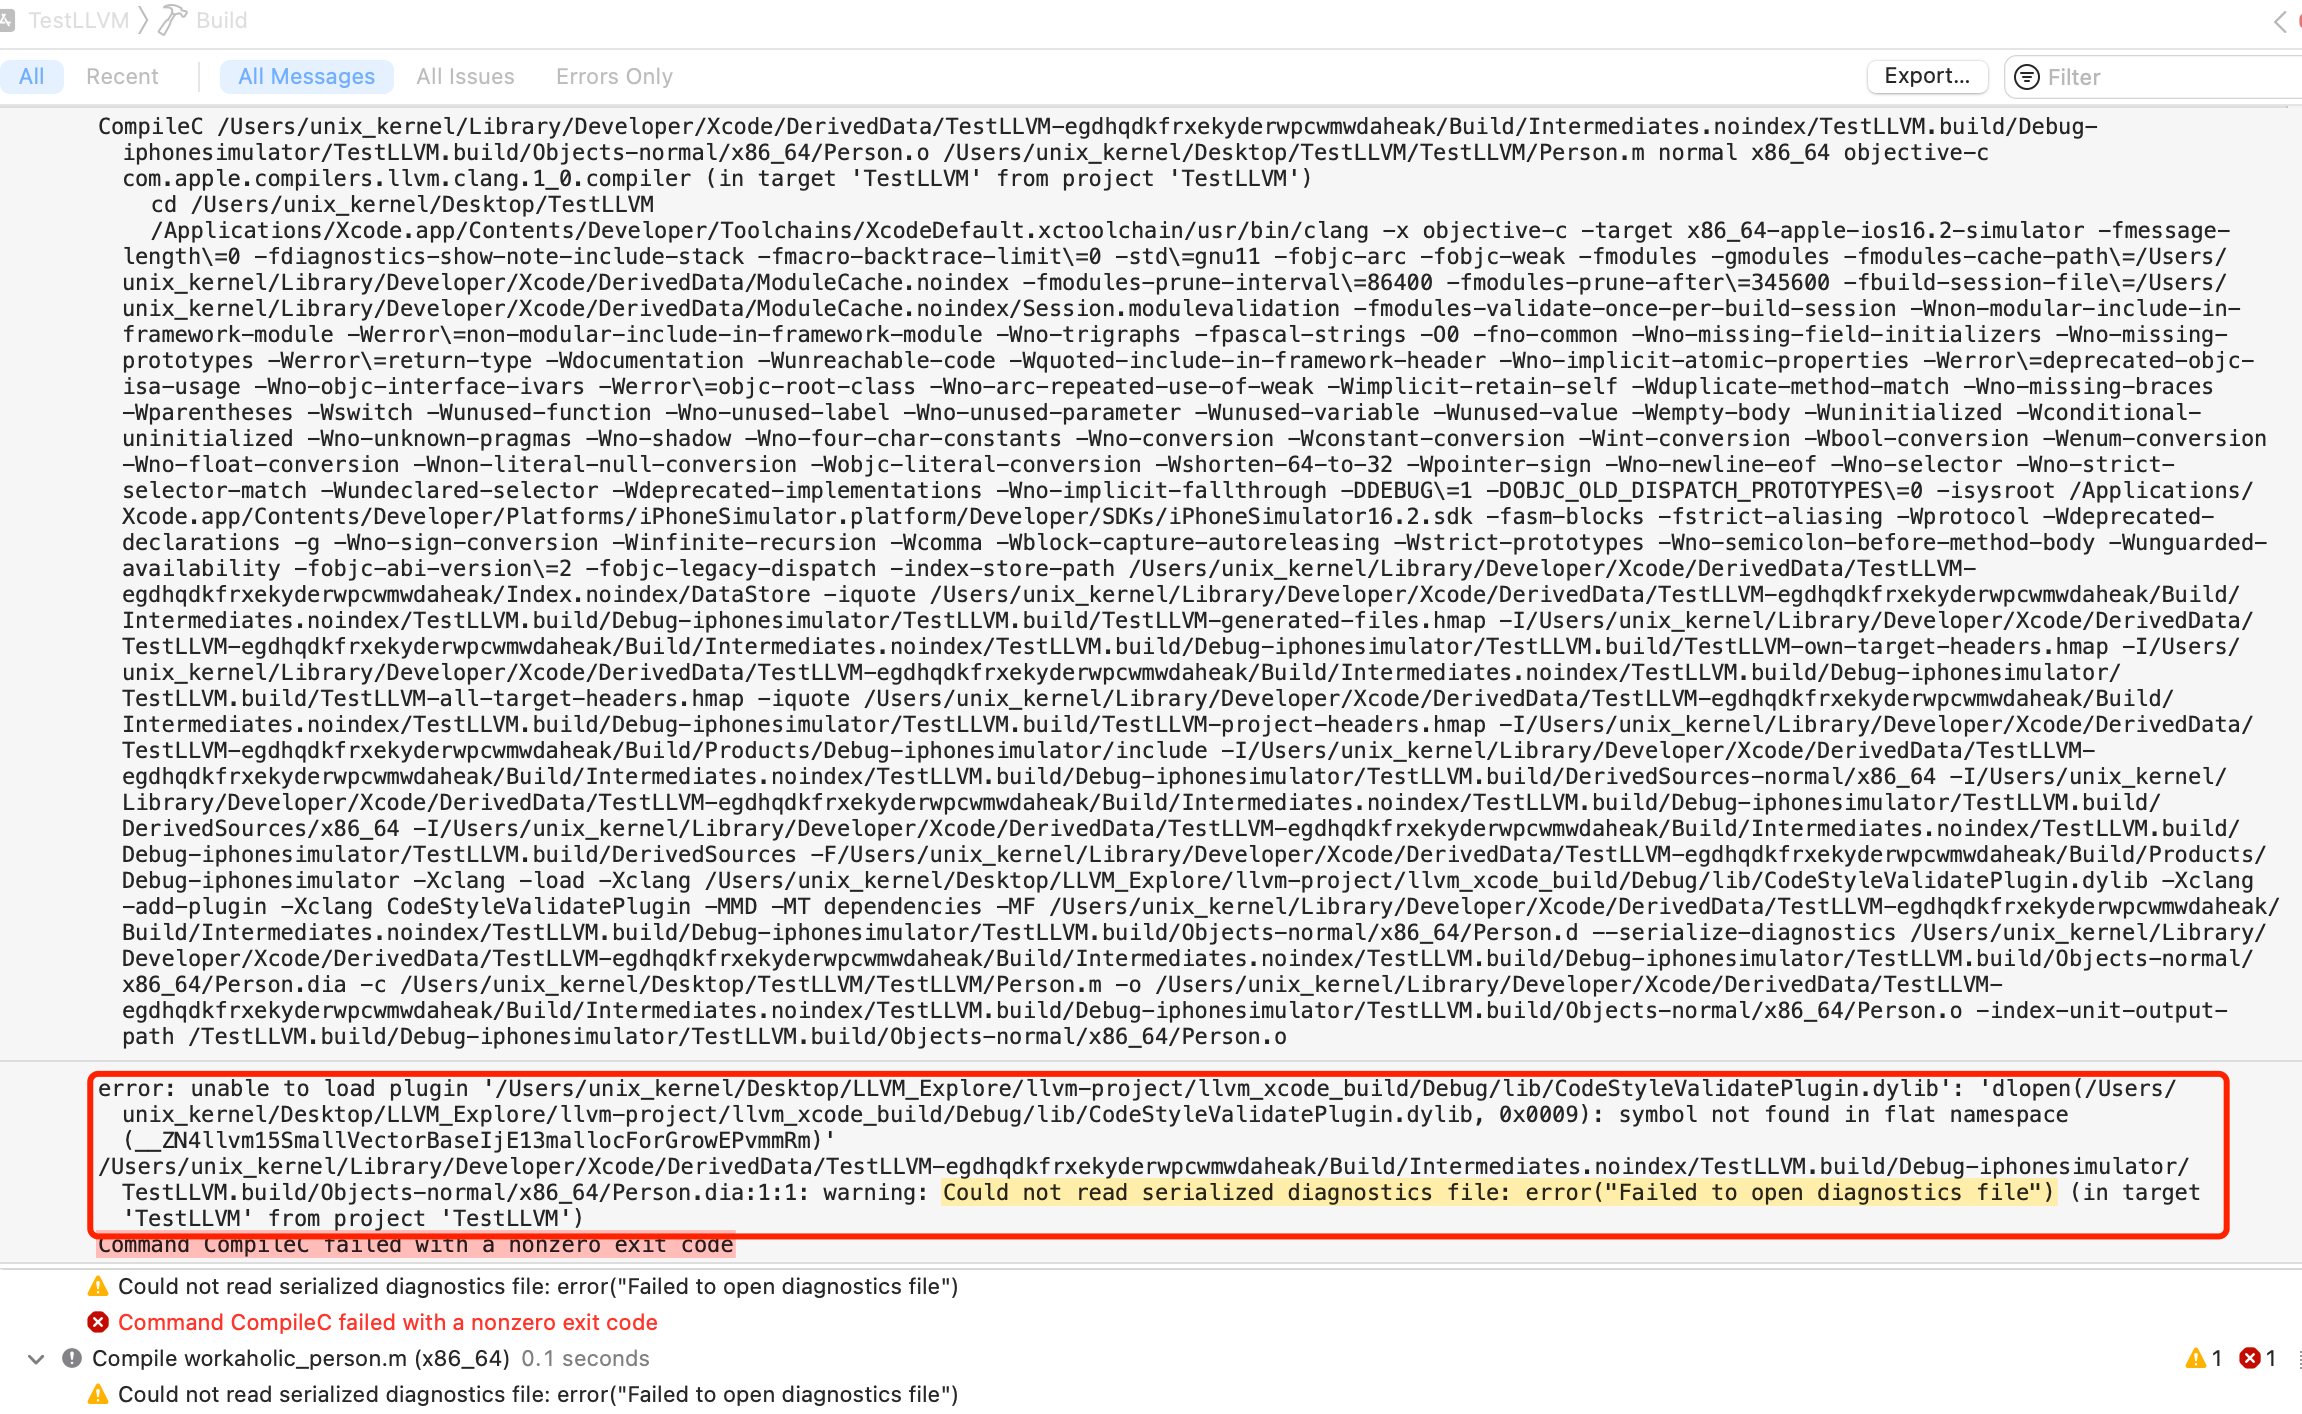
解决方案是在 Build Setiings 中增加2项用户自定义的设置:
-
CC:对应的是自己编译的 clang 的绝对路径 -
CXX:对应的是自己编译的 clang++ 绝对路径
如下所示:

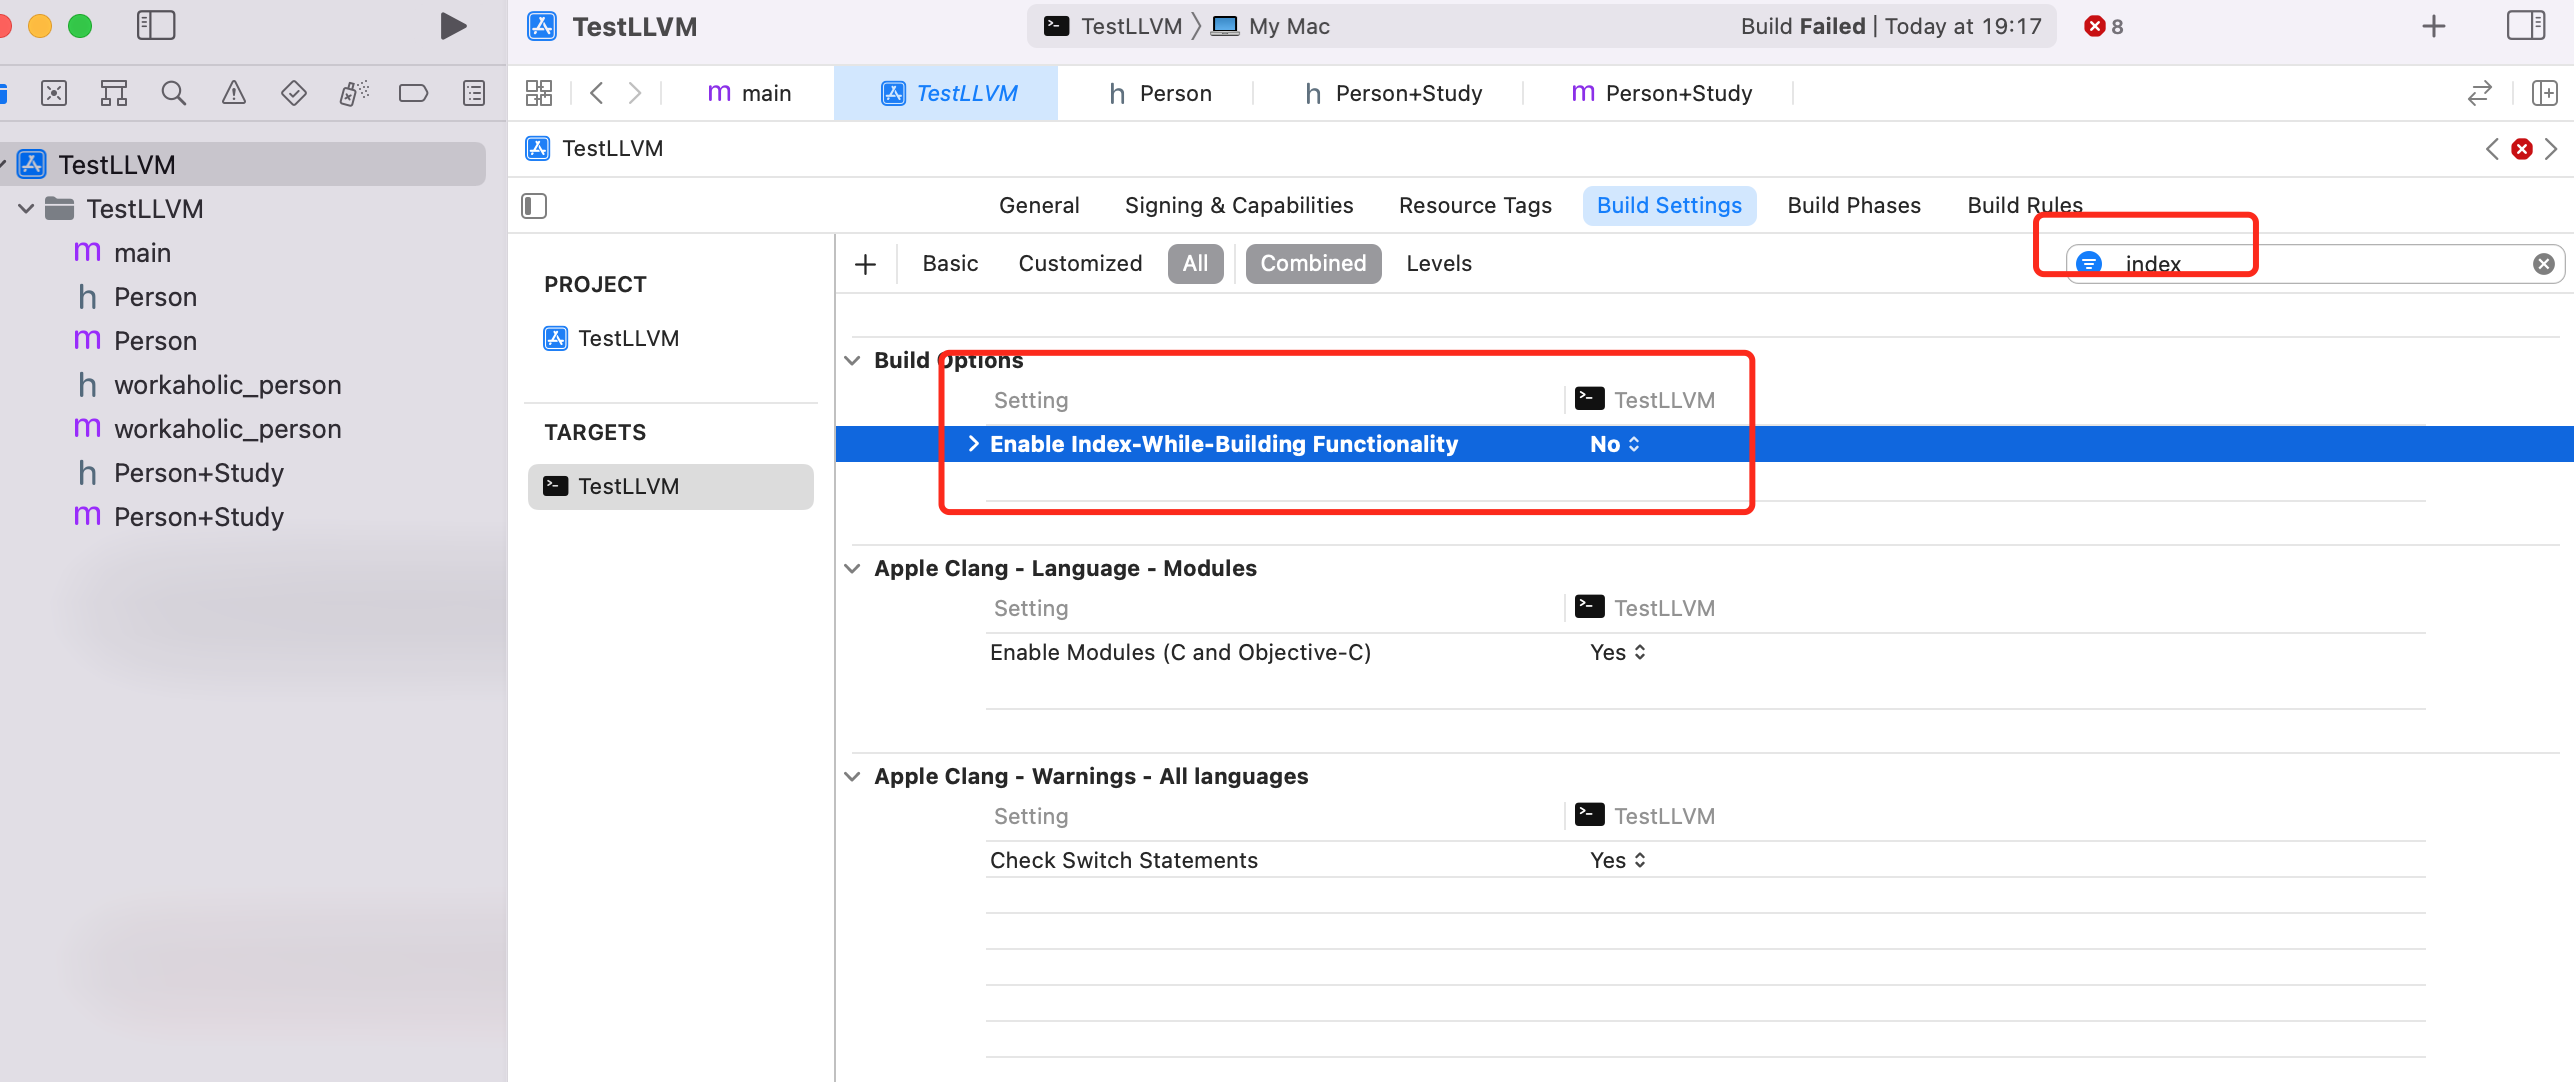
继续编译还是会报错,报错如下:
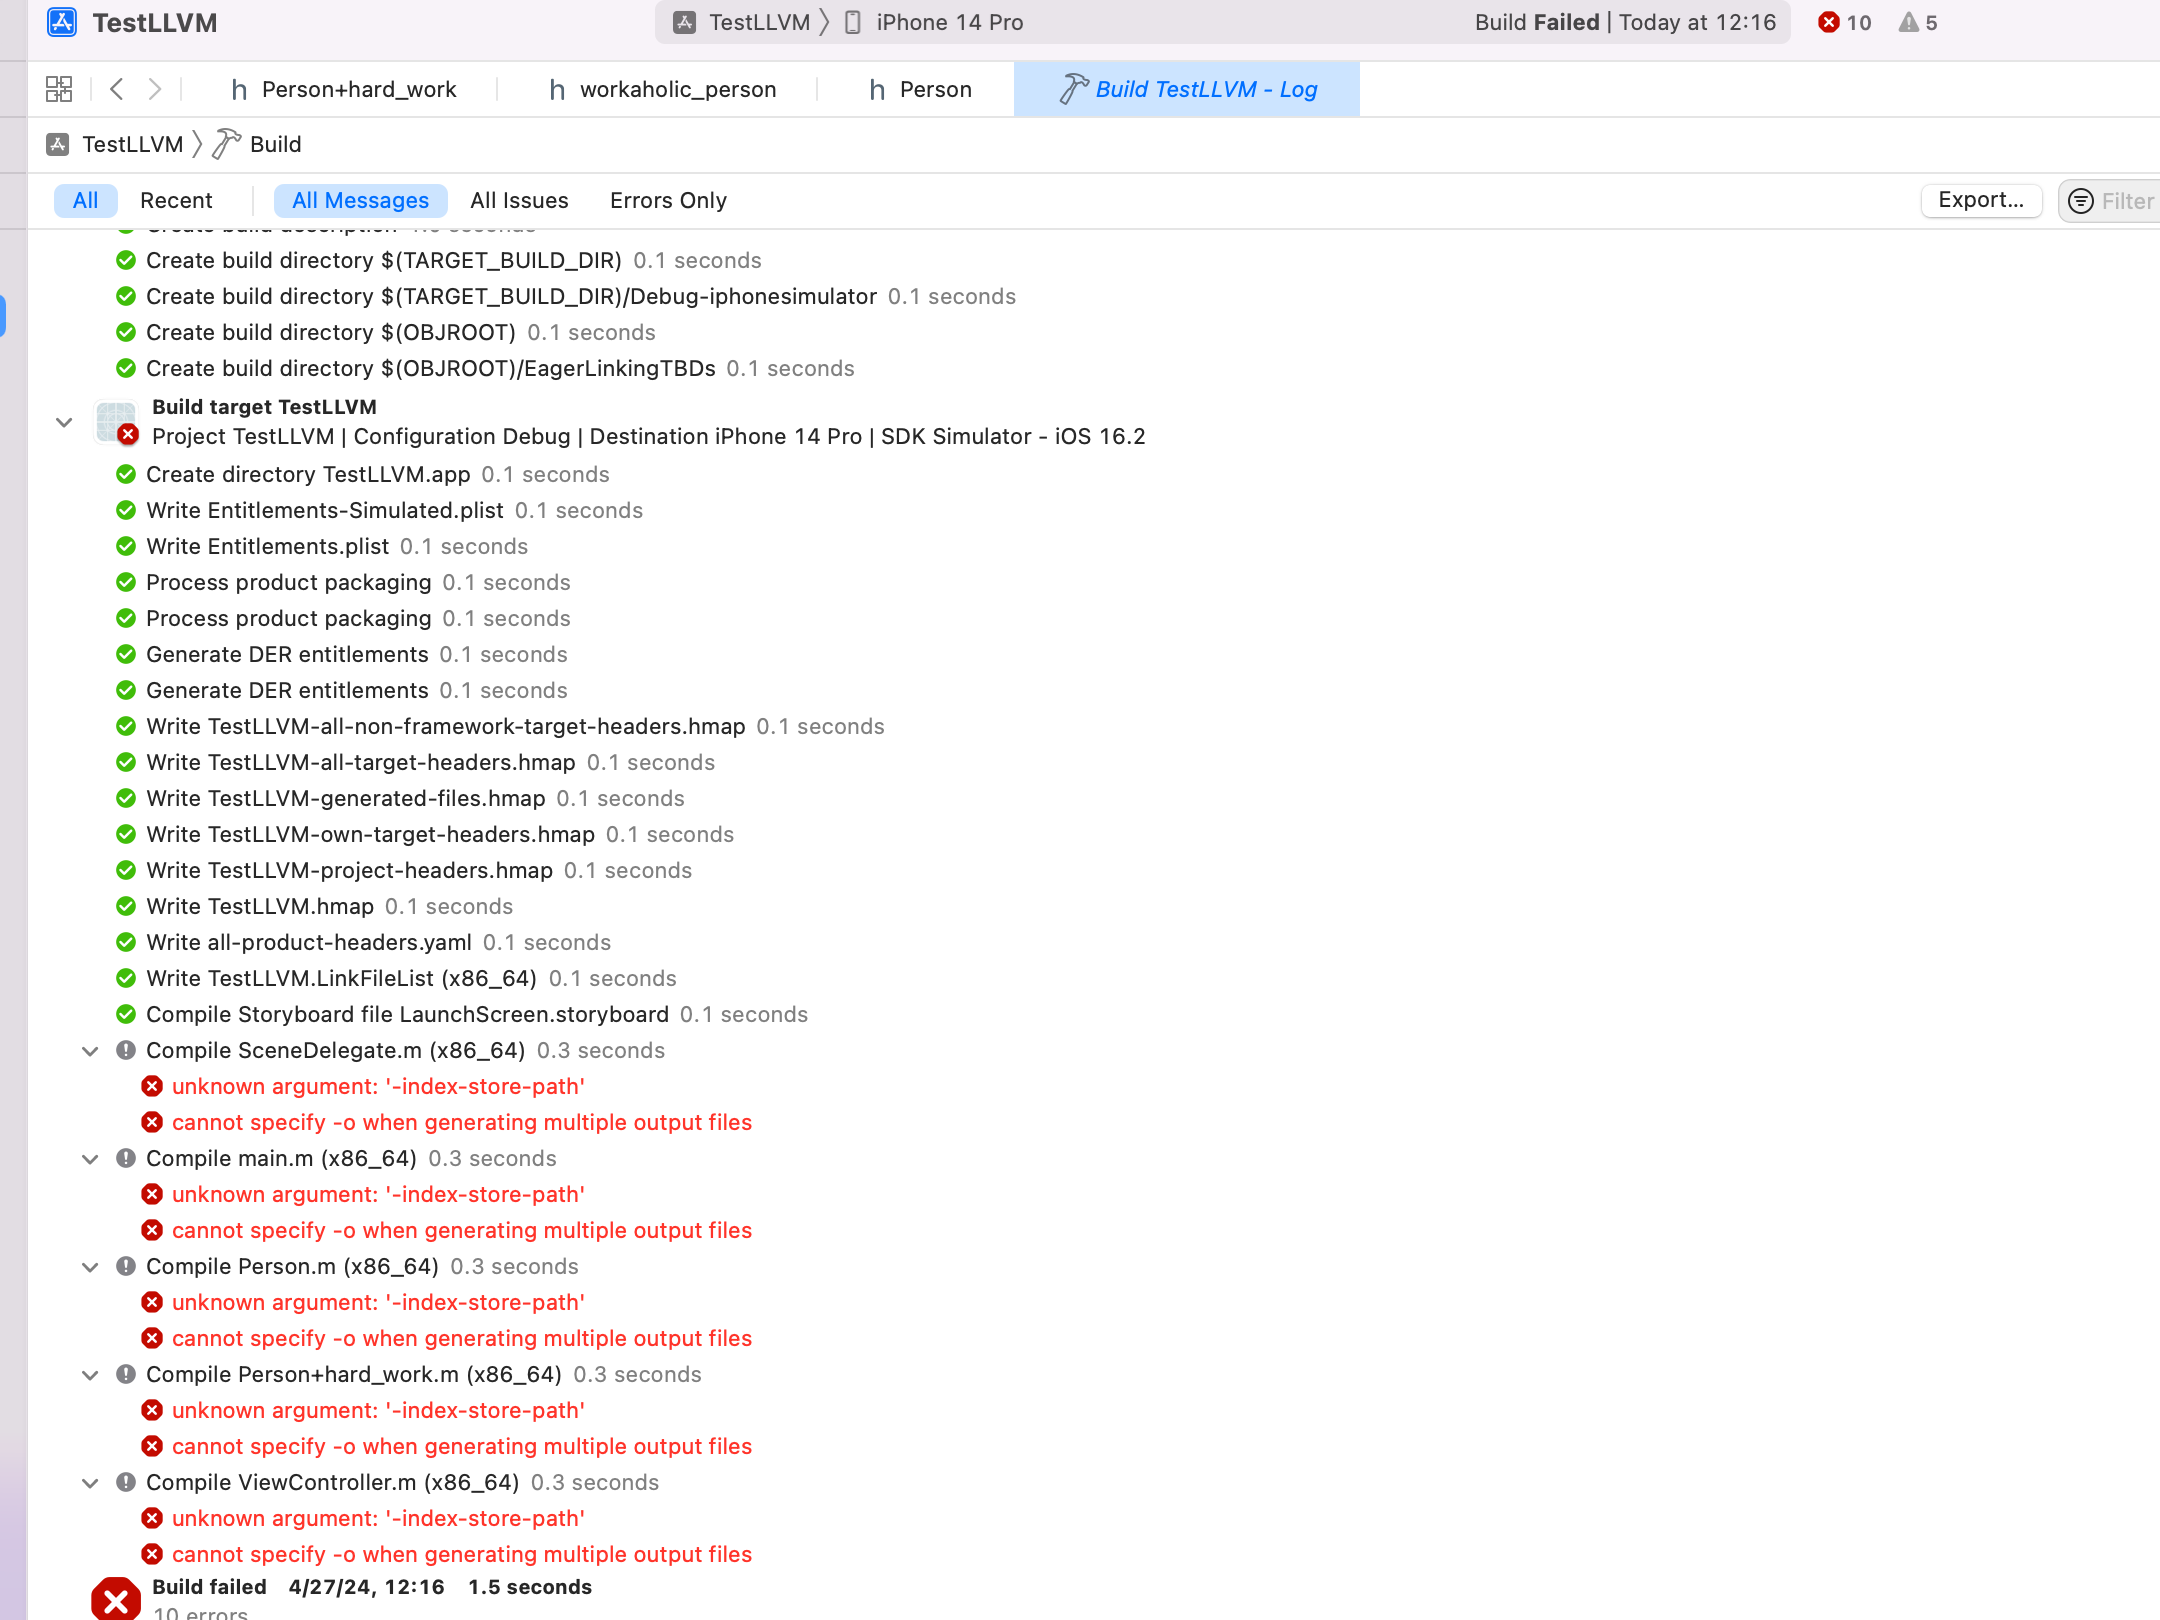
解决方案为:在 Build Settings 栏目中搜索 index,将 Enable Index-Wihle-Building Functionality 的 Default 改为 NO。
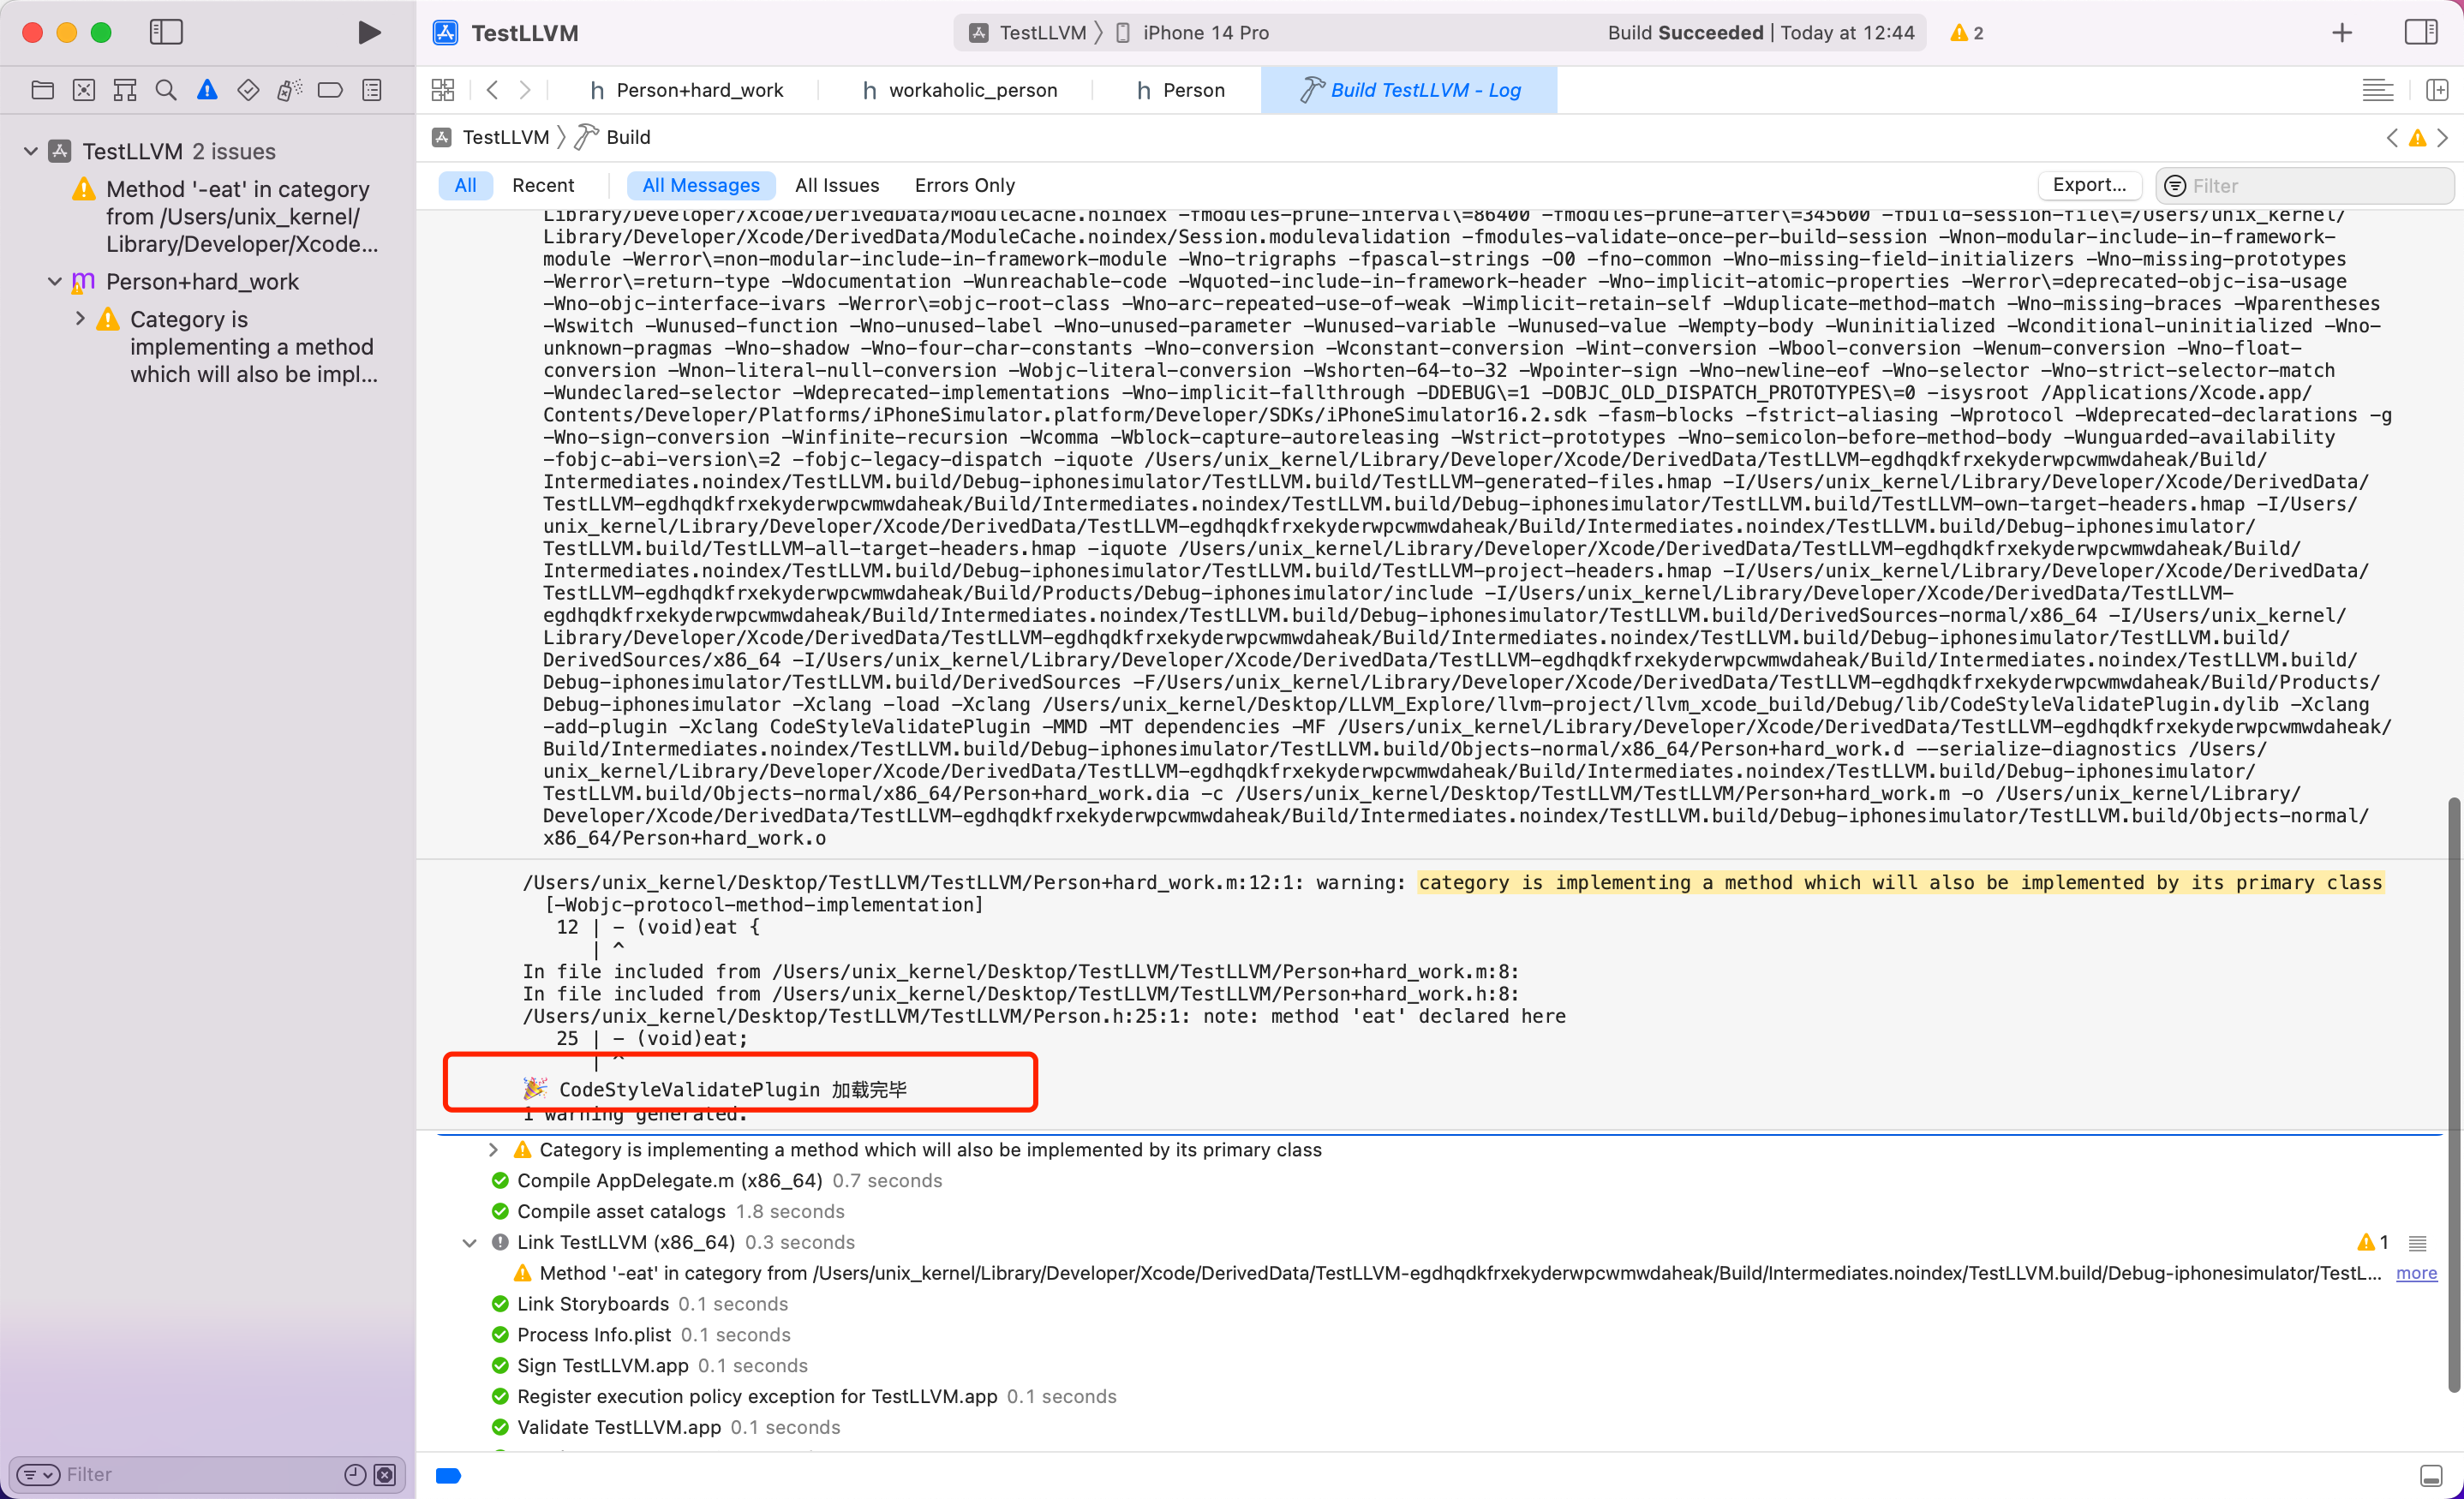
编译插件,验证正确性
编译项目后,会在编译日志看到 FANPlugin 插件的打印信息,说明前面的配置没有问题,接下去就是继续编写 FANPlugin.cpp 的逻辑代码,继续验证。
Tips: 由于重新修改了插件的源码,所以每次 Build 构建完 FANPlugin 之后,在 TestLLVM Xcode 项目中,最好每次都执行一下 Clean 操作。
编译成功,可以看到在日志中输出了我们编写的日志信息。
Clang 插件编写说明
AnalysisConsumer:AnalysisConsumer是 clang AST 中做实事儿的接口,根据具体情况ASTFrontendAction可能对应一个或多个AnalysisConsumerRecursiveASTVisitor&StmtVisitor:RecursiveASTVisitor是顶层的遍历 clang AST 的工具,虽然也能处理stmt级别的处理,但是终归没有StmtVisitor用的顺手PluginASTAction:clang 插件的关键组件之一。通过 PluginASTAction,可以在编译过程中运行额外的用户定义操作。这个类允许创建 AST 消费者对象,并处理插件命令行参数,以便根据需要执行特定操作。您可以通过实现ParseArgs方法来处理插件的命令行选项,以及通过覆盖getActionType方法来确定插件的执行时机,例如在主要操作之前或之后执行。这样的灵活性使得开发人员能够根据需求定制 clang 插件的行为ASTConsumer:用于处理抽象语法树(AST)的重要组件。ASTConsumer 负责遍历和处理由 clang 前端生成的 AST 节点,执行特定的操作或分析。通过实现 ASTConsumer,开发人员可以访问和处理 AST 中的各种节点,例如函数、变量声明、表达式等,以便进行静态分析、代码转换或其他编译器任务MatchFinder:提供类似 DSL 的方式用于匹配 AST 节点,用于做进一步的检验,获取节点来做判断或者进一步的处理。MatchFinder::MatchCallback:用于在 MatchFinder 中处理匹配结果的回调函数。当 MatchFinder 在抽象语法树(AST)中找到与匹配器描述的模式相匹配的节点时,会调用注册的 MatchCallback 来处理这些匹配结果。MatchCallback 通常包含一些虚拟方法,如run()、onStartOfTranslationUnit()、onEndOfTranslationUnit()等,开发人员可以根据需要重写这些方法来实现自定义的处理逻辑。例如,在run()方法中处理每个匹配结果,在onStartOfTranslationUnit()方法中处理每个翻译单元的开始,在onEndOfTranslationUnit()方法中处理每个翻译单元的结束。
继续完善代码
类名不符合规范的情况。
#import <Foundation/Foundation.h>

NS_ASSUME_NONNULL_BEGIN

@interface workaholic_person : NSObject

@end

NS_ASSUME_NONNULL_END
利用 Clang 查看 AST 指令为 clang -fmodules -fsyntax-only -Xclang -ast-dump workaholic_person.m
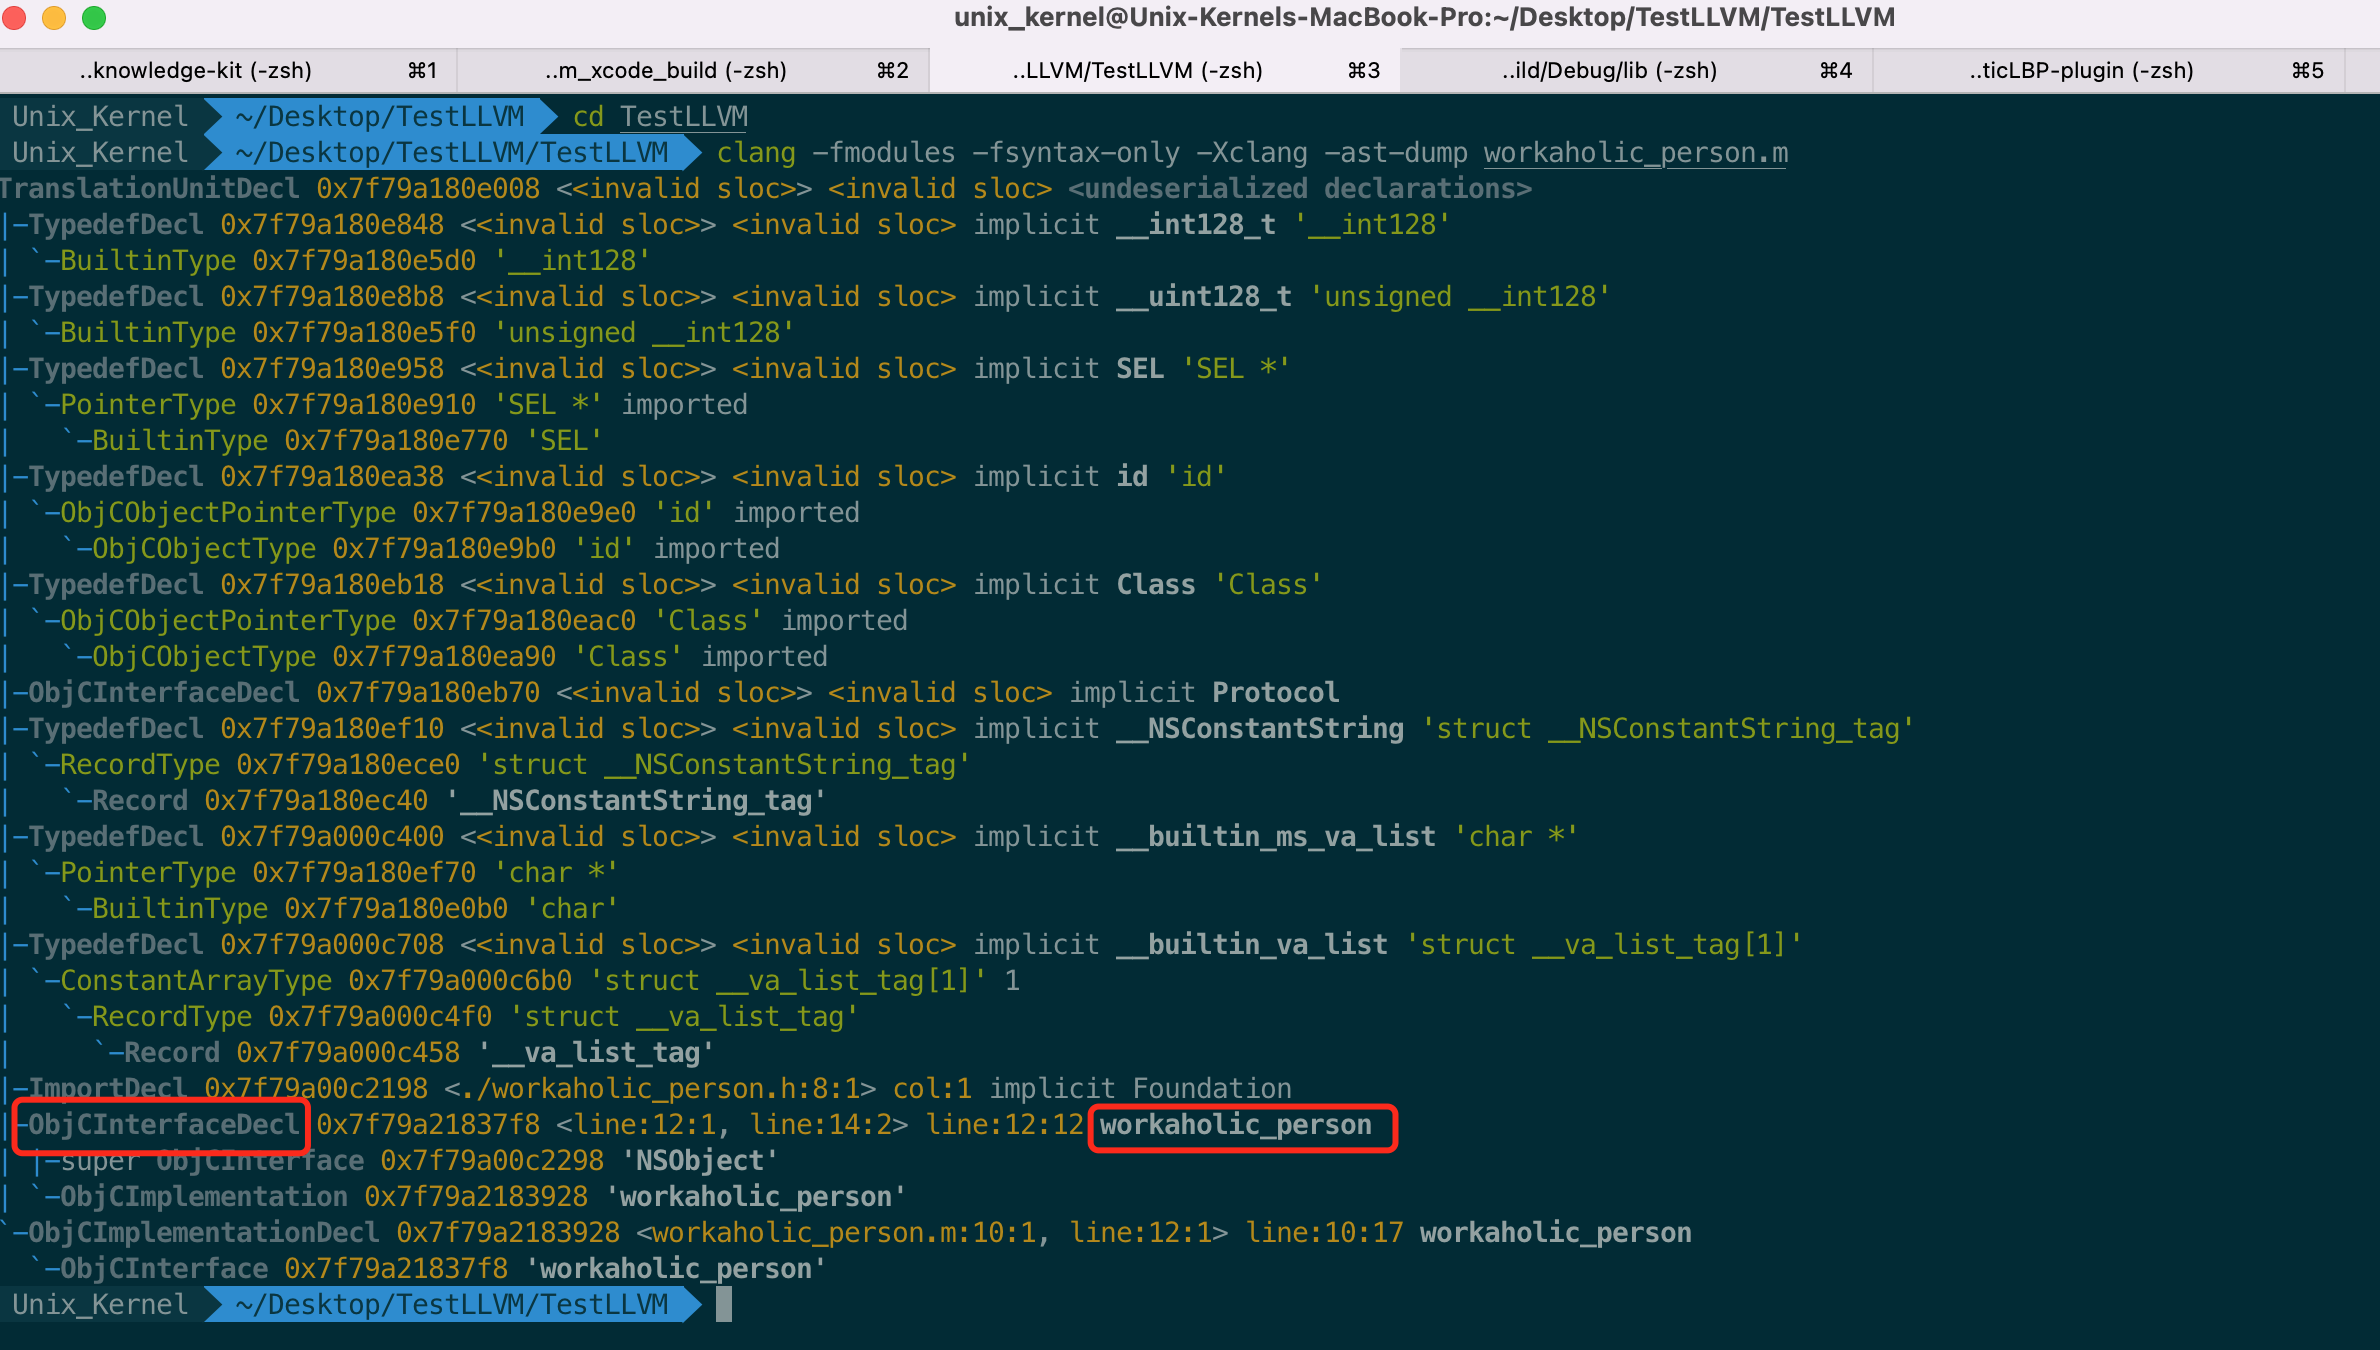
核心思路为:我们要分析类名不符合规范的情况,要精确报错,首先要识别到类名,利用 AST 的能力可以办到(类名在 AST 的 ObjCInterfaceDecl 节点上)。然后获取到类名的行号信息,精确报错。
步骤为:
- 注册插件,需要指定 Action 是什么。这里我们指定自定义的继承自
PluginASTAction的PluginASTAction - Action 内部会调用
CreateASTConsumer方法,所以需要创建一个继承自ASTConsumer的 consumer,即 ·FANCounsumer - Consumer 在 Xcode 解析完 AST 后会调用
HandleTranslationUnit方法,HandleTranslationUnit方法的参数是一个类行为ASTContext的对象,携带了 AST 的全部信息 - 然后创建一个
MatchFinder对象。在构造器里指定 Macther 找什么matcher.addMatcher(objcInterfaceDecl().bind("ObjCInterfaceDecl"), &handler),以及找到后做什么事情,将找到后的逻辑交给了一个 CallBack,即handler的void run(const MatchFinder::MatchResult &Result)方法 size_t pos = decl->getName().find('_')用来找类名中有没有下划线_。pos != StringRef::npos不等于StringRef::npos则说明找到了下划线,则执行括号里面的逻辑DiagnosticsEngine &D = ci.getDiagnostics()对象具有报错能力,D.Report()- 为了精确报错,需要找到具体的位置信息
SourceLocation loc = decl->getLocation().getLocWithOffset(pos)
完整代码
#include <iostream>
#include "clang/AST/AST.h"
#include "clang/AST/ASTConsumer.h"
#include "clang/ASTMatchers/ASTMatchers.h"
#include "clang/ASTMatchers/ASTMatchFinder.h"
#include "clang/Frontend/CompilerInstance.h"
#include "clang/Frontend/FrontendPluginRegistry.h"

#include <iostream>
#include <string>
#include <algorithm>

using namespace clang;
using namespace std;
using namespace llvm;
using namespace clang::ast_matchers;

#define CodeStyleValidateMethodDeclaration "ObjCMethodDecl"
#define CodeStyleValidatePropertyDeclaration "ObjcPropertyDecl"
#define CodeStyleValidateInterfaceDeclaration "ObjCInterfaceDecl"

namespace CodeStyleValidatePlugin {
    // 自定义 handler
    class CodeStyleValidateHandler : public MatchFinder::MatchCallback {
    private:
        CompilerInstance &ci;   // 编译器实例

        // 判断是否为开发者写的代码
        bool isDeveloperSourceCode (string filename) {
            if (filename.empty())
                return false;
            if(filename.find("/Applications/Xcode.app/") == 0)
                return false;
            return true;
        }

        // 判断属性是否需要用 Copy
        bool isShouldUseCopyAttribute(const string typeStr) {
            if (typeStr.find("NSString") != StringRef::npos ||
                typeStr.find("NSArray") != StringRef::npos ||
                typeStr.find("NSDictionary") != StringRef::npos
                ) {
                return true;
            }
            return false;
        }

        // 检测类名
        void validateInterfaceDeclaration(const ObjCInterfaceDecl *decl) {
            StringRef className = decl->getName();
            // 判断首字母不能以小写开头
            char c = className[0];
            if (isLowercase(c)) {
                std::string tempName = decl->getNameAsString();
                tempName[0] = toUppercase(c);
                StringRef replacement(tempName);
                SourceLocation nameStart = decl->getLocation();
                SourceLocation nameEnd = nameStart.getLocWithOffset(static_cast<int32_t>(className.size() - 1));
                FixItHint fixItHint = FixItHint::CreateReplacement(SourceRange(nameStart, nameEnd), replacement);

                //报告警告
                SourceLocation location = decl->getLocation();
                showWaringReport(location, "☠️ 杭城小刘提示你:Class 名不能以小写字母开头 ⚠️", &fixItHint);
            }

            // 判断下划线不能在类名有没有包含下划线
            size_t pos = decl->getName().find('_');
            if (pos != StringRef::npos) {
                std::string tempName = decl->getNameAsString();
                std::string::iterator end_pos = std::remove(tempName.begin(), tempName.end(), '_');
                tempName.erase(end_pos, tempName.end());
                StringRef replacement(tempName);
                SourceLocation nameStart = decl->getLocation();
                SourceLocation nameEnd = nameStart.getLocWithOffset(static_cast<int32_t>(className.size() - 1));
                FixItHint fixItHint = FixItHint::CreateReplacement(SourceRange(nameStart, nameEnd), replacement);

                //报告警告
                SourceLocation loc = decl->getLocation().getLocWithOffset(static_cast<int32_t>(pos));
                showWaringReport(loc, "☠️ 杭城小刘提示你:Class 名中不能带有下划线 ⚠️", &fixItHint);
            }
        }

        // 检测属性
        void validatePropertyDeclaration(const clang::ObjCPropertyDecl *propertyDecl) {

            StringRef name = propertyDecl -> getName();
            // 名称必须以小写字母开头
            bool checkUppercaseNameIndex = 0;
            if (name.find('_') == 0) {
                // 以下划线开头则首字母位置变为1
                checkUppercaseNameIndex = 1;
            }
            char c = name[checkUppercaseNameIndex];
            if (isUppercase(c)) {
                // 修正提示
                std::string tempName = name.str();
                tempName[checkUppercaseNameIndex] = toLowercase(c);
                StringRef replacement(tempName);
                SourceLocation nameStart = propertyDecl->getLocation();
                SourceLocation nameEnd = nameStart.getLocWithOffset(static_cast<int32_t>(name.size() - 1));
                FixItHint fixItHint = FixItHint::CreateReplacement(SourceRange(nameStart, nameEnd), replacement);
                SourceLocation location = propertyDecl->getLocation();
                // 报告警告
                showWaringReport(location, "☠️ 杭城小刘提示你:@property 名称必须以小写字母开头 ⚠️", &fixItHint);
            }

            // 检测属性
            if (propertyDecl->getTypeSourceInfo()) {
                ObjCPropertyAttribute::Kind attrKind = propertyDecl->getPropertyAttributes();
                SourceLocation location = propertyDecl->getLocation();
                string typeStr = propertyDecl->getType().getAsString();
                string propertyName = propertyDecl->getNameAsString();

                // 判断 Property 需要使用 copy
                if (isShouldUseCopyAttribute(typeStr) && !(attrKind & ObjCPropertyAttribute::Kind::kind_copy)) {
                    showWaringReport(location, "☠️ 杭城小刘提示你:建议使用 copy 代替 strong ⚠️", NULL);
                }

                // 判断int需要使用NSInteger
                if(!typeStr.compare("int")){
                    showWaringReport(location, "☠️ 杭城小刘提示你:建议使用 NSInteger 替换 int ⚠️", NULL);
                }
                // 判断delegat使用weak
                if ((typeStr.find("<")!=string::npos && typeStr.find(">")!=string::npos) && (typeStr.find("Array")==string::npos) && !(attrKind & ObjCPropertyAttribute::Kind::kind_weak)) {
                    showErrorReport(location, "☠️ 杭城小刘提示你:建议使用 weak 定义 Delegate ⚠️", NULL);
                }
            }
        }

        // 检测方法
        void validateMethodDeclaration(string fileName, const clang::ObjCMethodDecl *methodDecl) {
            // 检查名称的每部分,都不允许以大写字母开头
            Selector sel = methodDecl -> getSelector();
            int selectorPartCount = methodDecl -> getNumSelectorLocs();
            for (int i = 0; i < selectorPartCount; i++) {
                 StringRef selName = sel.getNameForSlot(i);
                 char c = selName[0];
                 if (isUppercase(c)) {
                     // 修正提示
                     std::string tempName = selName.str();
                     tempName[0] = toLowercase(c);
                     StringRef replacement(tempName);
                     SourceLocation nameStart = methodDecl -> getSelectorLoc(i);
                     SourceLocation nameEnd = nameStart.getLocWithOffset(static_cast<int32_t>(selName.size() - 1));
                     FixItHint fixItHint = FixItHint::CreateReplacement(SourceRange(nameStart, nameEnd), replacement);

                     // 报告警告
                     SourceLocation location = methodDecl->getLocation();
                     showWaringReport(location, "☠️ 杭城小刘提示你:方法名要以小写开头 ⚠️", &fixItHint);
                 }
            }

            // 检测方法中定义的参数名称是否存在大写开头
            for (ObjCMethodDecl::param_const_iterator it = methodDecl->param_begin(); it != methodDecl->param_end(); it++) {
                const ParmVarDecl *parmVarDecl = *it;
                StringRef name = parmVarDecl -> getName();
                char c = name[0];
                if (isUppercase(c)) {
                    // 修正提示
                    std::string tempName = name.str();
                    tempName[0] = toLowercase(c);
                    StringRef replacement(tempName);
                    SourceLocation nameStart = parmVarDecl -> getLocation();
                    SourceLocation nameEnd = nameStart.getLocWithOffset(static_cast<int32_t>(name.size() - 1));
                    FixItHint fixItHint = FixItHint::CreateReplacement(SourceRange(nameStart, nameEnd), replacement);

                    //报告警告
                    SourceLocation location = methodDecl->getLocation();
                    showWaringReport(location, "☠️ 杭城小刘提示你:参数名称要小写开头 ⚠️", &fixItHint);
                }
            }
        }


        template <unsigned N>
        /// 抛出警告
        /// @param Loc 位置
        /// @param Hint 修改提示
        void showWaringReport(SourceLocation Loc, const char (&FormatString)[N], FixItHint *Hint) {
            DiagnosticsEngine &diagEngine = ci.getDiagnostics();
            unsigned DiagID = diagEngine.getCustomDiagID(clang::DiagnosticsEngine::Warning, FormatString);
            (Hint!=NULL) ? diagEngine.Report(Loc, DiagID) << *Hint : diagEngine.Report(Loc, DiagID);
        }

        template <unsigned N>
        /// 抛出错误
        /// @param Loc 位置
        /// @param Hint 修改提示
        void showErrorReport(SourceLocation Loc, const char (&FormatString)[N], FixItHint *Hint) {
            DiagnosticsEngine &diagEngine = ci.getDiagnostics();
            unsigned DiagID = diagEngine.getCustomDiagID(clang::DiagnosticsEngine::Error, FormatString);
            (Hint!=NULL) ? diagEngine.Report(Loc, DiagID) << *Hint : diagEngine.Report(Loc, DiagID);
        }

    public:
        CodeStyleValidateHandler(CompilerInstance &ci) :ci(ci) {}

        // 主要方法,分配 类、方法、属性 做不同处理
        void run(const MatchFinder::MatchResult &Result) override {
            if (const ObjCInterfaceDecl *interfaceDecl = Result.Nodes.getNodeAs<ObjCInterfaceDecl>(CodeStyleValidateInterfaceDeclaration)) {
                string filename = ci.getSourceManager().getFilename(interfaceDecl->getSourceRange().getBegin()).str();
                if(isDeveloperSourceCode(filename)){
                    // 类的检测
                    validateInterfaceDeclaration(interfaceDecl);
                }
            }

            if (const ObjCPropertyDecl *propertyDecl = Result.Nodes.getNodeAs<ObjCPropertyDecl>(CodeStyleValidatePropertyDeclaration)) {
                string filename = ci.getSourceManager().getFilename(propertyDecl->getSourceRange().getBegin()).str();
                if(isDeveloperSourceCode(filename)) {
                    // 属性的检测
                    validatePropertyDeclaration(propertyDecl);
                }
            }

            if (const ObjCMethodDecl *methodDecl = Result.Nodes.getNodeAs<ObjCMethodDecl>(CodeStyleValidateMethodDeclaration)) {
                string filename = ci.getSourceManager().getFilename(methodDecl->getSourceRange().getBegin()).str();
                if(isDeveloperSourceCode(filename)) {
                    // 方法的检测
                    validateMethodDeclaration(filename, methodDecl);
                }
            }
        }
    };

    // 自定义的处理工具
    class CodeStyleValidateASTConsumer: public ASTConsumer {
    private:
        MatchFinder matcher;
        CodeStyleValidateHandler handler;
    public:
        //调用 CreateASTConsumer 方法后就会加载 Consumer 里面的方法
        CodeStyleValidateASTConsumer(CompilerInstance &ci) :handler(ci) {
            matcher.addMatcher(objcInterfaceDecl().bind(CodeStyleValidateInterfaceDeclaration), &handler);
            matcher.addMatcher(objcMethodDecl().bind(CodeStyleValidateMethodDeclaration), &handler);
            matcher.addMatcher(objcPropertyDecl().bind(CodeStyleValidatePropertyDeclaration), &handler);
        }

        // 遍历完一次语法树就会调用一次下面方法。该方法通常被用来处理整个翻译单元的 AST,进行进一步的分析、处理或者其他操作。在处理完整个 AST 后,开发者可以在这个方法中执行他们需要的操作,比如生成代码、执行静态分析、进行重构等。
        void HandleTranslationUnit(ASTContext &context) override {
            matcher.matchAST(context);
        }
    };

    // 入口,解析 AST 后的动作
    class ValidateCodeStyleAction: public PluginASTAction {
        std::set<std::string> ParsedTemplates;
    public:
        // 需要返回一个 Consumer,所以继续创建一个继承自 ASTConsumer 的 Consumer
        unique_ptr<ASTConsumer> CreateASTConsumer(CompilerInstance &ci, StringRef iFile) override {
            return unique_ptr<CodeStyleValidateASTConsumer> (new CodeStyleValidateASTConsumer(ci)); // 使用自定义的处理工具
        }

        bool ParseArgs(const CompilerInstance &ci, const std::vector<std::string> &args) override {
            return true;
        }
    };
}

// 注册插件,告诉 LLVM 插件对应的 Action 是 FANAction
static FrontendPluginRegistry::Add<CodeStyleValidatePlugin::ValidateCodeStyleAction>
X("CodeStyleValidatePlugin", "This plugin is designed for scanning code styles, powered by @FantasticLBP");
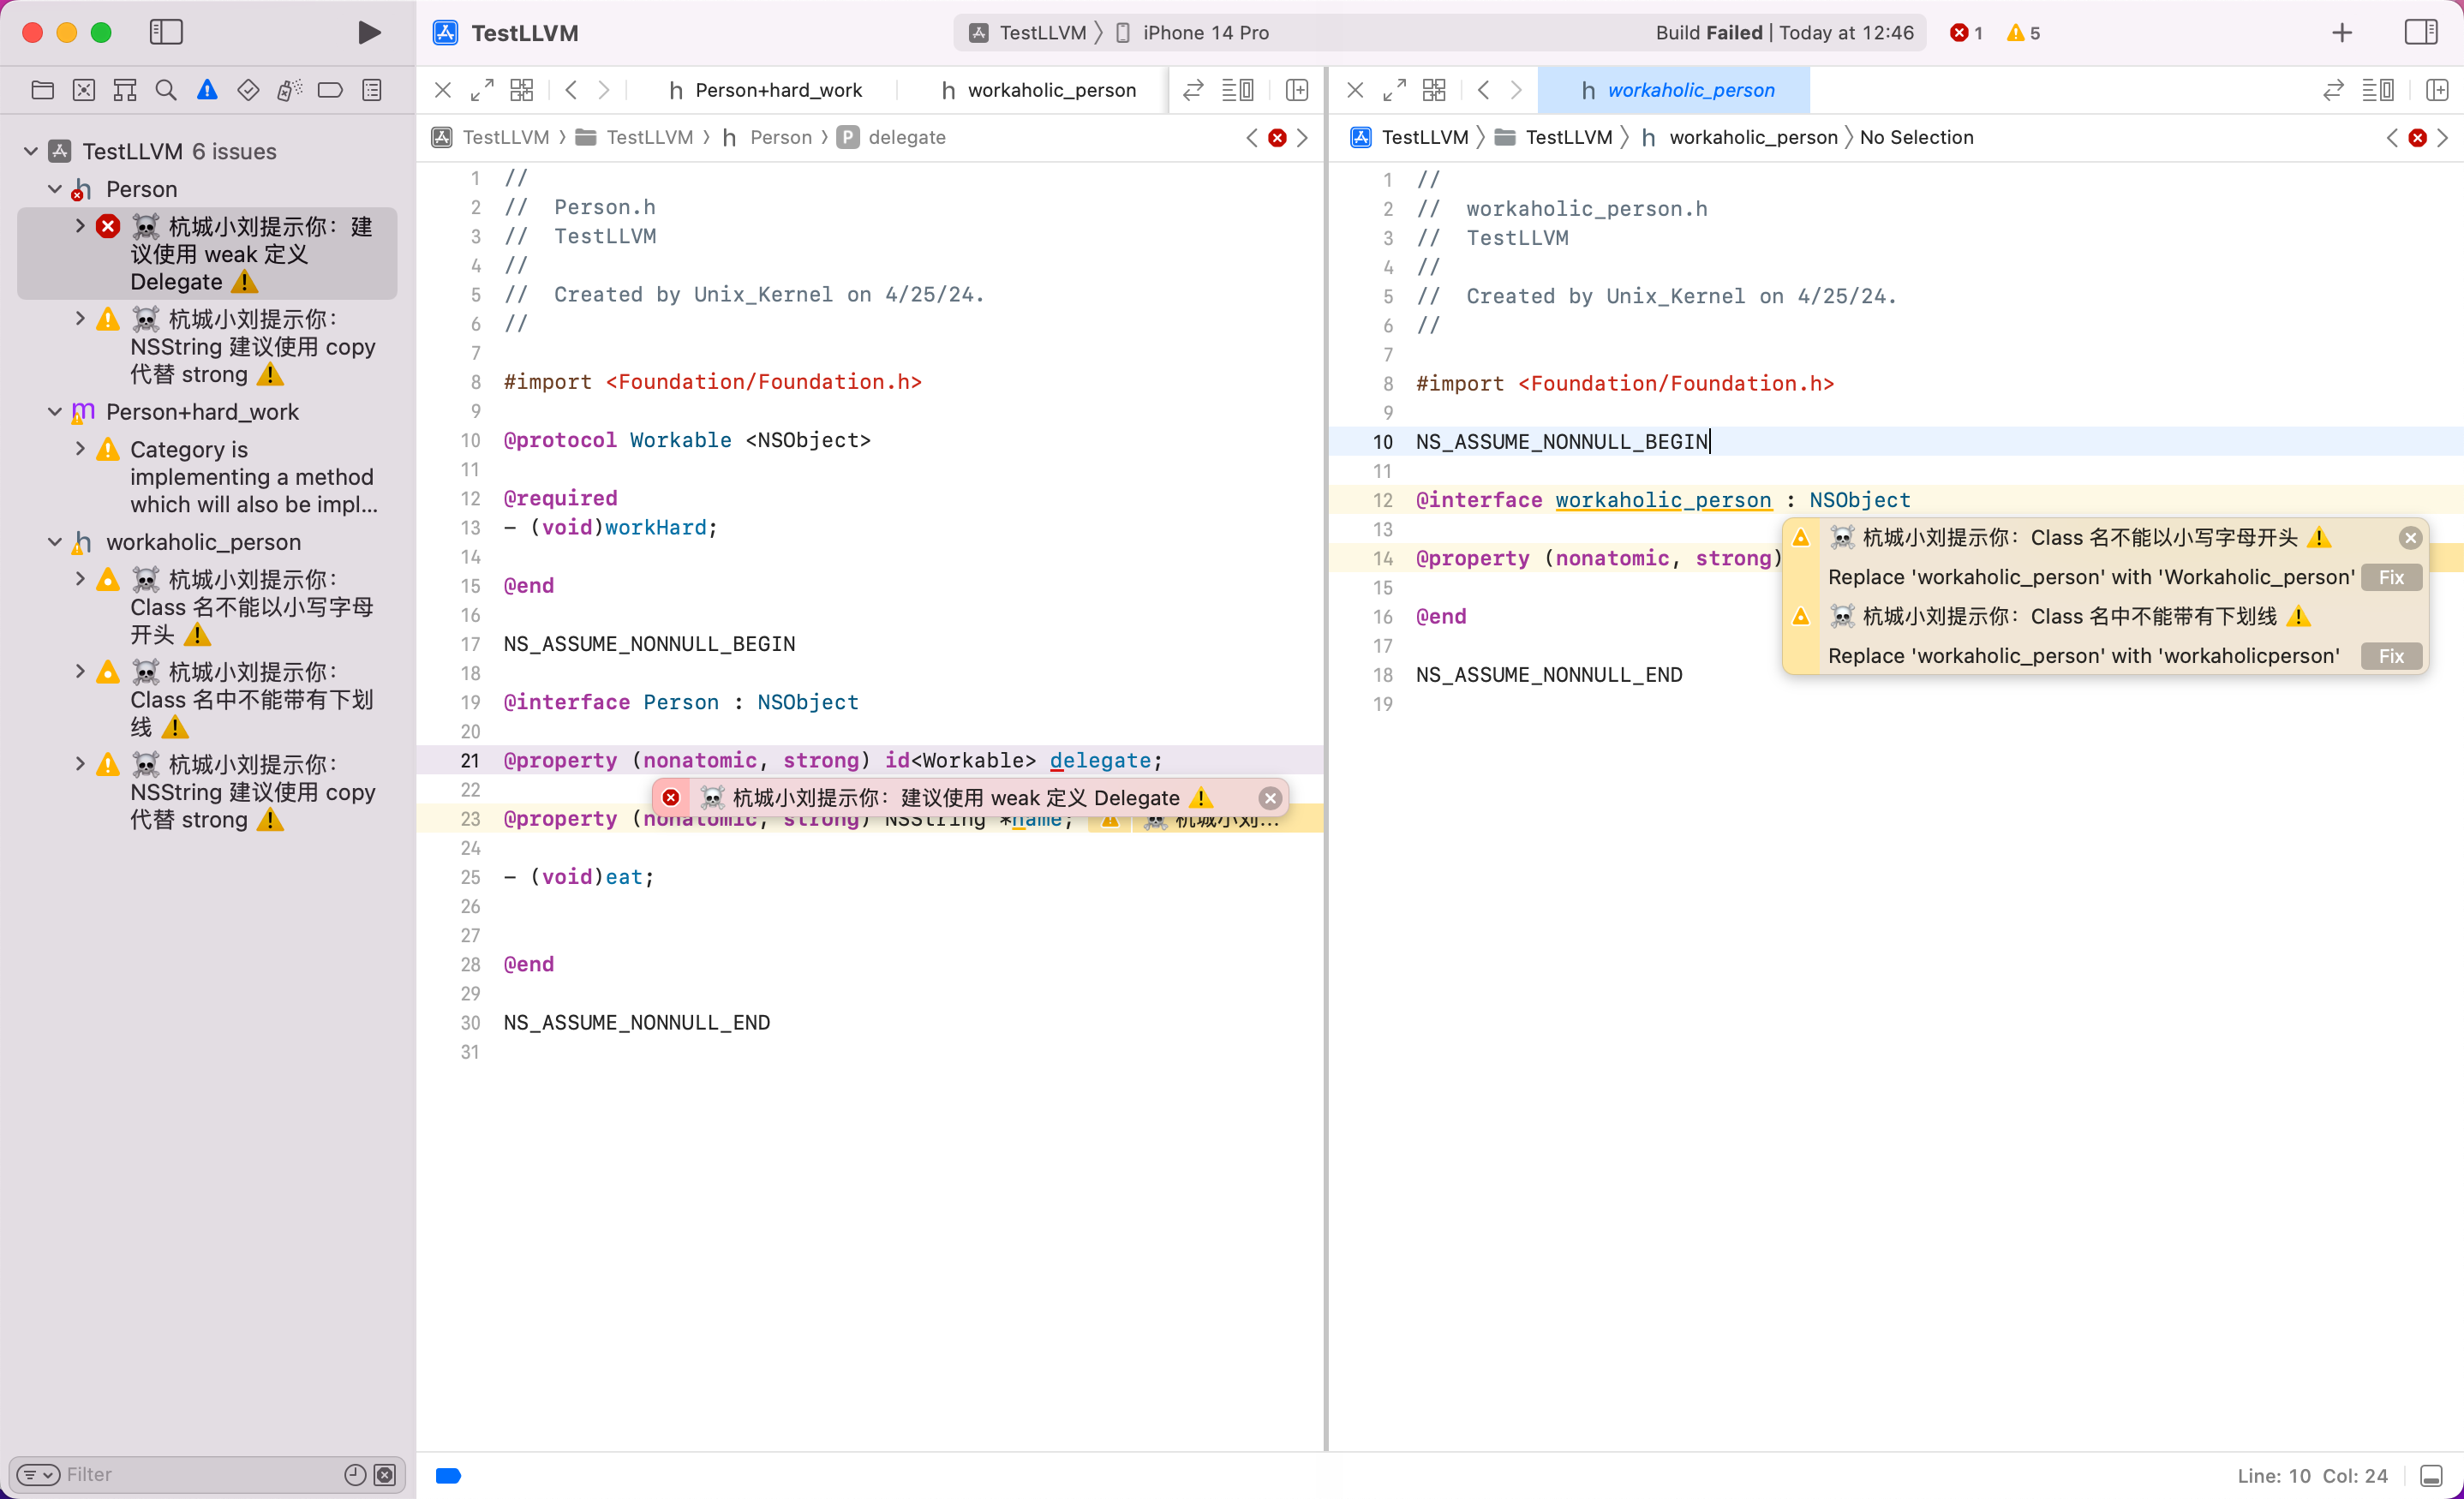
效果如下:
- 可以对类名检测,如果带下划线,则报错提示并给出修改意见
- 可以对 Category 名做检测,如果带下划线,则报错提示并给出修改意见
- 编写的
CodeStyleValidatePluginDemo 中对不符合规范的做了DiagnosticsEngine::Warning级别的警告。如果遇到1个警告则不影响,继续编译。如果是DiagnosticsEngine::Error级别的编译报错,遇到1个则终止编译,请注意该区别,按需编写自己的插件逻辑。
有没有其他方式?
利用 LLVM 编译前端 Clang + AST 的能力可以解决大多数编译器相关的问题,但是过程可能较为复杂。还有个思路是利用脚本能力,各种脚本语言,比如 Python、Node 都具备 glob 模块。glob 可以快速匹配并实现字符串的查找能力。
利用关键词 @interface 类名 : 父类名 的特点,找到到所有的类名,判断类名带有 "_",然后将类名保存起来,最后输出有问题的类信息。
检查 Category 中重名的方法
-
使用开源库 LIEF 的能力
-
脚本 Python、Node glob 模块的快速匹配能力
-
添加 Xcode 环境变量
OBJC_PRINT_REPLACED_METHODS,运行时候会打印出来。参考官方文档此处再引申聊聊命名规范的事情。官方文档 也说了 Category 命名的的最佳实践
Category Method Name Best Practice
It is not possible to tell whether a given method name will conflict with an existing method defined by the original class because classes often contain private methods that are not listed in the classes interface. Further, a future version of the class may add new methods that clash with methods previously defined in your category. In order to avoid undefined behavior, it’s best practice to add a prefix to method names in categories on framework classes, just like you should add a prefix to the names of your own classes. You might choose to use the same three letters you use for your class prefixes, but lowercase to follow the usual convention for method names, then an underscore, before the rest of the method name.
简单来说,虽然有些类的方法在
.m中可能存在10个方法,但在.h中公开了3个方法,然后在迭代的过程中,可能另一个对象也新增了3个方法,这3个方法可能是公开的也可能是私有方法,由于大家都遵循常见的 OC 命名策略(见名知意)所以很容易造成命名 冲突。给 Category 或者动态库、静态库命名最好带前缀,以避免方法冲突。这个好处不只是命名规范上的,更是代码逻辑安全出发的,由于 OC 强大的 Runtime 消息机制,重名的方法容易被调用。官方给的例子
@interface UIView (MyCategory)

// CORRECT: The method name is prefixed.
- (BOOL)wxyz_isOccludedByView:(UIView*)otherView;

// INCORRECT: The method name is not prefixed. This method may clash with an existing method in UIView.
- (BOOL)isOccludedByView:(UIView*)otherView;

@end
除了 CI、CD 最后一道防线的拦截外,事前,团队内宣讲统一代码风格,Code Review 阶段看到 Category 方法命名不合理的地方,即使给出严厉的 Comment,也能拦截和规范一部分情况。
-
使用 LLVM 编写 Clang 插件,解析 AST 拿到所有的
ObjCInterfaceDecl信息,然后结合ObjCMethodDecl信息便可获取 Category 中的 所有方法,再判断方法是否同名
Pass 插桩,实现精准测试
这部分涉及到 Objective-C 和 Swift 的代码插桩逻辑的不同实现,篇幅较大,可以查看这篇文章 精准测试最佳实践
静态检测、静态分析
通过语法树进行代码静态分析,找出非语法性错误。模拟代码执行路径,分析出 control-flow graph(CFG)。
LLVM 项目中 clang 内置了一堆 checker,用于实现 lint。
具体的使用可以查看这篇文章:质量检测
CodeGen - IR 代码生成与 OC Runtime 桥接
-
Class/Meta Class/Protocol/Category 内存结构生成,并存放在指定的 section 中(如 Class:
_DATA, _objc_classrefs) -
Non-Fragile ABI:为每个 Ivar 合成
OBJC_IVAR_$_偏移值常量 -
存取 Ivar 的语句(_ivar = 123; int a = _ivar) 转成 base +
OBJC_IVAR_$_的形式 -
将语法树中的
ObjcMessageExpr翻译成相应版本的objc_msgSend,super 翻译成objc_msgSendSuper -
根据修饰符 strong、weak、copy、atomic 合成 @property 自动实现的 setter/getter。处理
@synthesize -
ARC:分析对象引用关系,将
objc_storeStrongobjc_storeWeak等 ARC 代码插入 -
将 ObjcAutoreleasePoolStmt 翻译成
objc_autoreleasePoolPush、objc_autoreleasePoolPop -
自动调用
[super dealloc]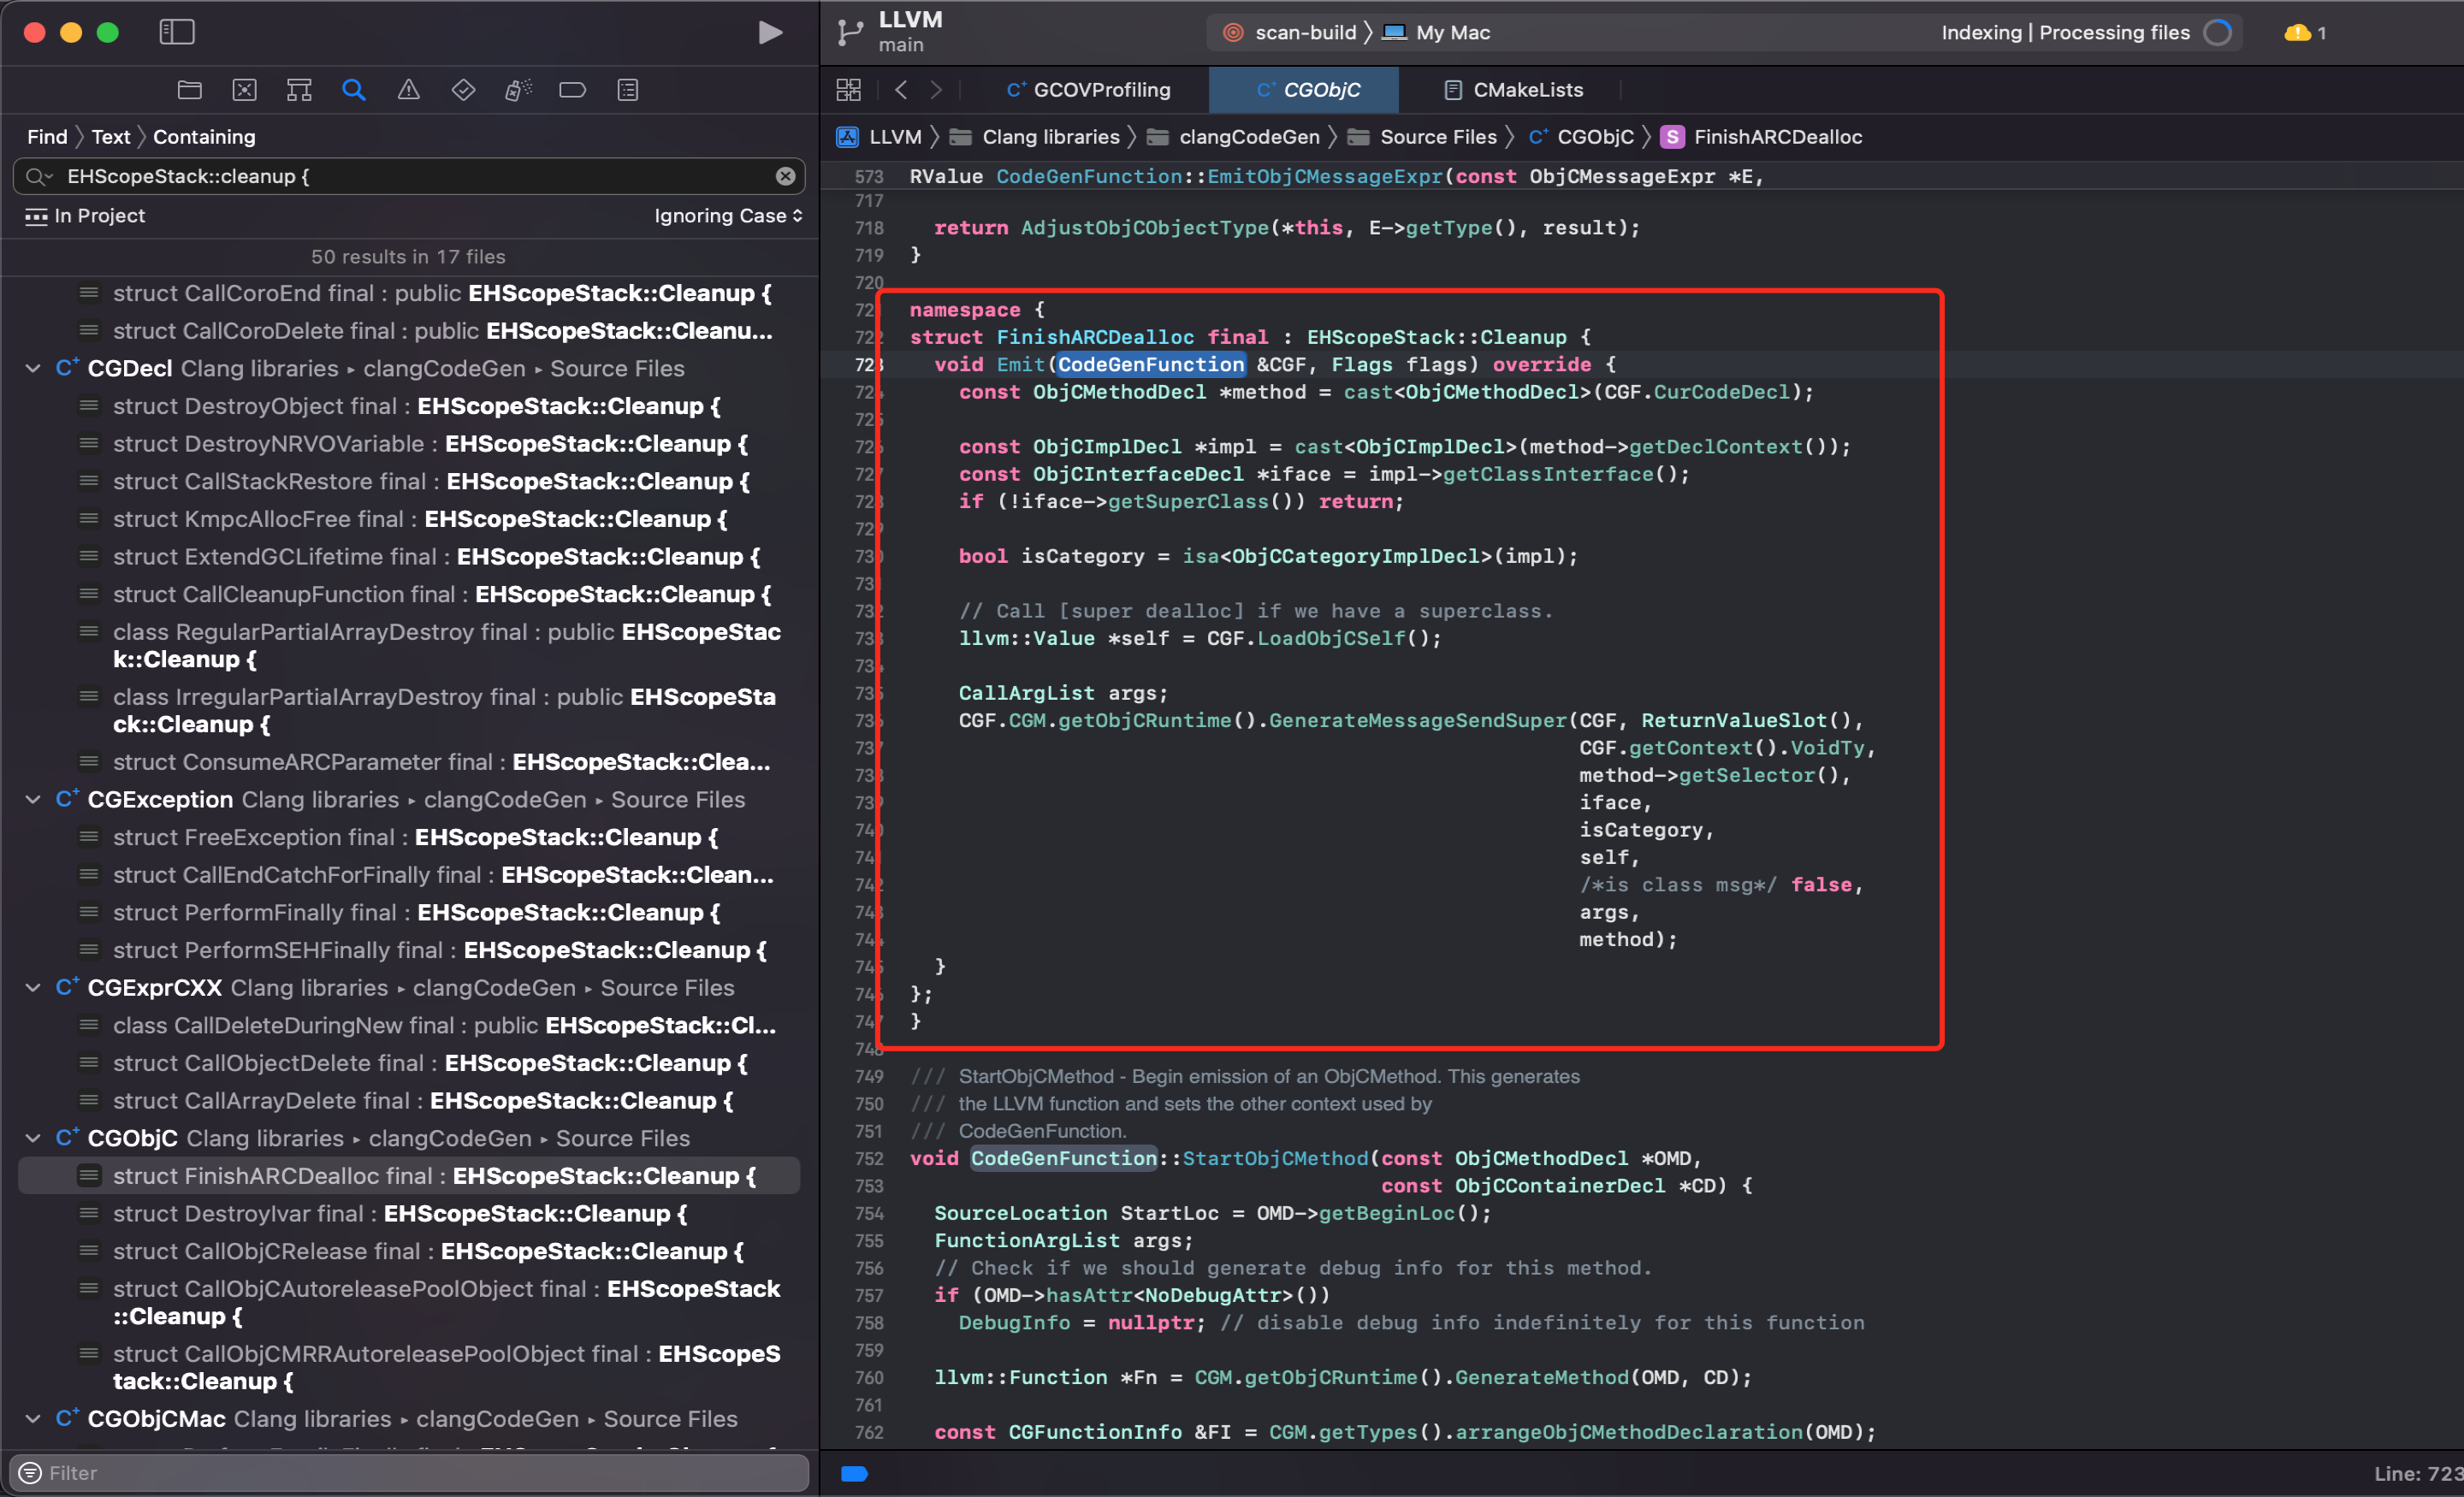
-
为每个拥有 ivar 的 Class 合成
.cxx_destructor方法来自动释放类的成员变量,代替 MRC 时代的self.xxx = nil