mirror of
https://github.com/NohamR/knowledge-kit.git
synced 2026-05-25 20:00:40 +00:00

1080 lines
33 KiB
Markdown
1080 lines
33 KiB
Markdown
# webpack 从入门到精通
|
||
|
||
## 小实验
|
||
|
||
我们一步步打包一个小项目看看 webpack 是如何工作的。
|
||
|
||
1. 先写一个 hello.js
|
||
|
||
```javascript
|
||
function hello(messgae){
|
||
alert(messgae);
|
||
}
|
||
```
|
||
|
||
2. 然后对其打包,发现终端报错。解决后知道在 webpack 2.0 的时候,我们打包一个 js 文件可能是这样的,比如将 hello.js 打包为 hello.bundle.js 。
|
||
|
||
```powershell
|
||
webpack hello.js hello.bundle.js
|
||
```
|
||
|
||
但是在现在 webpack 4.5.0 的时候就需要指定 mode 和输出路径
|
||
|
||
```powershell
|
||
webpack --mode=development hello.js --output-file hello.bundle.js
|
||
```
|
||
|
||
mode 有指定的3种值, development、production、none。区别在于 development 打包出来的东西是没压缩的、可读的,production 打包出来的是压缩的、不可读的。
|
||
|
||
3. 然后编写一个 world.js 和 一个 style.css ,然后进行打包
|
||
|
||
```javascript
|
||
require('./world.js');
|
||
require('./style.css');
|
||
|
||
function hello(messgae){
|
||
alert(messgae);
|
||
}
|
||
hello("hello webpack");
|
||
```
|
||
|
||
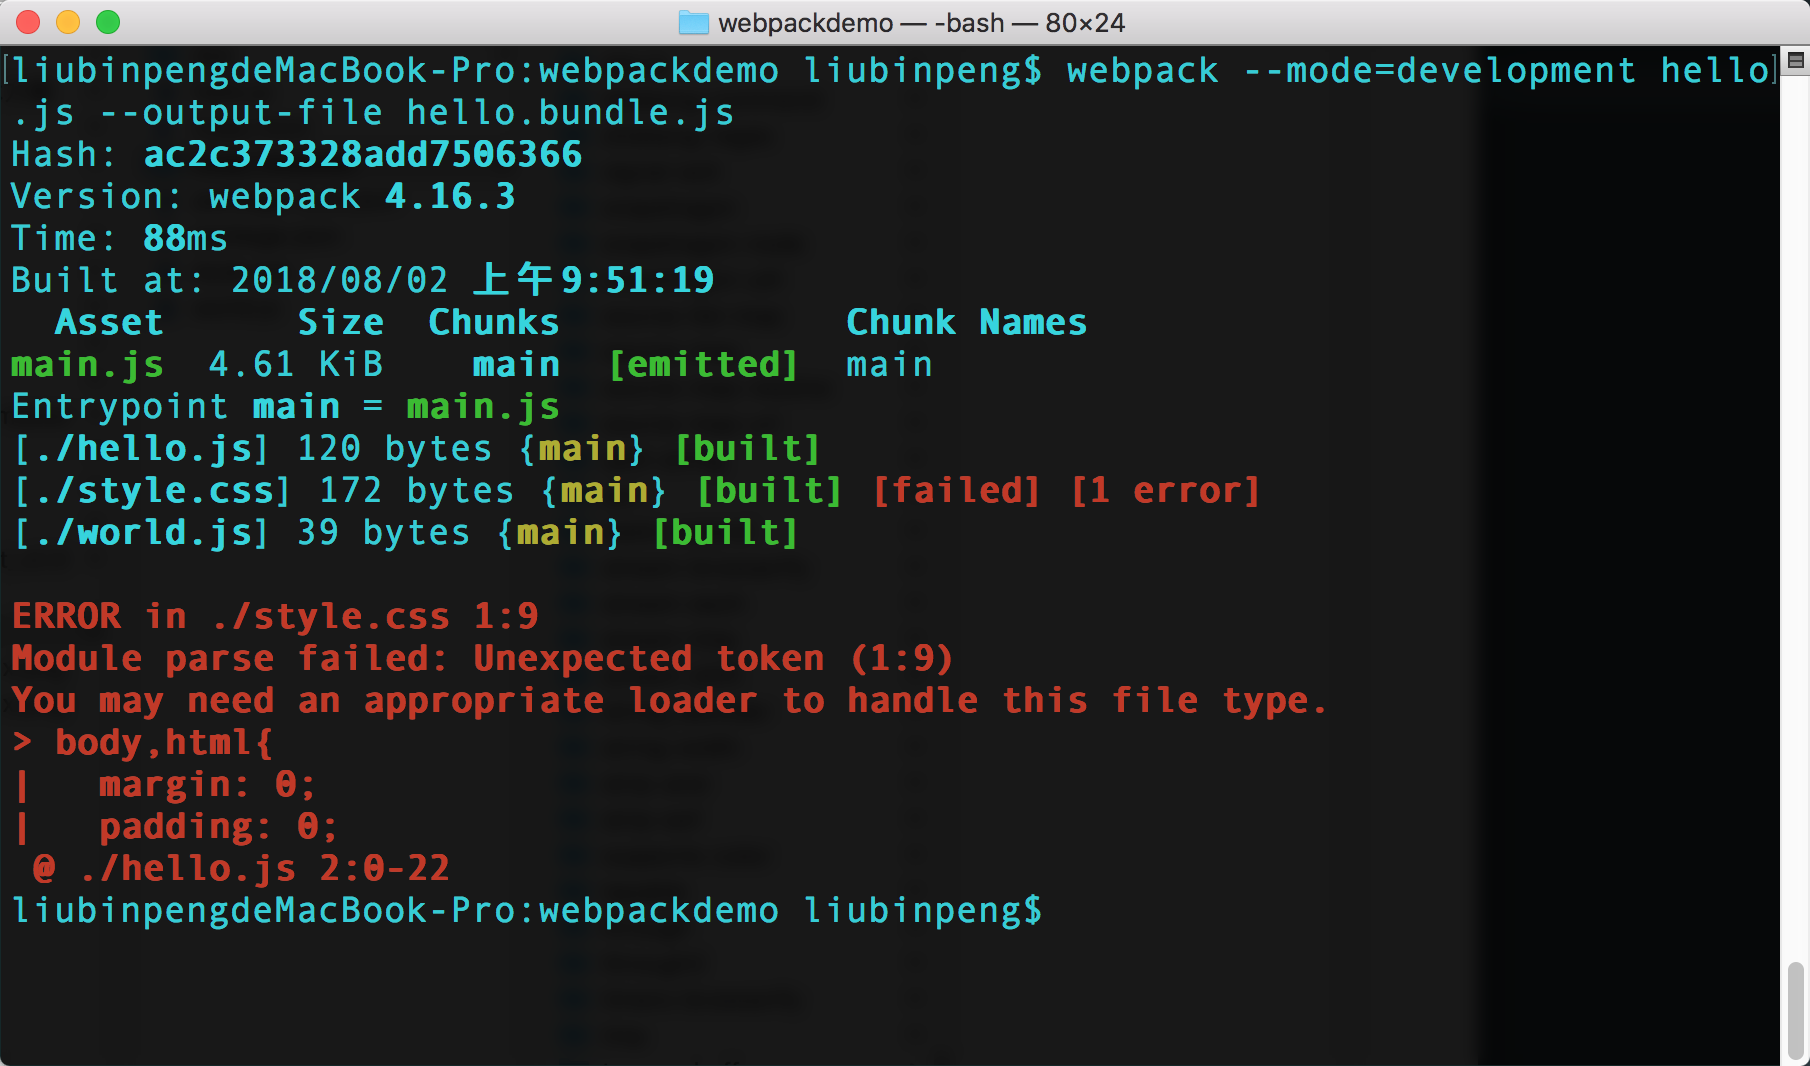
|
||
|
||
通过报错信息知道, webpack 对于 css 文件并不是默认支持的,需要指定相应的 loader 对其打包。
|
||
|
||
4. 所以我们继续安装 css-loader、style-loader。然后指定 css 文件的 loader 为 css-loader
|
||
|
||
```javascript
|
||
require('./world.js');
|
||
require('css-loader!./style.css');
|
||
|
||
function hello(messgae){
|
||
alert(messgae);
|
||
}
|
||
|
||
hello("hello webpack");
|
||
```
|
||
|
||
5. 接下来设置页面的背景颜色,发现网页并没有生效。这是因为 webpack 并不知道我们的样式如何作用到 html 中,所以我们需要指定 style-loader
|
||
|
||
```css
|
||
//style.css
|
||
body,html{
|
||
margin: 0;
|
||
padding: 0;
|
||
}
|
||
|
||
body{
|
||
font-size: 17px;
|
||
background: burlywood;
|
||
}
|
||
```
|
||
|
||
```javascript
|
||
//hello.js
|
||
require('./world.js');
|
||
require('style-loader!css-loader!./style.css');
|
||
|
||
function hello(messgae){
|
||
alert(messgae);
|
||
}
|
||
|
||
hello("hello webpack");
|
||
```
|
||
|
||
6. 查看网页效果。发现函数确实执行了,背景颜色也生效了,我们写的 css 代码新建了一个 **style标签** 被直接写入到 html 中了。
|
||
|
||
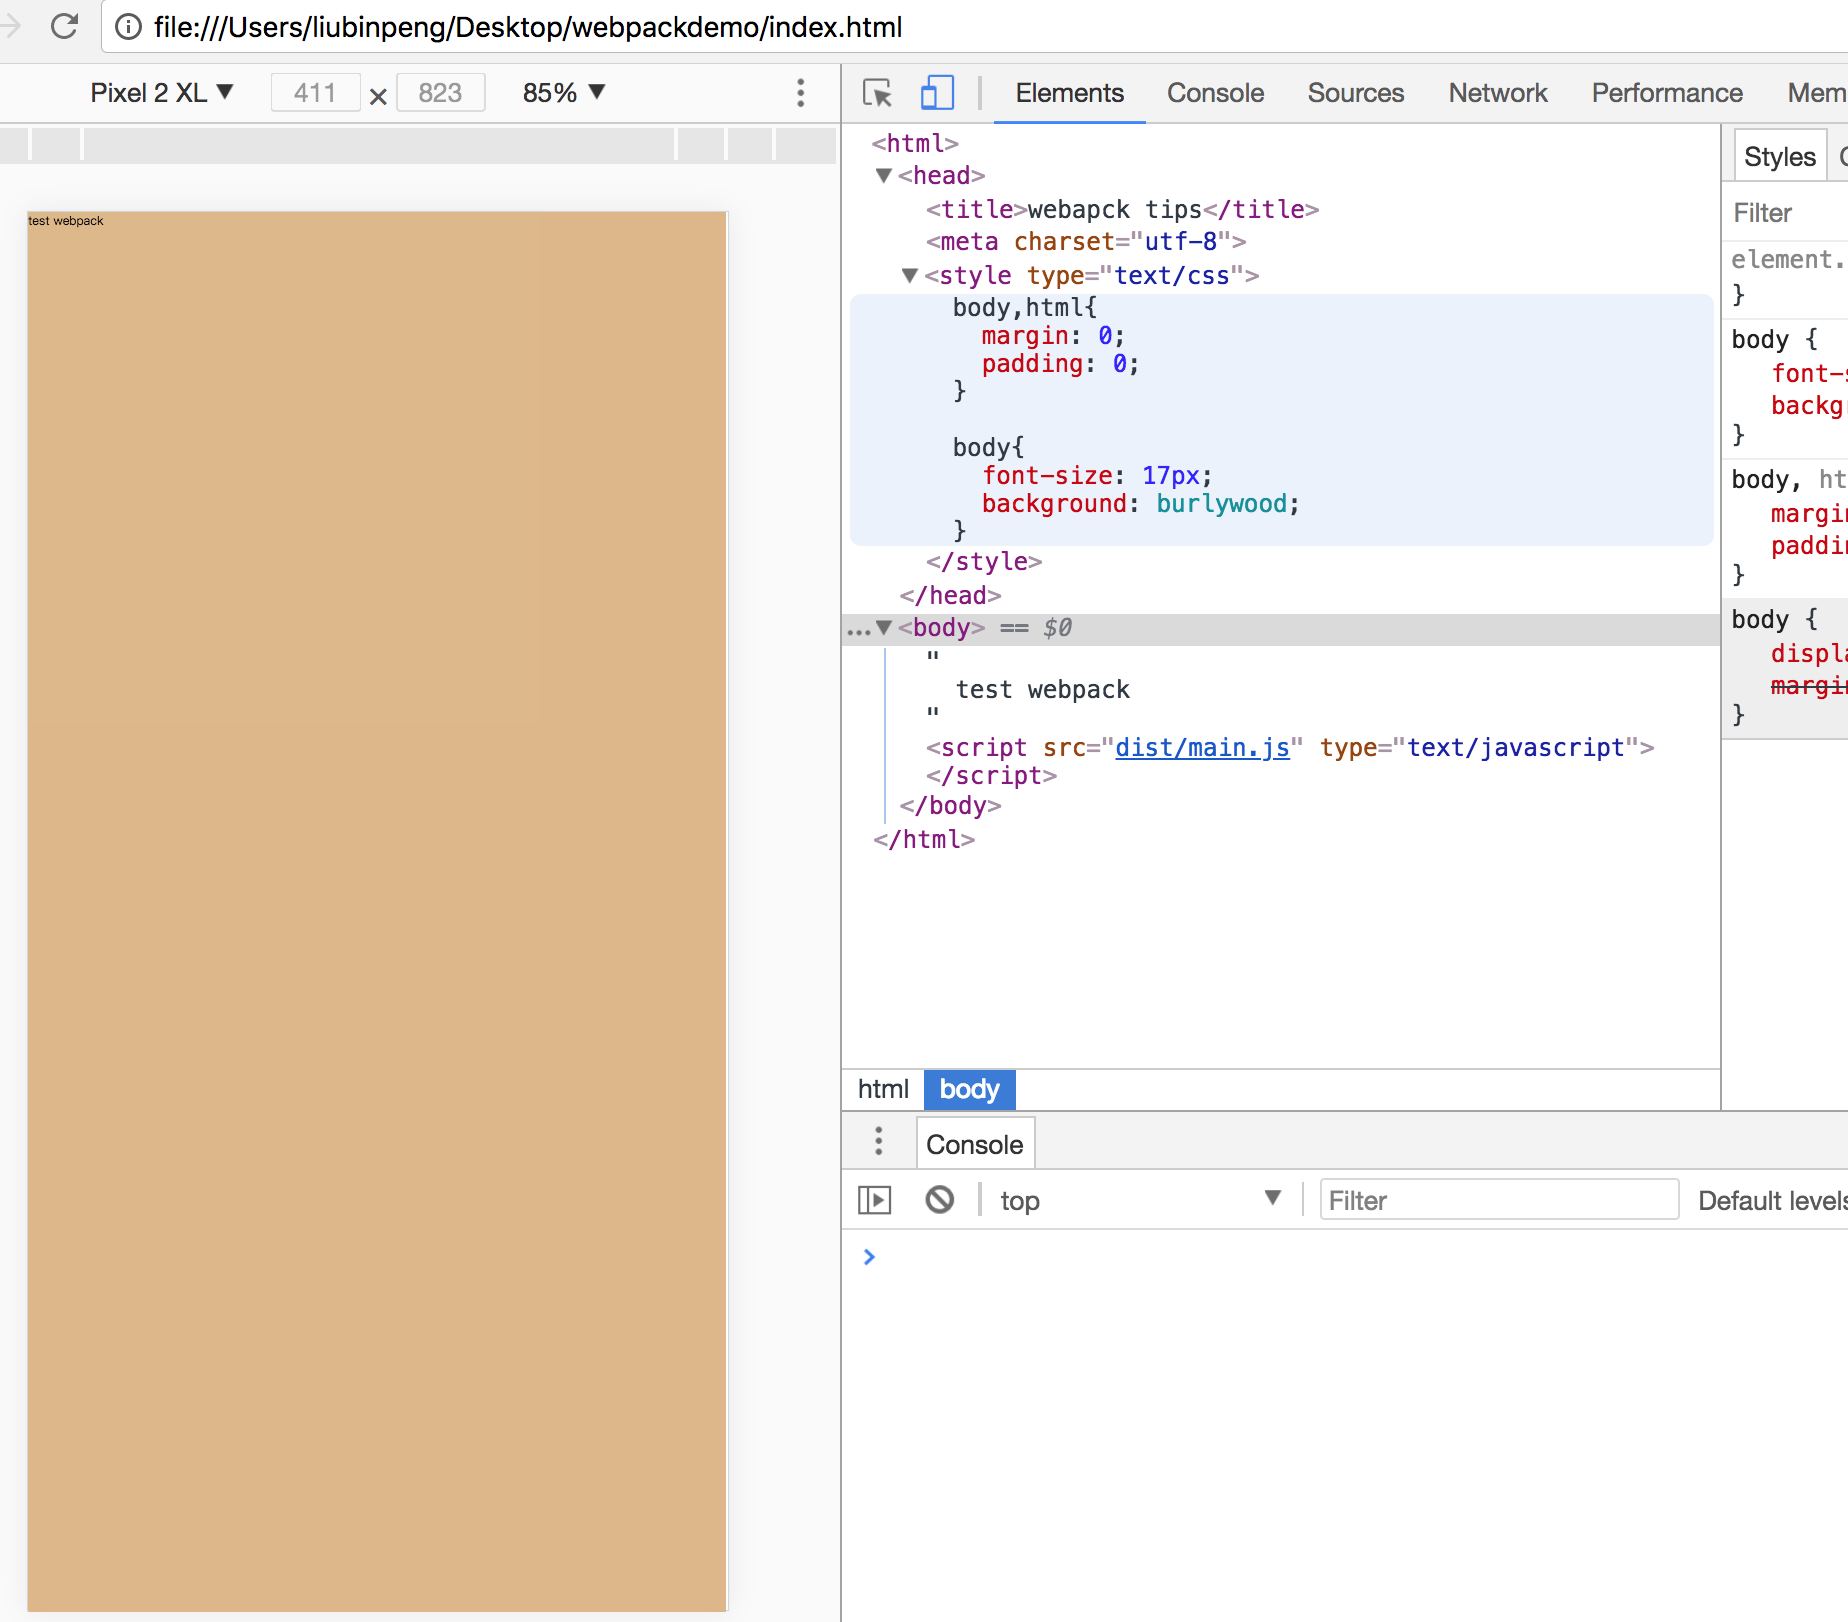
|
||
|
||
7. 说说2个 loader 的作用。
|
||
|
||
* css-loader 就是 webpack 可以处理 css 文件。
|
||
* style-loader 的作用就是将 css-loader 处理完的文件新建一个 style 标签插入到 html 中
|
||
|
||
8. 很多人会想 **require\('style-loader!css-loader!./style.css'\);** 我每次写一个 css 文件,那么都需要在前面加入 **style-loader、css-loader** 吗?显然不是,webpack 还为我们提供了简单写法
|
||
|
||
```javascript
|
||
require('./world.js');
|
||
// require('style-loader!css-loader!./style.css');
|
||
require('./style.css');
|
||
|
||
function hello(messgae){
|
||
alert(messgae);
|
||
}
|
||
|
||
hello("hello webpack");
|
||
```
|
||
|
||
webpack-cli 写法为
|
||
|
||
```powershell
|
||
webpack --mode=development hello.js --output-file hello.bundle.js --module-bind 'css=style-loader!css-loader'
|
||
```
|
||
|
||
9. 之前的做法还存在一个弊端,就是每次修改了代码,我们都需要在终端重新运行打包命令,十分繁琐。这里强大的 webpack 为我们提供了一个 option,可以监听代码改变然后自动打包。如下
|
||
|
||
```powershell
|
||
webpack --mode=development hello.js --output-file hello.bundle.js --module-bind 'css=style-loader!css-loader' --watch
|
||
```
|
||
|
||
这样,我们在源代码每次一修改,webpack 会自动打包
|
||
|
||
10. 如果你想看到打包过程,那么可以使用 **pregress** 参数。这样在打包的时候可以看到左下角有构件的进度
|
||
|
||
```powershell
|
||
webpack --mode=development hello.js --output-file hello.bundle.js --module-bind 'css=style-loader!css-loader' --progress
|
||
```
|
||
|
||
11. 如果像看到打包的模块,可以使用 **--display-modules**
|
||
|
||
```powershell
|
||
webpack --mode=development hello.js --output-file hello.bundle.js --module-bind 'css=style-loader!css-loader' --progress --display-modules
|
||
```
|
||
|
||
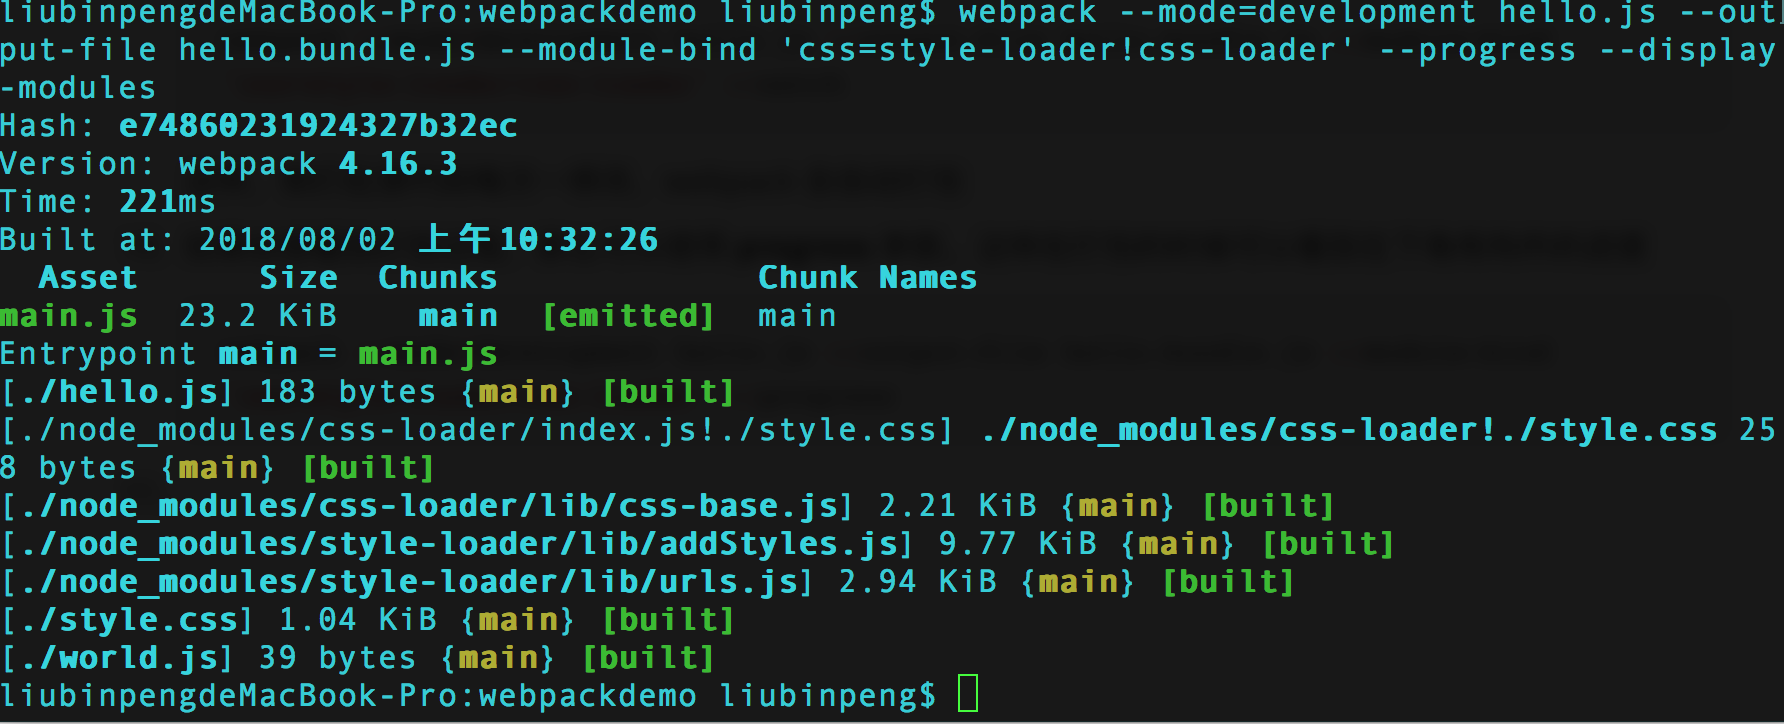
|
||
|
||
12. 如果想知道打包某个模块的原因,可以使用 **--display-reasons**
|
||
|
||
```powershell
|
||
webpack --mode=development hello.js --output-file hello.bundle.js --module-bind 'css=style-loader!css-loader' --progress --display-modules --display-reasons
|
||
```
|
||
|
||
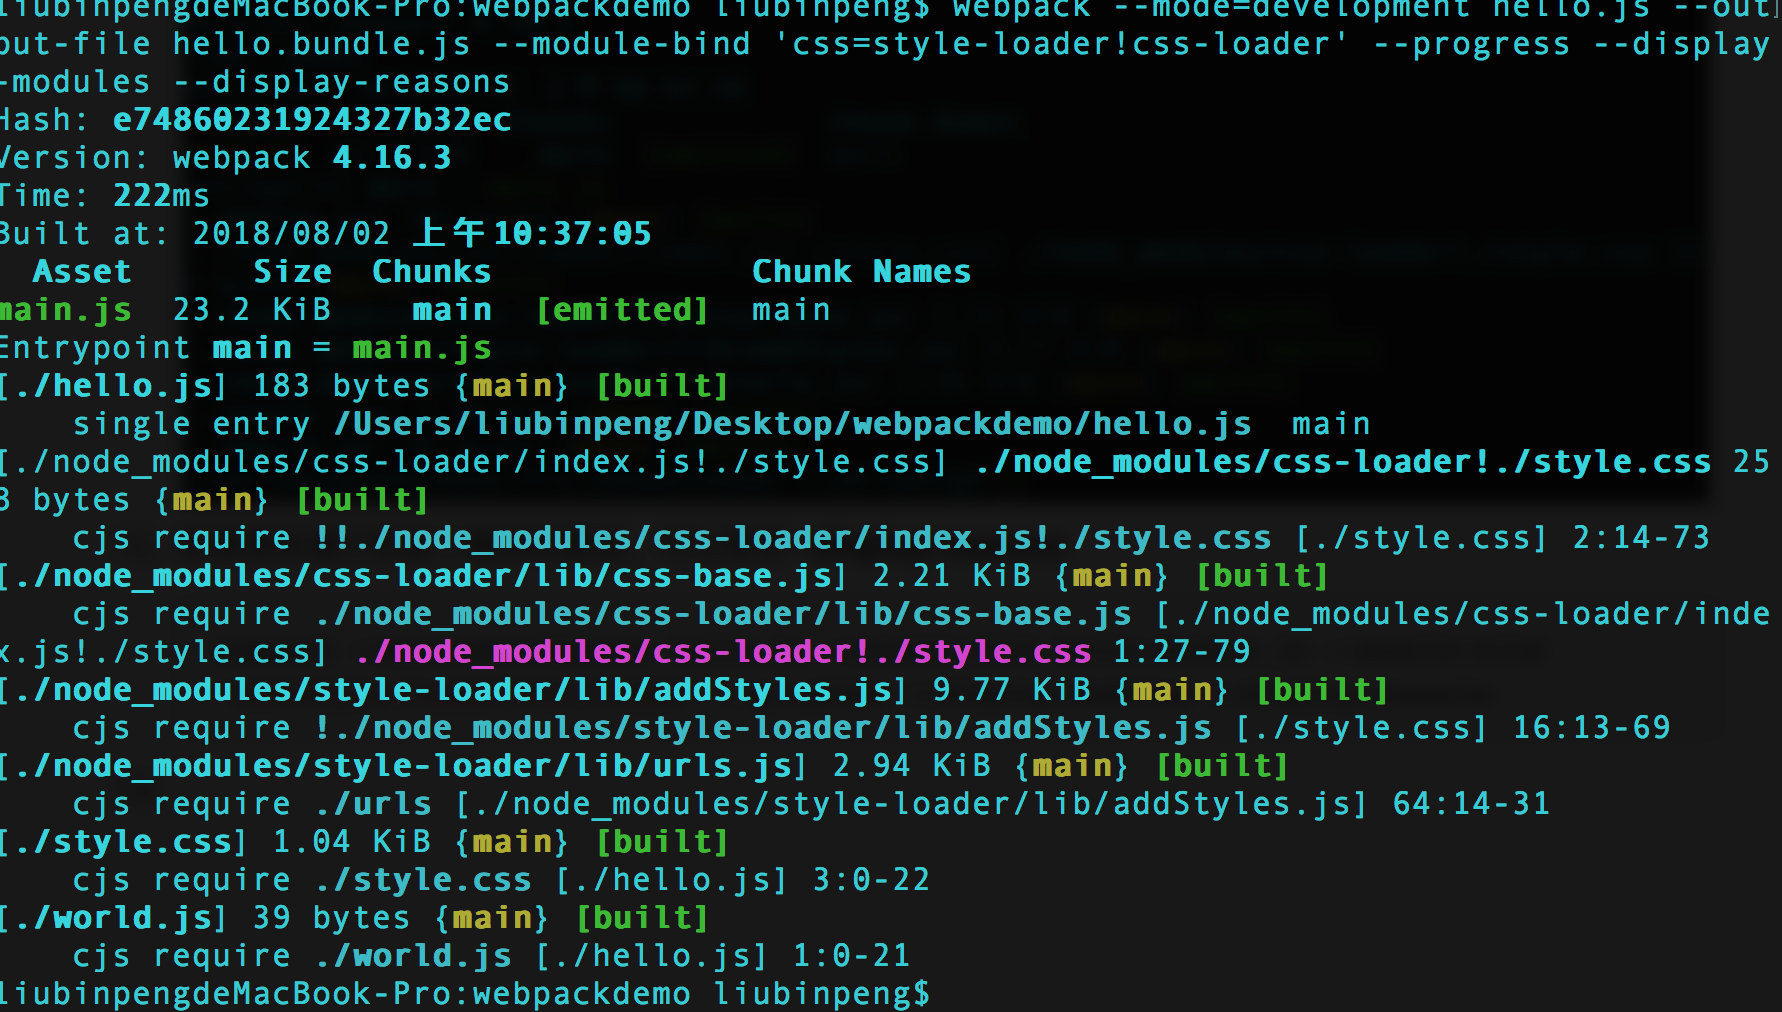
|
||
|
||
## 用 webpack.config.js 完成上述步骤
|
||
|
||
1. 初始化项目,编辑 webpack.config.js
|
||
|
||
```powershell
|
||
var path = require('path');
|
||
|
||
module.exports = {
|
||
entry: './src/script/main.js',
|
||
output:{
|
||
path: path.resolve(__dirname,'./dist/js'),
|
||
filename: 'bundle.js'
|
||
}
|
||
}
|
||
```
|
||
|
||
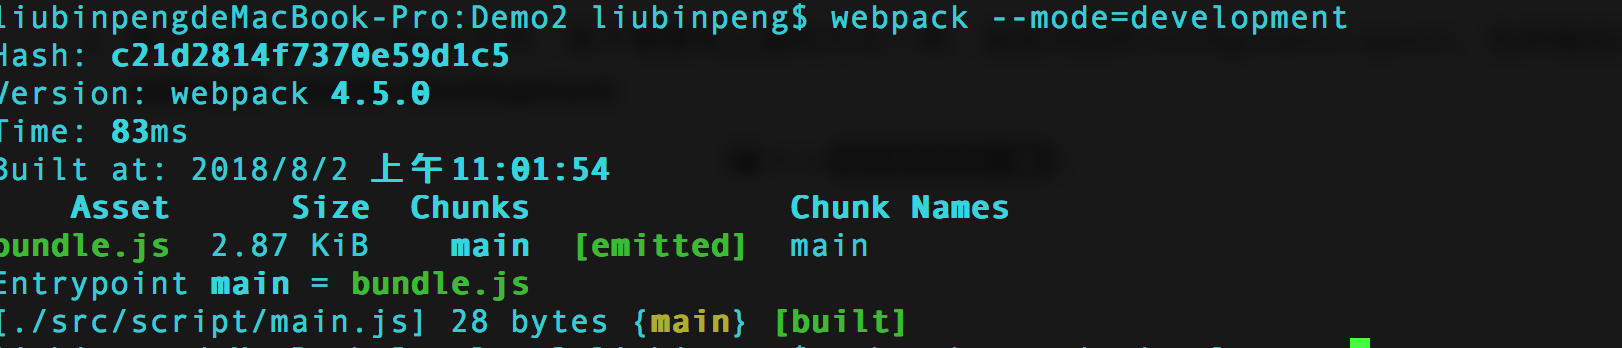
2. 有了 webpack.config.js 文件,就不需要和上面的方式一样,指定对应的 configuration option。在终端运行 **webpack --mode=development **
|
||
|
||
|
||
|
||
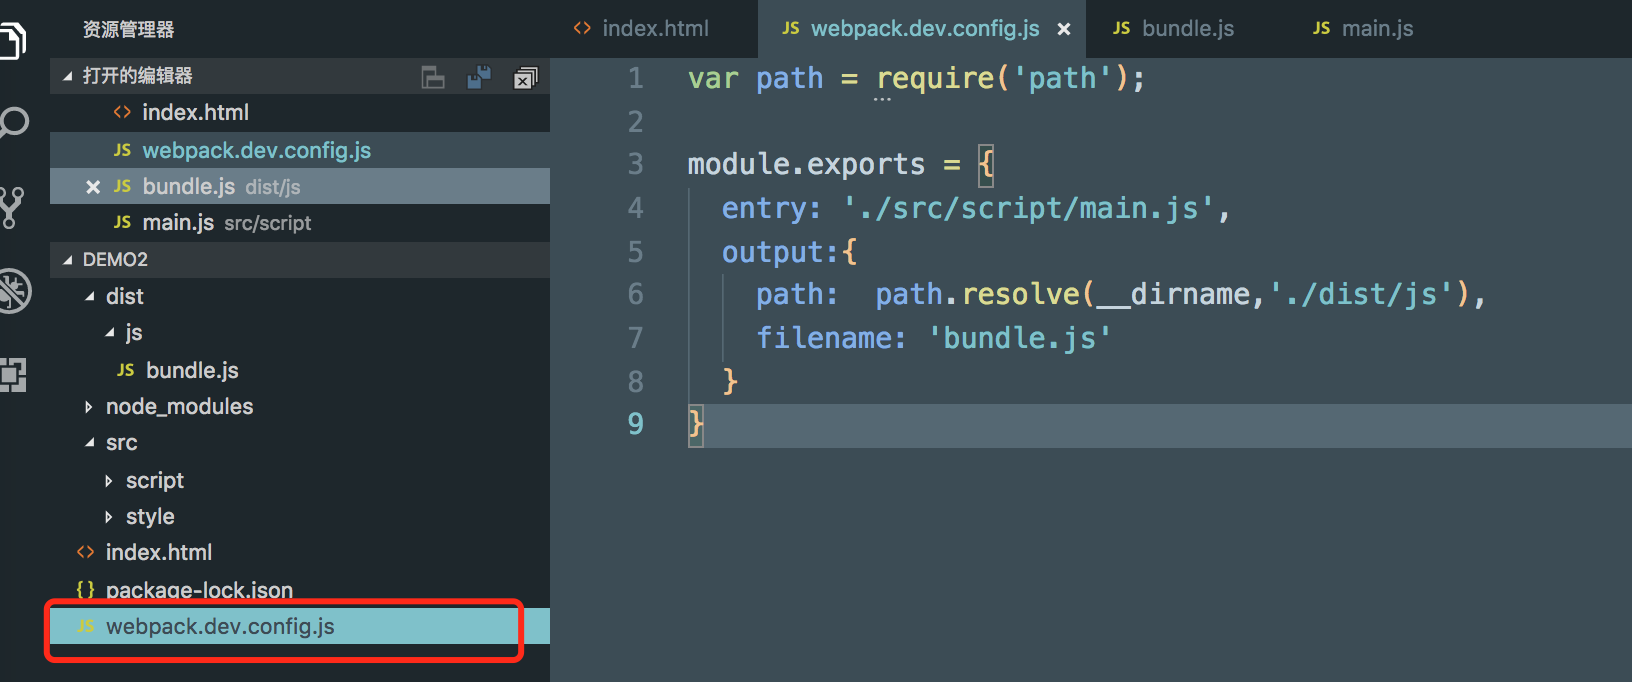
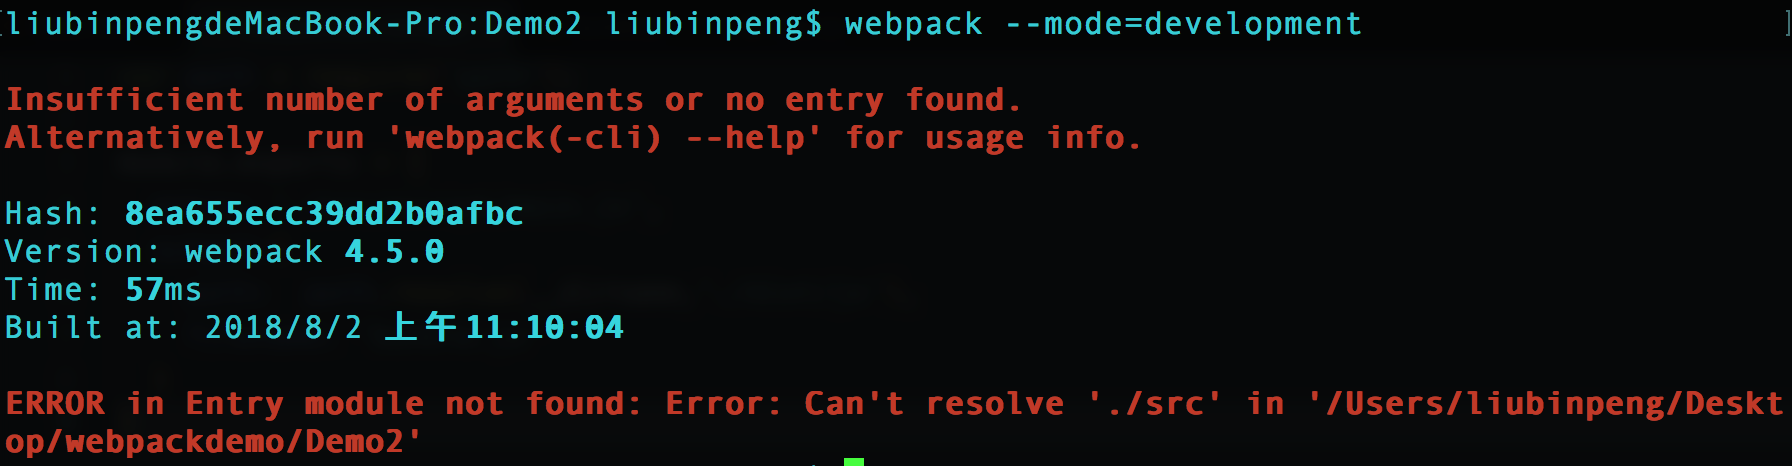
3. 注意:如果我们将 webpack.config.js 改名为 webpack.dev.config.js ,然后在命令行打包,会发现没效果。
|
||
|
||
|
||
|
||
|
||
|
||
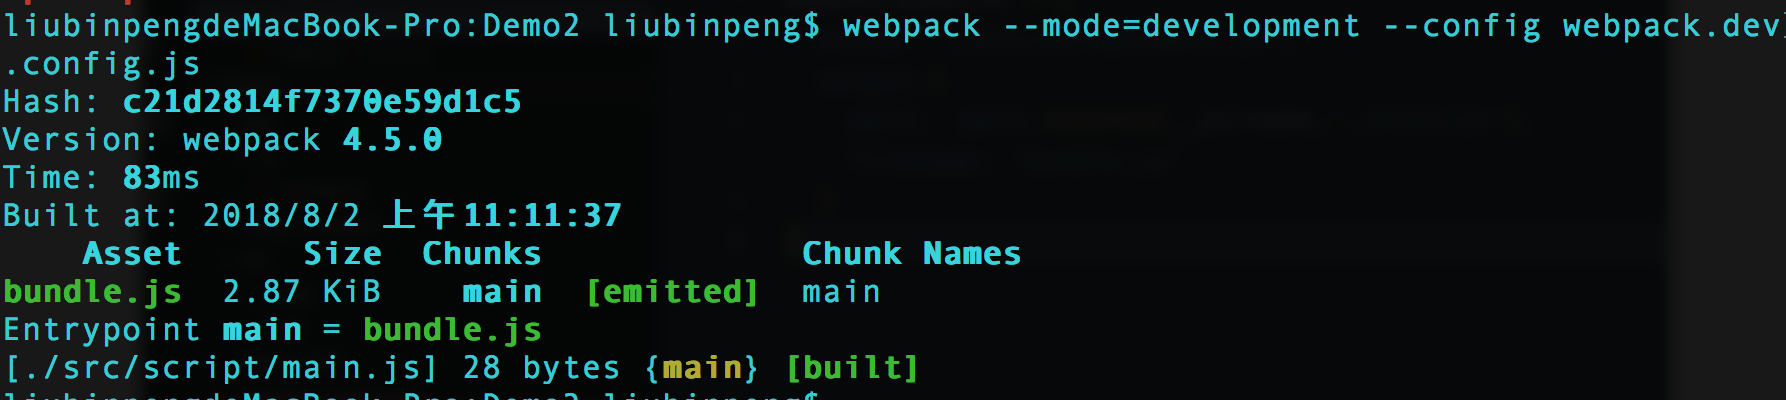
要将 webpack.dev.config.js 同样生效,我们需要在命令行使用下面命令。
|
||
|
||
```powershell
|
||
webpack --mode=development --config webpack.dev.config.js
|
||
```
|
||
|
||
|
||
|
||
4. 如果想像上个实验一样,看到打包时候的一些信息,怎么办呢?
|
||
|
||
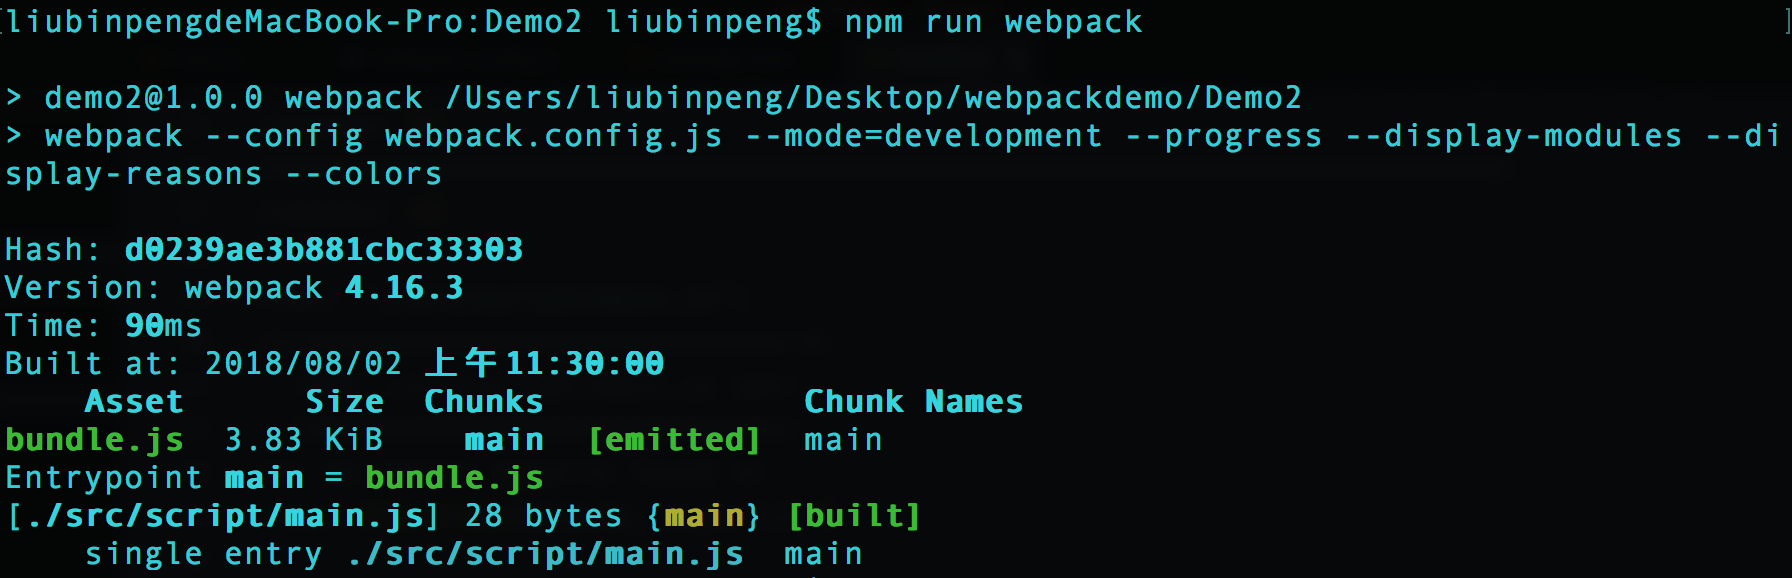
可以配合 npm 的 package.json 文件中的 scripts 标签,在下面添加 key 为 webpack 的项,然后将命令写到后边。然后在命令行运行 **npm run webpack**
|
||
|
||
```
|
||
"scripts": {
|
||
"test": "echo \"Error: no test specified\" && exit 1",
|
||
"webpack": "webpack --config webpack.config.js --mode=development --progress --display-modules --display-reasons --colors"
|
||
},
|
||
```
|
||
|
||
|
||
|
||
5. 对于 webpack 的 entrt 主要有3种写法,每种写法都有不同区别。
|
||
|
||
* 如果 webpack 只有单一入口,那么就可以是字符串。
|
||
|
||
```json
|
||
entry: './src/script/main.js',
|
||
```
|
||
|
||
* 如果 webpack 有多个入口,那么就可以是数组。
|
||
|
||
```json
|
||
entry: ['./src/script/main.js','./src/script/a.js'],
|
||
```
|
||
|
||
* 如果 webpack 有多个入口,那么可以用对象。
|
||
|
||
```json
|
||
entry: {
|
||
main: './src/script/main.js',
|
||
a : './src/script/a.js'
|
||
},
|
||
```
|
||
|
||
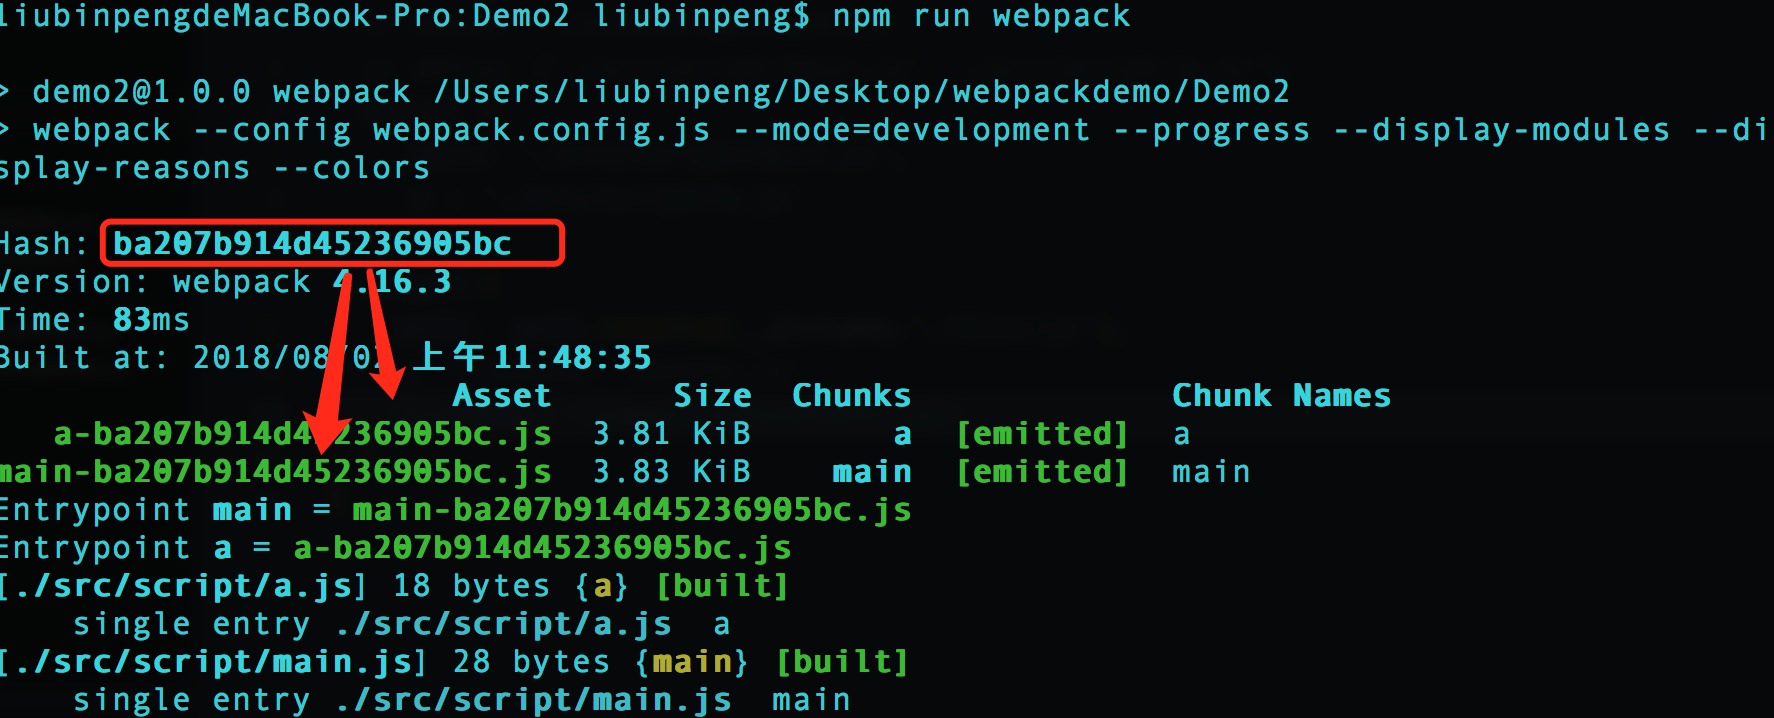
6. 如果指定了多个入口,那么执行打包会报错,因为 webpack 文档说如果多个 entry,且只有一个 output 的 filename,那么打包的结果会覆盖。所以我们需要设置如下
|
||
|
||
> When combining with the [`output.library`](https://webpack.js.org/configuration/output#output-library) option: If an array is passed only the last item is exported.
|
||
|
||
```json
|
||
var path = require('path');
|
||
|
||
module.exports = {
|
||
entry: {
|
||
main: './src/script/main.js',
|
||
a : './src/script/a.js'
|
||
},
|
||
output:{
|
||
path: path.resolve(__dirname,'./dist/js'),
|
||
filename: '[name]-[hash].js'
|
||
}
|
||
}
|
||
```
|
||
|
||
|
||
|
||
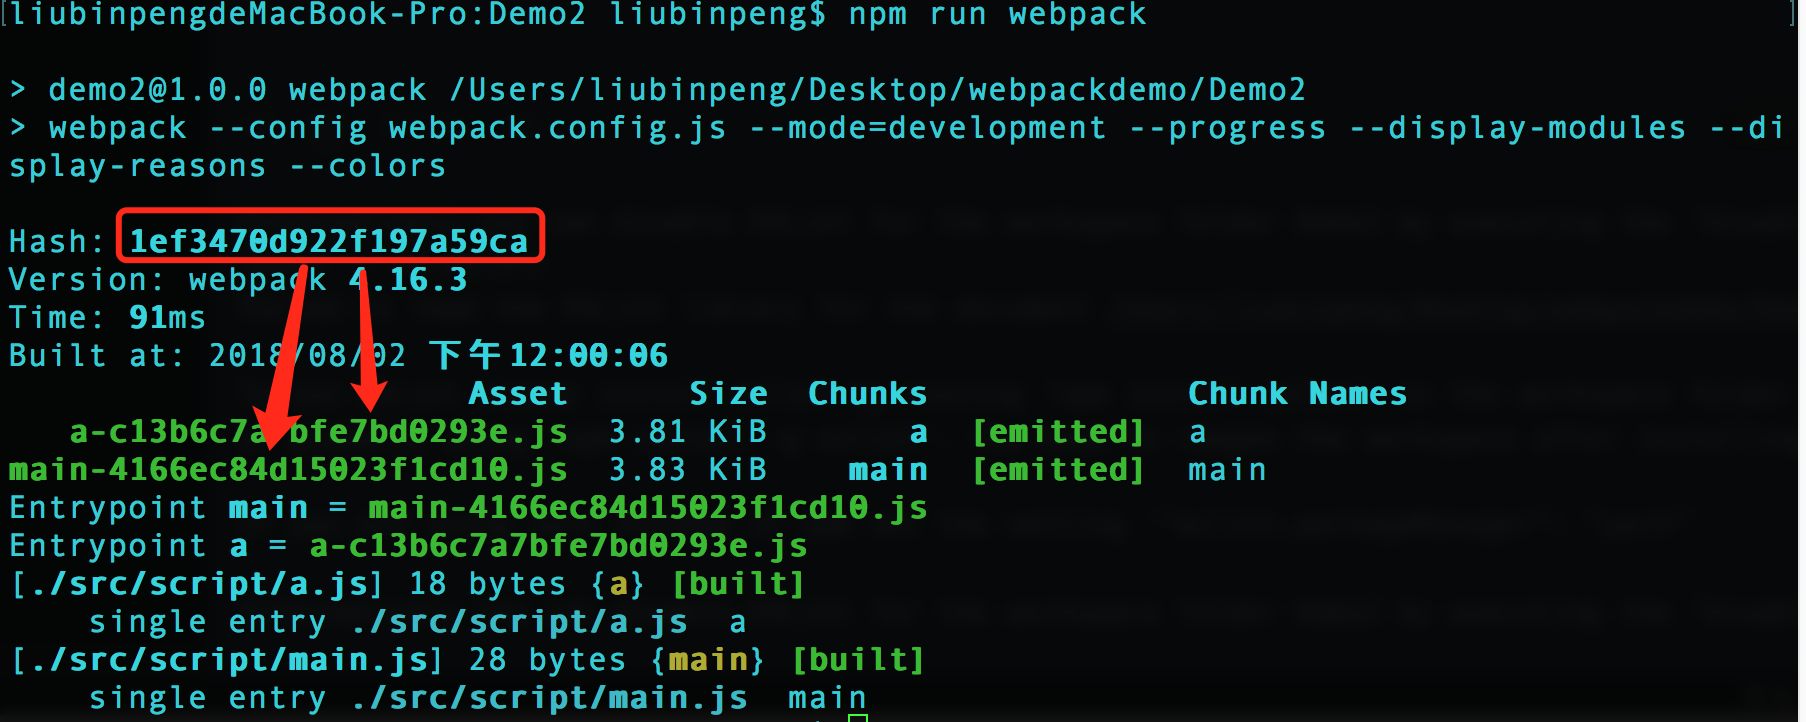
将文件修改为 **filename: '\[name\]-\[chunkhash\].js'**
|
||
|
||
|
||
|
||
会发现 hash 和 chunkhash 的输出的文件名并不一样
|
||
|
||
说明: chunkhash 是根据文件的内容生成的唯一标示(类似于md5生成的唯一标示、文件版本号)。如果一个资源在打包前后文本没有变过的话,二次打包的生成的 chunkhash 是一致的。
|
||
|
||
## 生成项目中 html 页面文件
|
||
|
||
对于生成的的 js,我们 html 如何使用呢?难道每次一打包,html 中的 script 需要修改 src 吗?不是的,webpack 提供了 html-webpack-plugin
|
||
|
||
1. 安装
|
||
|
||
```powershell
|
||
npm install html-webpack-plugin --save-dev
|
||
```
|
||
|
||
2. 然后运行命令,将现有的 js 打包引入到 html 文件中
|
||
|
||
```json
|
||
var htmlWebpackPlugin = require('html-webpack-plugin');
|
||
//...
|
||
plugins: [
|
||
new htmlWebpackPlugin()
|
||
]
|
||
```
|
||
|
||
然后生成的文件是 webpack 帮我们生成的 html 文件。当然我们可以新建一个自己的 html 作为模版。
|
||
|
||
```json
|
||
plugins: [
|
||
new htmlWebpackPlugin({
|
||
template: 'index.html'
|
||
})
|
||
]
|
||
```
|
||
|
||
```html
|
||
//模版
|
||
<html>
|
||
<head>
|
||
<titile>webpack demo</titile>
|
||
</head>
|
||
<body>
|
||
<h2>我是 webpack 生成 html 的模版</h2>
|
||
</body>
|
||
<script type="text/javascript" src="./dist/js/bundle.js" ></script>
|
||
</html>
|
||
//打包生成的
|
||
<html>
|
||
<head>
|
||
<titile>webpack demo</titile>
|
||
</head>
|
||
<body>
|
||
<h2>我是 webpack 生成 html 的模版</h2>
|
||
<script type="text/javascript" src="main-4166ec84d15023f1cd10.js"></script><script type="text/javascript" src="a-c13b6c7a7bfe7bd0293e.js"></script></body>
|
||
<script type="text/javascript" src="./dist/js/bundle.js" ></script>
|
||
</html>
|
||
```
|
||
|
||
说明:上面选中的 template 写了 index.html 就会找到合适的文件是因为 webpack 有个上下文参数 context,会根据上下文找到对应的 html(这里就是根目录)
|
||
|
||
3. 上述的缺点是生成的 html 也会放在 dist/js 目录下。
|
||
|
||

|
||
|
||
需要做到的效果就是 html 放在根目录, js 放在 dist 目录下的 js 目录下。需要对 webpack.config.js 的 output 属性做修改
|
||
|
||
4. ```js
|
||
output:{
|
||
path: path.resolve(__dirname,'./dist'),
|
||
filename: 'js/[name]-[chunkhash].js'
|
||
},
|
||
```
|
||
5. plugins 的参数很多可以自定义
|
||
|
||
```json
|
||
plugins: [
|
||
new htmlWebpackPlugin({
|
||
template: 'index.html',
|
||
filename: 'index-[hash].html',
|
||
inject: 'head'
|
||
})
|
||
]
|
||
```
|
||
|
||
* template: 指定生成 html 的模版
|
||
* filename:指定生成 html 的命名规则
|
||
* inject :指定生成 js 的 script 插入的位置。head、body
|
||
|
||
6. 如果想通过 plugins 传值到 生成的 html,怎么办?
|
||
|
||
* htmlWebpackPlugin.options 对象就可以拿到传递过来的值
|
||
* <%= htmlWebpackPlugin.options.title %> 模版语法来拿值
|
||
|
||
```json
|
||
//webpack.config.js
|
||
plugins: [
|
||
new htmlWebpackPlugin({
|
||
template: 'index.html',
|
||
filename: 'index.html',
|
||
inject: 'head',
|
||
title: 'Webpack is awesome',
|
||
date : new Date()
|
||
})
|
||
]
|
||
```
|
||
|
||
```html
|
||
// 模版 html
|
||
<html>
|
||
<head>
|
||
<titile><%= htmlWebpackPlugin.options.title %></titile>
|
||
</head>
|
||
<body>
|
||
<h2>我是 webpack 生成 html 的模版</h2>
|
||
<h3>时间:<%= htmlWebpackPlugin.options.date %></h3>
|
||
</body>
|
||
</html>
|
||
|
||
//生成的html
|
||
<html>
|
||
<head>
|
||
<titile>Webpack is awesome</titile>
|
||
<script type="text/javascript" src="js/main-82c7521f0a4a776cc00b.js"></script><script type="text/javascript" src="js/a-273641522fd044fc27c7.js"></script></head>
|
||
<body>
|
||
<h2>我是 webpack 生成 html 的模版</h2>
|
||
<h3>时间:Thu Aug 02 2018 15:40:50 GMT+0800 (CST)</h3>
|
||
</body>
|
||
</html>
|
||
```
|
||
|
||
7. 我们很好奇 html-webpack-plugin 可以传递什么参数?或者这个对象包含什么信息。做个测试就知道了
|
||
|
||
```html
|
||
//模版 html
|
||
<% for (var key in htmlWebpackPlugin){ %>
|
||
<%= key %>
|
||
<% } %>
|
||
|
||
//生成的 html
|
||
files
|
||
options
|
||
```
|
||
|
||
看到最外层的节点就2个:files、options。那么我们分别对这2个节点遍历输出。因为遍历出的 value (**htmlWebpackPlugin.files\[key\] **)可能是对象、数组。所以用 **JSON.Stringfy\(htmlWebpackPlugin.files\[key\]\)** 打印
|
||
|
||
```html
|
||
<html>
|
||
<head>
|
||
<titile><%= htmlWebpackPlugin.options.title %></titile>
|
||
</head>
|
||
<body>
|
||
<h2>我是 webpack 生成 html 的模版</h2>
|
||
<h3>时间:<%= htmlWebpackPlugin.options.date %></h3>
|
||
<% for (var key in htmlWebpackPlugin.files){ %>
|
||
<%= key %> <%= JSON.stringify(htmlWebpackPlugin.files[key]) %>
|
||
<% } %>
|
||
<hr>
|
||
<% for (var key in htmlWebpackPlugin.options){ %>
|
||
<%= key %> <%= JSON.stringify(htmlWebpackPlugin.options[key]) %>
|
||
<% } %>
|
||
</body>
|
||
</html>
|
||
|
||
//生成的 html
|
||
<html>
|
||
<head>
|
||
<titile>Webpack is awesome</titile>
|
||
<script type="text/javascript" src="js/main-82c7521f0a4a776cc00b.js"></script><script type="text/javascript" src="js/a-273641522fd044fc27c7.js"></script></head>
|
||
<body>
|
||
<h2>我是 webpack 生成 html 的模版</h2>
|
||
<h3>时间:Thu Aug 02 2018 15:51:27 GMT+0800 (CST)</h3>
|
||
|
||
publicPath ""
|
||
|
||
chunks {"main":{"size":28,"entry":"js/main-82c7521f0a4a776cc00b.js","hash":"82c7521f0a4a776cc00b","css":[]},"a":{"size":18,"entry":"js/a-273641522fd044fc27c7.js","hash":"273641522fd044fc27c7","css":[]} }
|
||
|
||
js ["js/main-82c7521f0a4a776cc00b.js","js/a-273641522fd044fc27c7.js"]
|
||
|
||
css []
|
||
|
||
manifest
|
||
|
||
<hr>
|
||
|
||
template "/Users/liubinpeng/Desktop/webpackdemo/Demo2/node_modules/html-webpack-plugin/lib/loader.js!/Users/liubinpeng/Desktop/webpackdemo/Demo2/index.html"
|
||
|
||
templateParameters
|
||
|
||
filename "index.html"
|
||
|
||
hash false
|
||
|
||
inject "head"
|
||
|
||
compile true
|
||
|
||
favicon false
|
||
|
||
minify false
|
||
|
||
cache true
|
||
|
||
showErrors true
|
||
|
||
chunks "all"
|
||
|
||
excludeChunks []
|
||
|
||
chunksSortMode "auto"
|
||
|
||
meta {}
|
||
|
||
title "Webpack is awesome"
|
||
|
||
xhtml false
|
||
|
||
date "2018-08-02T07:51:27.110Z"
|
||
|
||
</body>
|
||
</html>
|
||
```
|
||
|
||
8. 有时候我们想把部分 js 放到 head ,部分 js 放到 body 中。单独通过 webpack.config.js 是没办法实现这个目的,结合上面的成果,我们可以拿到 **htmlWebpackPlugin.files.chunks** 属性,比如将 a.js 放到 head 标签,main.js 放到 body 标签。
|
||
|
||
```json
|
||
plugins: [
|
||
new htmlWebpackPlugin({
|
||
template: 'index.html',
|
||
filename: 'index.html',
|
||
inject: false,
|
||
title: 'Webpack is awesome',
|
||
date : new Date()
|
||
})
|
||
]
|
||
```
|
||
|
||
```html
|
||
//模版 html
|
||
<html>
|
||
<head>
|
||
<titile><%= htmlWebpackPlugin.options.title %></titile>
|
||
<script type="text/javascript" src="<%= htmlWebpackPlugin.files.chunks.a.entry %>"></script>
|
||
</head>
|
||
<body>
|
||
<h2>我是 webpack 生成 html 的模版</h2>
|
||
<h3>时间:<%= htmlWebpackPlugin.options.date %></h3>
|
||
<script type="text/javascript" src="<%= htmlWebpackPlugin.files.chunks.a.entry %>"></script>
|
||
</body>
|
||
</html>
|
||
```
|
||
|
||
```html
|
||
//生成 html
|
||
<html>
|
||
<head>
|
||
<titile>Webpack is awesome</titile>
|
||
<script type="text/javascript" src="js/a-273641522fd044fc27c7.js"></script>
|
||
</head>
|
||
<body>
|
||
<h2>我是 webpack 生成 html 的模版</h2>
|
||
<h3>时间:Thu Aug 02 2018 15:58:56 GMT+0800 (CST)</h3>
|
||
<script type="text/javascript" src="js/a-273641522fd044fc27c7.js"></script>
|
||
</body>
|
||
</html>
|
||
```
|
||
|
||
需要注意的是当自定义 js 文件的位置的时候,需要将 webpack.config.js 中 plugins 下的 inject 设置为 false
|
||
|
||
9. 接下来看到的这种需求绝对很有料。前面我们看到的都是相对路径,但是我们的产品需要上线,所以我们的 js 文件资源路径需要改变。如下:
|
||
|
||
```json
|
||
//webpack.config.js
|
||
output:{
|
||
path: path.resolve(__dirname,'./dist'),
|
||
filename: 'js/[name]-[chunkhash].js',
|
||
publicPath: 'http://test.lbp.com'
|
||
},
|
||
```
|
||
|
||
```html
|
||
//生成的 html
|
||
<html>
|
||
<head>
|
||
<titile>Webpack is awesome</titile>
|
||
<script type="text/javascript" src="http://test.lbp.com/js/a-502c14d352874172253c.js"></script>
|
||
</head>
|
||
<body>
|
||
<h2>我是 webpack 生成 html 的模版</h2>
|
||
<h3>时间:Thu Aug 02 2018 16:25:12 GMT+0800 (CST)</h3>
|
||
<script type="text/javascript" src="http://test.lbp.com/js/a-502c14d352874172253c.js"></script>
|
||
</body>
|
||
</html>
|
||
```
|
||
|
||
10. 利用 webpack 我们还可以打包好的 html 做一些优化,比如删除注释、去掉空格.
|
||
|
||
修改 webpack.config.js 中 plugins 节点下的 htmlWebpackPlugin 的 minify 属性
|
||
|
||
```json
|
||
plugins: [
|
||
new htmlWebpackPlugin({
|
||
template: 'index.html',
|
||
filename: 'index.html',
|
||
inject: false,
|
||
title: 'Webpack is awesome',
|
||
date : new Date(),
|
||
minify:{
|
||
removeComments: true,
|
||
collapseWhitespace: true
|
||
}
|
||
})
|
||
],
|
||
```
|
||
|
||
我们对 模版 html 写一些注释,运行 npm run webpack 后看到生成的页面中注释、空格都被去掉了。
|
||
|
||
11. 如果想打包生成多个 html 怎么办?可能使用 plugins 下的 new htmlWebpackPlugin\(\) 多来几组配置项
|
||
|
||
```json
|
||
plugins: [
|
||
new htmlWebpackPlugin({
|
||
template: 'index.html',
|
||
filename: 'a.html',
|
||
title: 'this is a.html',
|
||
chunks: ['main','a'],
|
||
inject: 'body'
|
||
}),
|
||
new htmlWebpackPlugin({
|
||
template: 'index.html',
|
||
filename: 'b.html',
|
||
title: 'this is b.html',
|
||
chunks: ['main','b'],
|
||
inject: 'body'
|
||
}),
|
||
new htmlWebpackPlugin({
|
||
template: 'index.html',
|
||
filename: 'c.html',
|
||
title: 'this is c.html',
|
||
chunks: ['main','c'],
|
||
inject: 'body'
|
||
})
|
||
]
|
||
```
|
||
|
||
注意:这里我们可以指定每个生成的 filename 以及 title。实现上述需求关键点在于 **chunks** 这个属性。用一个数组的形式来指定需要引用的 chunk。
|
||
|
||
12. 上面只是实现了 a、b、c 3个页面,如果多了的话按照上面的写法要烦死人的。 webpack 为我们提供了 **excludeChunks** 这个属性,它指定了不需要包含的chunk。上面写法的另一种写法
|
||
|
||
```json
|
||
plugins: [
|
||
new htmlWebpackPlugin({
|
||
template: 'index.html',
|
||
filename: 'a.html',
|
||
title: 'this is a.html',
|
||
// chunks: ['main','a'],
|
||
inject: 'body',
|
||
excludeChunks: ['b','c']
|
||
}),
|
||
new htmlWebpackPlugin({
|
||
template: 'index.html',
|
||
filename: 'b.html',
|
||
title: 'this is b.html',
|
||
//chunks: ['main','b'],
|
||
inject: 'body',
|
||
excludeChunks: ['a','c']
|
||
}),
|
||
new htmlWebpackPlugin({
|
||
template: 'index.html',
|
||
filename: 'c.html',
|
||
title: 'this is c.html',
|
||
// chunks: ['main','c'],
|
||
inject: 'body',
|
||
excludeChunks: ['a','b']
|
||
})
|
||
],
|
||
```
|
||
|
||
13. 有种需求是:当我们需要减小首页 HTTP 请求(提高首页的渲染速度),也就是将一些首页必须用到的 JS 文件用内联的方式写在首页 html 的 script 标签里面,不重要的 js 文件通过 script 的 src 引入。要怎么做呢?webpack 在设计之初没想到这种需求,很多人在 github 提了很多 issue ,官方认识到这种需求,所以在后期更新的 demo 中看到了解决方案。
|
||
|
||
* htmlWebpackPlugin.files.chunks 对象拿到的是我们在 webpack.config.js 设置过 publicPath 生成的完整路径
|
||
|
||
* 通过截取字符串子串的方式拿到文件地址。 **htmlWebpackPlugin.files.chunks.main.entry.substr\(htmlWebpackPlugin.files.publicPath.length\) **
|
||
|
||
* [官方的解决方案](https://github.com/jantimon/html-webpack-plugin/blob/master/examples/inline/template.jade)
|
||
|
||
```jade
|
||
compilation.assets[jsFile.substr(htmlWebpackPlugin.files.publicPath.length)].source()
|
||
```
|
||
|
||
在我们的项目中加以改造,为生成的每个页面的 header 里面加入 main.js。在 body 部分加入除了 main.js 之外的其他 js。
|
||
|
||
```html
|
||
//模版html
|
||
<html>
|
||
<head>
|
||
<title><%= htmlWebpackPlugin.options.title %></title>
|
||
<script type="text/javascript">
|
||
<%= compilation.assets[htmlWebpackPlugin.files.chunks.main.entry.substr(htmlWebpackPlugin.files.publicPath.length)].source() %>
|
||
|
||
</script>
|
||
|
||
</head>
|
||
<body>
|
||
<h2>我是 webpack 生成 html 的模版</h2>
|
||
<% for(var key in htmlWebpackPlugin.files.chunks){ %>
|
||
<% if( key !== 'main'){ %>
|
||
<script type="text/javascript" src="<%= htmlWebpackPlugin.files.chunks[key].entry %>"></script>
|
||
<% } %>
|
||
<% } %>
|
||
</body>
|
||
</html>
|
||
```
|
||
|
||
```js
|
||
//webpack.config.js
|
||
var htmlWebpackPlugin = require('html-webpack-plugin');
|
||
var path = require('path');
|
||
|
||
module.exports = {
|
||
// entry: './src/script/main.js',
|
||
// entry: ['./src/script/main.js','./src/script/a.js'],
|
||
entry: {
|
||
main: './src/script/main.js',
|
||
a : './src/script/a.js',
|
||
b : './src/script/b.js',
|
||
c : './src/script/c.js'
|
||
},
|
||
output:{
|
||
path: path.resolve(__dirname,'./dist'),
|
||
filename: 'js/[name]-[hash].js',
|
||
publicPath: 'http://test.lbp.com'
|
||
},
|
||
plugins: [
|
||
new htmlWebpackPlugin({
|
||
template: 'index.html',
|
||
filename: 'a.html',
|
||
title: 'this is a.html',
|
||
inject: false,
|
||
excludeChunks: ['b','c']
|
||
}),
|
||
new htmlWebpackPlugin({
|
||
template: 'index.html',
|
||
filename: 'b.html',
|
||
title: 'this is b.html',
|
||
inject: false,
|
||
excludeChunks: ['a','c']
|
||
}),
|
||
new htmlWebpackPlugin({
|
||
template: 'index.html',
|
||
filename: 'c.html',
|
||
title: 'this is c.html',
|
||
inject: false,
|
||
excludeChunks: ['a','b']
|
||
})
|
||
],
|
||
}
|
||
```
|
||
|
||
为了验证生效,我将 main.js 加入了 alert
|
||
|
||
```js
|
||
//main.js
|
||
function helloworld(msg){
|
||
alert(msg);
|
||
}
|
||
|
||
helloworld("hello webpack");
|
||
```
|
||
|
||
看看打包后生成的 a.html
|
||
|
||
```html
|
||
<html>
|
||
<head>
|
||
<title>this is a.html</title>
|
||
<script type="text/javascript">
|
||
/******/ (function(modules) { // webpackBootstrap
|
||
/******/ // The module cache
|
||
/******/ var installedModules = {};
|
||
/******/
|
||
/******/ // The require function
|
||
/******/ function __webpack_require__(moduleId) {
|
||
/******/
|
||
/******/ // Check if module is in cache
|
||
/******/ if(installedModules[moduleId]) {
|
||
/******/ return installedModules[moduleId].exports;
|
||
/******/ }
|
||
/******/ // Create a new module (and put it into the cache)
|
||
/******/ var module = installedModules[moduleId] = {
|
||
/******/ i: moduleId,
|
||
/******/ l: false,
|
||
/******/ exports: {}
|
||
/******/ };
|
||
/******/
|
||
/******/ // Execute the module function
|
||
/******/ modules[moduleId].call(module.exports, module, module.exports, __webpack_require__);
|
||
/******/
|
||
/******/ // Flag the module as loaded
|
||
/******/ module.l = true;
|
||
/******/
|
||
/******/ // Return the exports of the module
|
||
/******/ return module.exports;
|
||
/******/ }
|
||
/******/
|
||
/******/
|
||
/******/ // expose the modules object (__webpack_modules__)
|
||
/******/ __webpack_require__.m = modules;
|
||
/******/
|
||
/******/ // expose the module cache
|
||
/******/ __webpack_require__.c = installedModules;
|
||
/******/
|
||
/******/ // define getter function for harmony exports
|
||
/******/ __webpack_require__.d = function(exports, name, getter) {
|
||
/******/ if(!__webpack_require__.o(exports, name)) {
|
||
/******/ Object.defineProperty(exports, name, { enumerable: true, get: getter });
|
||
/******/ }
|
||
/******/ };
|
||
/******/
|
||
/******/ // define __esModule on exports
|
||
/******/ __webpack_require__.r = function(exports) {
|
||
/******/ if(typeof Symbol !== 'undefined' && Symbol.toStringTag) {
|
||
/******/ Object.defineProperty(exports, Symbol.toStringTag, { value: 'Module' });
|
||
/******/ }
|
||
/******/ Object.defineProperty(exports, '__esModule', { value: true });
|
||
/******/ };
|
||
/******/
|
||
/******/ // create a fake namespace object
|
||
/******/ // mode & 1: value is a module id, require it
|
||
/******/ // mode & 2: merge all properties of value into the ns
|
||
/******/ // mode & 4: return value when already ns object
|
||
/******/ // mode & 8|1: behave like require
|
||
/******/ __webpack_require__.t = function(value, mode) {
|
||
/******/ if(mode & 1) value = __webpack_require__(value);
|
||
/******/ if(mode & 8) return value;
|
||
/******/ if((mode & 4) && typeof value === 'object' && value && value.__esModule) return value;
|
||
/******/ var ns = Object.create(null);
|
||
/******/ __webpack_require__.r(ns);
|
||
/******/ Object.defineProperty(ns, 'default', { enumerable: true, value: value });
|
||
/******/ if(mode & 2 && typeof value != 'string') for(var key in value) __webpack_require__.d(ns, key, function(key) { return value[key]; }.bind(null, key));
|
||
/******/ return ns;
|
||
/******/ };
|
||
/******/
|
||
/******/ // getDefaultExport function for compatibility with non-harmony modules
|
||
/******/ __webpack_require__.n = function(module) {
|
||
/******/ var getter = module && module.__esModule ?
|
||
/******/ function getDefault() { return module['default']; } :
|
||
/******/ function getModuleExports() { return module; };
|
||
/******/ __webpack_require__.d(getter, 'a', getter);
|
||
/******/ return getter;
|
||
/******/ };
|
||
/******/
|
||
/******/ // Object.prototype.hasOwnProperty.call
|
||
/******/ __webpack_require__.o = function(object, property) { return Object.prototype.hasOwnProperty.call(object, property); };
|
||
/******/
|
||
/******/ // __webpack_public_path__
|
||
/******/ __webpack_require__.p = "http://test.lbp.com";
|
||
/******/
|
||
/******/
|
||
/******/ // Load entry module and return exports
|
||
/******/ return __webpack_require__(__webpack_require__.s = "./src/script/main.js");
|
||
/******/ })
|
||
/************************************************************************/
|
||
/******/ ({
|
||
|
||
/***/ "./src/script/main.js":
|
||
/*!****************************!*\
|
||
!*** ./src/script/main.js ***!
|
||
\****************************/
|
||
/*! no static exports found */
|
||
/***/ (function(module, exports) {
|
||
|
||
eval("function helloworld(msg){\n alert(msg);\n}\n\n\nhelloworld(\"hello webpack\");\n\n//# sourceURL=webpack:///./src/script/main.js?");
|
||
|
||
/***/ })
|
||
|
||
/******/ });
|
||
|
||
</script>
|
||
|
||
</head>
|
||
<body>
|
||
<h2>我是 webpack 生成 html 的模版</h2>
|
||
<script type="text/javascript" src="http://test.lbp.com/js/a-4caa8a542ab497f63bf8.js"></script>
|
||
</body>
|
||
</html>
|
||
```
|
||
|
||
在浏览器调试后发现页面是可以正常弹出“hello webpack”
|
||
|
||
## loader
|
||
|
||
新建项目,一步步认识 loader
|
||
|
||
1. Js loader
|
||
|
||
我们写的项目中会用 es6,但是并不是所有的浏览器都支持 es6(虽然各个浏览器厂商每年在不断新增对 es6 的支持),所以我们需要使用 babel 将 es6 转换为浏览器都支持的 es2015 。所以使用 babel-loader 的时候需要指定 babel 转换的模式。loader 官方给出了2种方式
|
||
|
||
* 可以直接像 url 的 get 形式一样,将参数传递在后面。
|
||
|
||
```js
|
||
//方式1
|
||
require("babel-loader?presets=latest");
|
||
//方式2
|
||
{
|
||
test: /\.png$/,
|
||
loader: 'url-loader?presets=latest'
|
||
}
|
||
```
|
||
|
||
* 写在 query 参数里面
|
||
|
||
```js
|
||
{
|
||
test: /\.js$/,
|
||
loader: 'babel',
|
||
query: {
|
||
presets: ['latest']
|
||
}
|
||
}
|
||
```
|
||
|
||
* 其实还有一种方式:在 package.json 文件里面添加一个 key 为 babel。
|
||
|
||
```json
|
||
"babel": {
|
||
presets: ['latest']
|
||
}
|
||
```
|
||
|
||
注意:webpack 现在已经是4.5.0了。以前的版本的写法是
|
||
|
||
```js
|
||
module: {
|
||
loaders: [
|
||
{
|
||
test: /\.js$/,
|
||
loader: 'babel-loader',
|
||
query: {
|
||
presets: ['latest']
|
||
}
|
||
}
|
||
]
|
||
},
|
||
```
|
||
|
||
现在的写法为
|
||
|
||
```js
|
||
module: {
|
||
rules: [
|
||
{
|
||
test: /\.js$/,
|
||
loader: 'babel-loader',
|
||
options: {
|
||
presets: ['latest']
|
||
}
|
||
}
|
||
]
|
||
},
|
||
```
|
||
|
||
注意:我们工程如果安装的依赖非常多,node\_modules 文件非常多,babel 转换会很慢,这时候需要指定2个参数可以显著提高速度
|
||
|
||
```js
|
||
module: {
|
||
rules: [
|
||
{
|
||
test: /\.js$/,
|
||
loader: 'babel-loader',
|
||
options: {
|
||
presets: ['latest']
|
||
},
|
||
exclude: path.resolve(__dirname,'./node_modules/'),
|
||
include: path.resolve(__dirname,'./src')
|
||
}
|
||
]
|
||
},
|
||
```
|
||
|
||
2. css loader
|
||
|
||
打包 css 经常会用到 css-loader、style-loader。我们经常写 flex 的时候很多浏览器兼容性不一致,所以我们需要加前缀,这时候需要使用 postcss-loader、autoprefixer
|
||
|
||
官网给出2种写法
|
||
|
||
* loader
|
||
|
||
```js
|
||
{
|
||
test: /\.css$/,
|
||
loader: 'style-loader!css-loader!postcss-loader'
|
||
}
|
||
```
|
||
|
||
* loaders
|
||
|
||
```js
|
||
{
|
||
test: /\.css$/,
|
||
loaders: ['style-loader','css-loader','postcss-loader']
|
||
}
|
||
```
|
||
|
||
如果项目中不只是使用了 css 的话,比如还使用了 less 和 sass 的话,我们需要将 css 加额外的设置
|
||
|
||
```js
|
||
{
|
||
test: /\.css$/,
|
||
use:[
|
||
'style-loader',
|
||
{loader: 'css-loader', options: {importLoaders: 1} },
|
||
{
|
||
loader: 'postcss-loader',
|
||
options:{
|
||
plugins:function(){
|
||
return [
|
||
require('postcss-import')(),
|
||
require('autoprefixer')({browsers:['last 5 versions']})
|
||
]
|
||
}
|
||
}
|
||
}
|
||
]
|
||
},
|
||
{
|
||
test: /\.less$/,
|
||
use:[
|
||
'style-loader',
|
||
{loader: 'css-loader', options: {importLoaders: 1} },
|
||
{
|
||
loader: 'postcss-loader',
|
||
options:{
|
||
plugins:function(){
|
||
return [
|
||
require('postcss-import')(),
|
||
require('autoprefixer')({browsers:['last 5 versions']})
|
||
]
|
||
}
|
||
}
|
||
},
|
||
'less-loader'
|
||
]
|
||
},
|
||
```
|
||
|
||
3. 处理模版
|
||
|
||
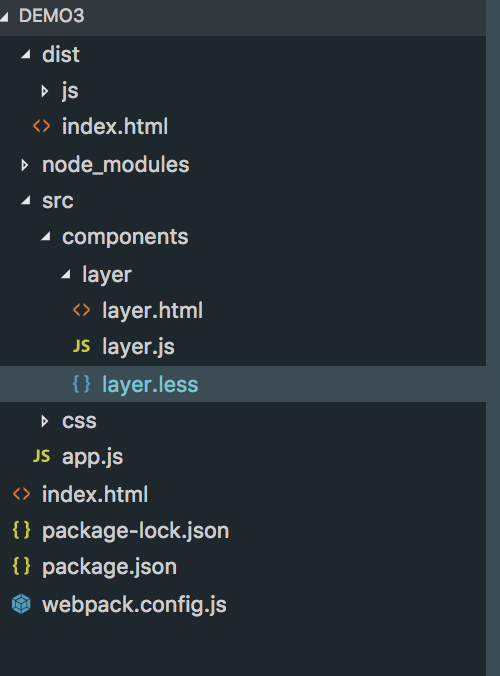
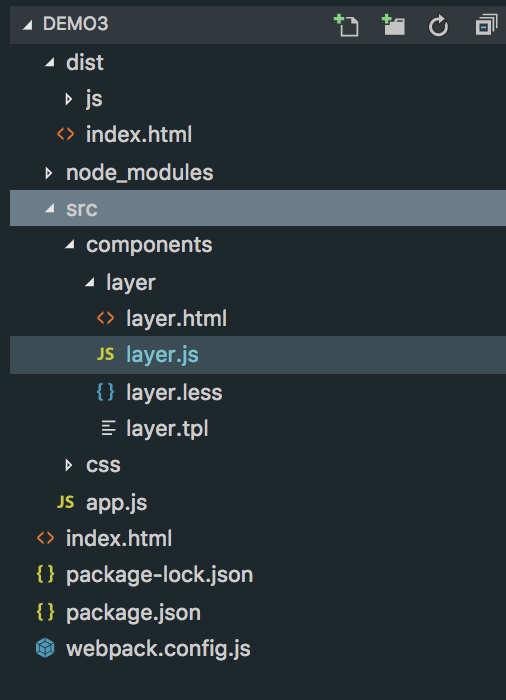
在 webpack 经常打包处理的时候会遇到模版。有普通的 html 模版,也会有 ejs 模式下的 tpl 模版
|
||
|
||
- html 模版
|
||
|
||
```html
|
||
<html>
|
||
<head>
|
||
<title><%= htmlWebpackPlugin.options.title %></title>
|
||
|
||
</head>
|
||
<body>
|
||
<div id="app">
|
||
|
||
</div>
|
||
</body>
|
||
</html>
|
||
```
|
||
|
||
```js
|
||
//layer.js
|
||
import './layer.less'
|
||
import tpl from './layer.html'
|
||
|
||
function layer(){
|
||
return {
|
||
name: 'layer',
|
||
tpl: tpl
|
||
}
|
||
}
|
||
|
||
export default layer;
|
||
|
||
//app.js
|
||
import Layer from './components/layer/layer.js';
|
||
import './css/common.css';
|
||
|
||
|
||
const App = function(){
|
||
var dom = document.getElementById("app");
|
||
var layer = new Layer();
|
||
dom.innerHTML = layer.tpl;
|
||
}
|
||
|
||
new App()
|
||
```
|
||
|
||
|
||
|
||
|
||
- ejs 模版
|
||
|
||
```js
|
||
//layer.tpl
|
||
<div class="layer">
|
||
<div>this is <%= name %> layr</div>
|
||
<% for(var i=0;i < arr.length; i++){ %>
|
||
<%= arr[i] %>
|
||
<% } %>
|
||
|
||
</div>
|
||
|
||
//layer.js
|
||
import './layer.less'
|
||
import tpl from './layer.tpl'
|
||
|
||
function layer(){
|
||
return {
|
||
name: 'layer',
|
||
tpl: tpl
|
||
}
|
||
}
|
||
|
||
export default layer;
|
||
|
||
|
||
//app.js
|
||
import Layer from './components/layer/layer.js';
|
||
import './css/common.css';
|
||
|
||
|
||
const App = function(){
|
||
var dom = document.getElementById("app");
|
||
var layer = new Layer();
|
||
dom.innerHTML = layer.tpl({
|
||
name: 'john',
|
||
arr: ['swift','Objective-C','JS','python']
|
||
});
|
||
}
|
||
|
||
new App()
|
||
```
|
||
|
||
|
||
|
||
|