
18 KiB
NSTimer、CSDisplayLink 中的内存泄露
CADisplayLink 内存泄漏
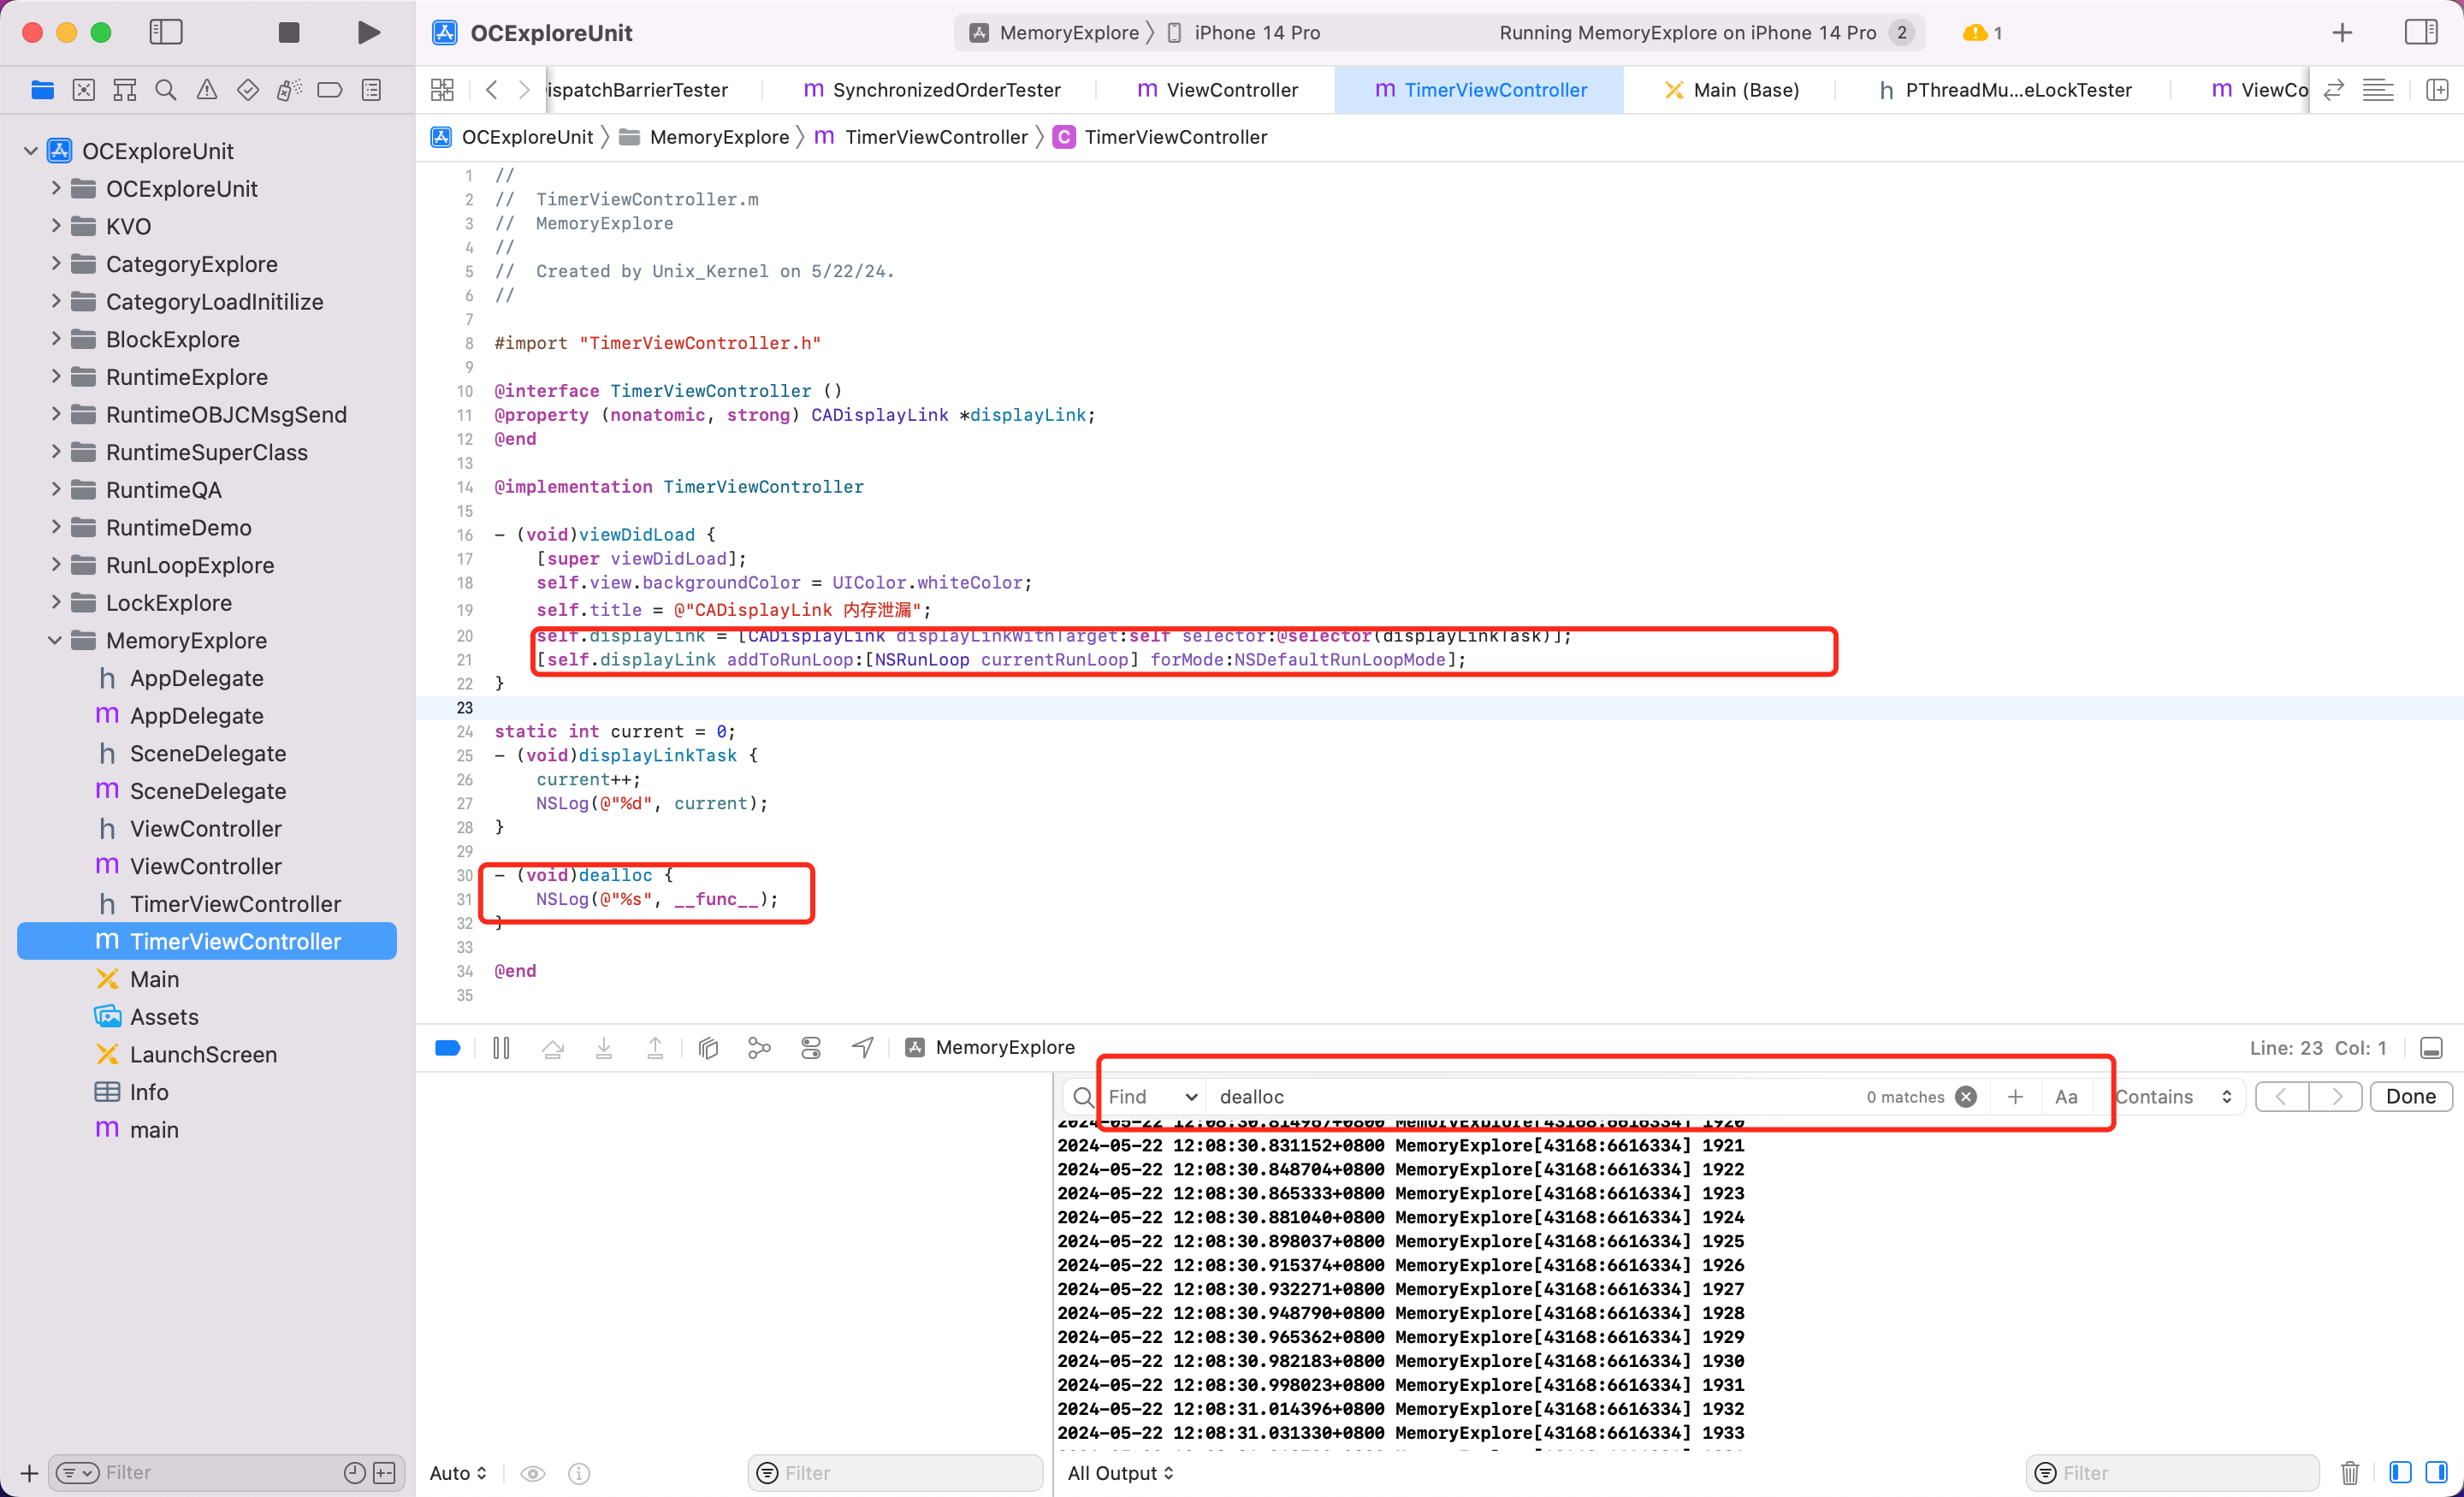
可以看到 CADisplayLink 和 VC,VC 和 CADisplayLink 互相持有,造成内存泄漏,没有释放。即使页面离开,定时器还在继续运行,不断打印。
NSTimer 内存泄漏
对比实验
NSTimer 的基础 API [NSTimer scheduledTimersWithTimeInterval:1 repeat:YES block:nil] 和当前的 VC 都会互相持有,造成环,会存在内存泄漏问题
Demo 如下:
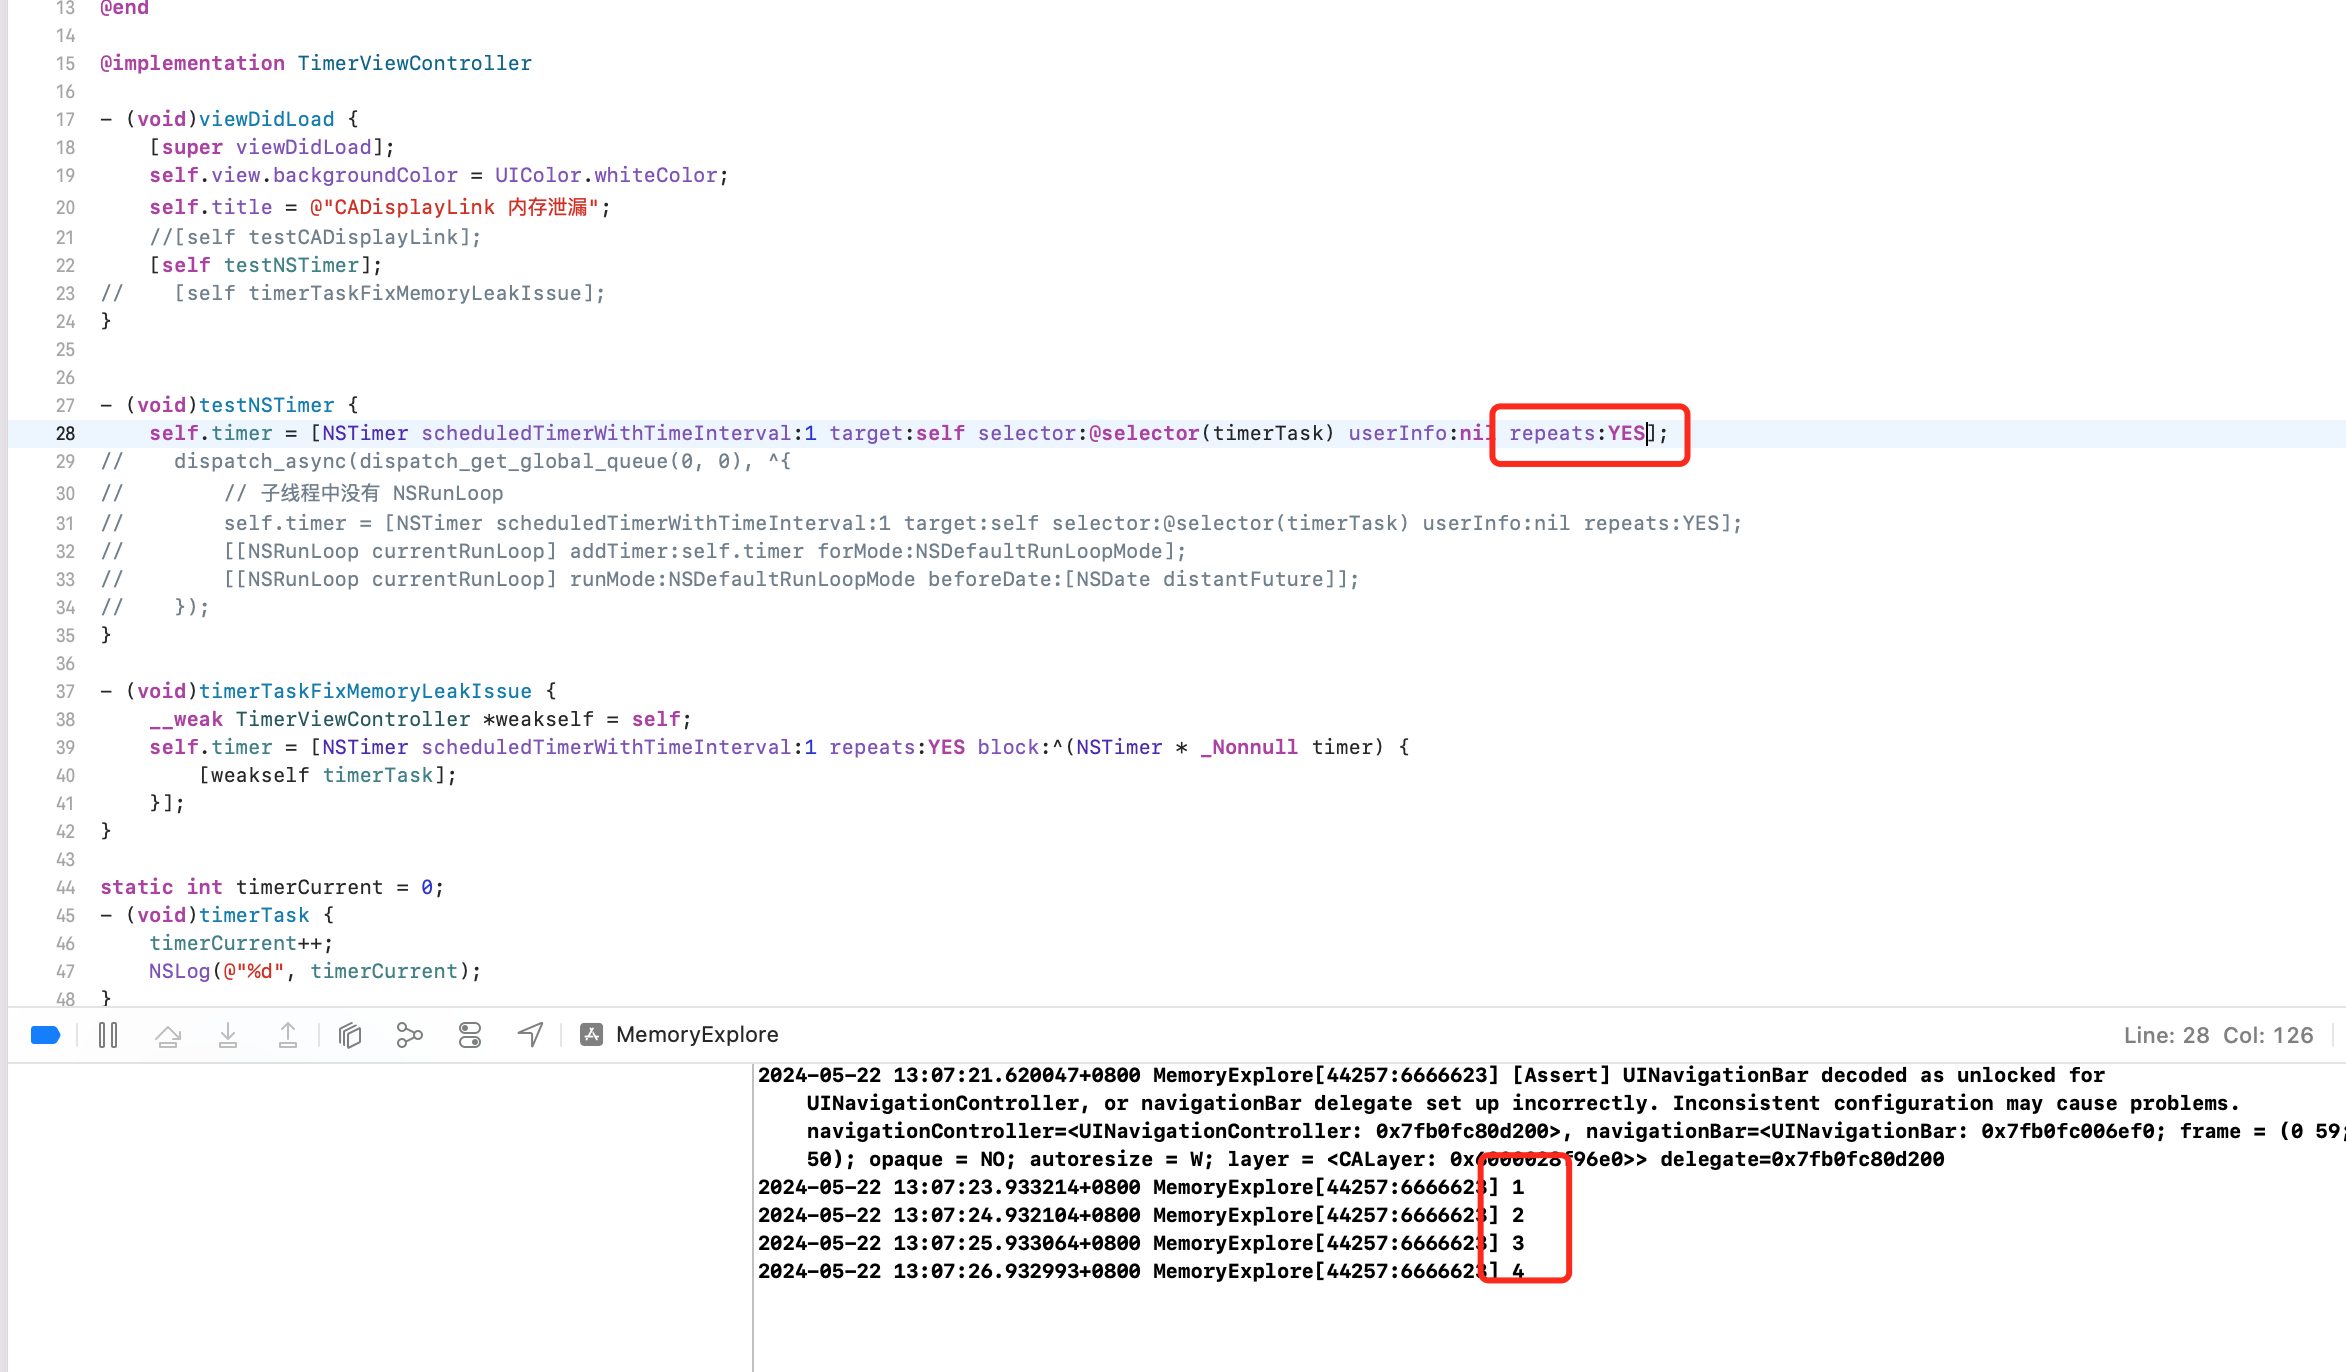
但是当使用 [NSTimer scheduledTimerWithTimeInterval:1 target:self selector:@selector(timerTask) userInfo:nil repeats:NO]; repeats 为 NO 的时候,好像不会内存泄漏。这是为什么?
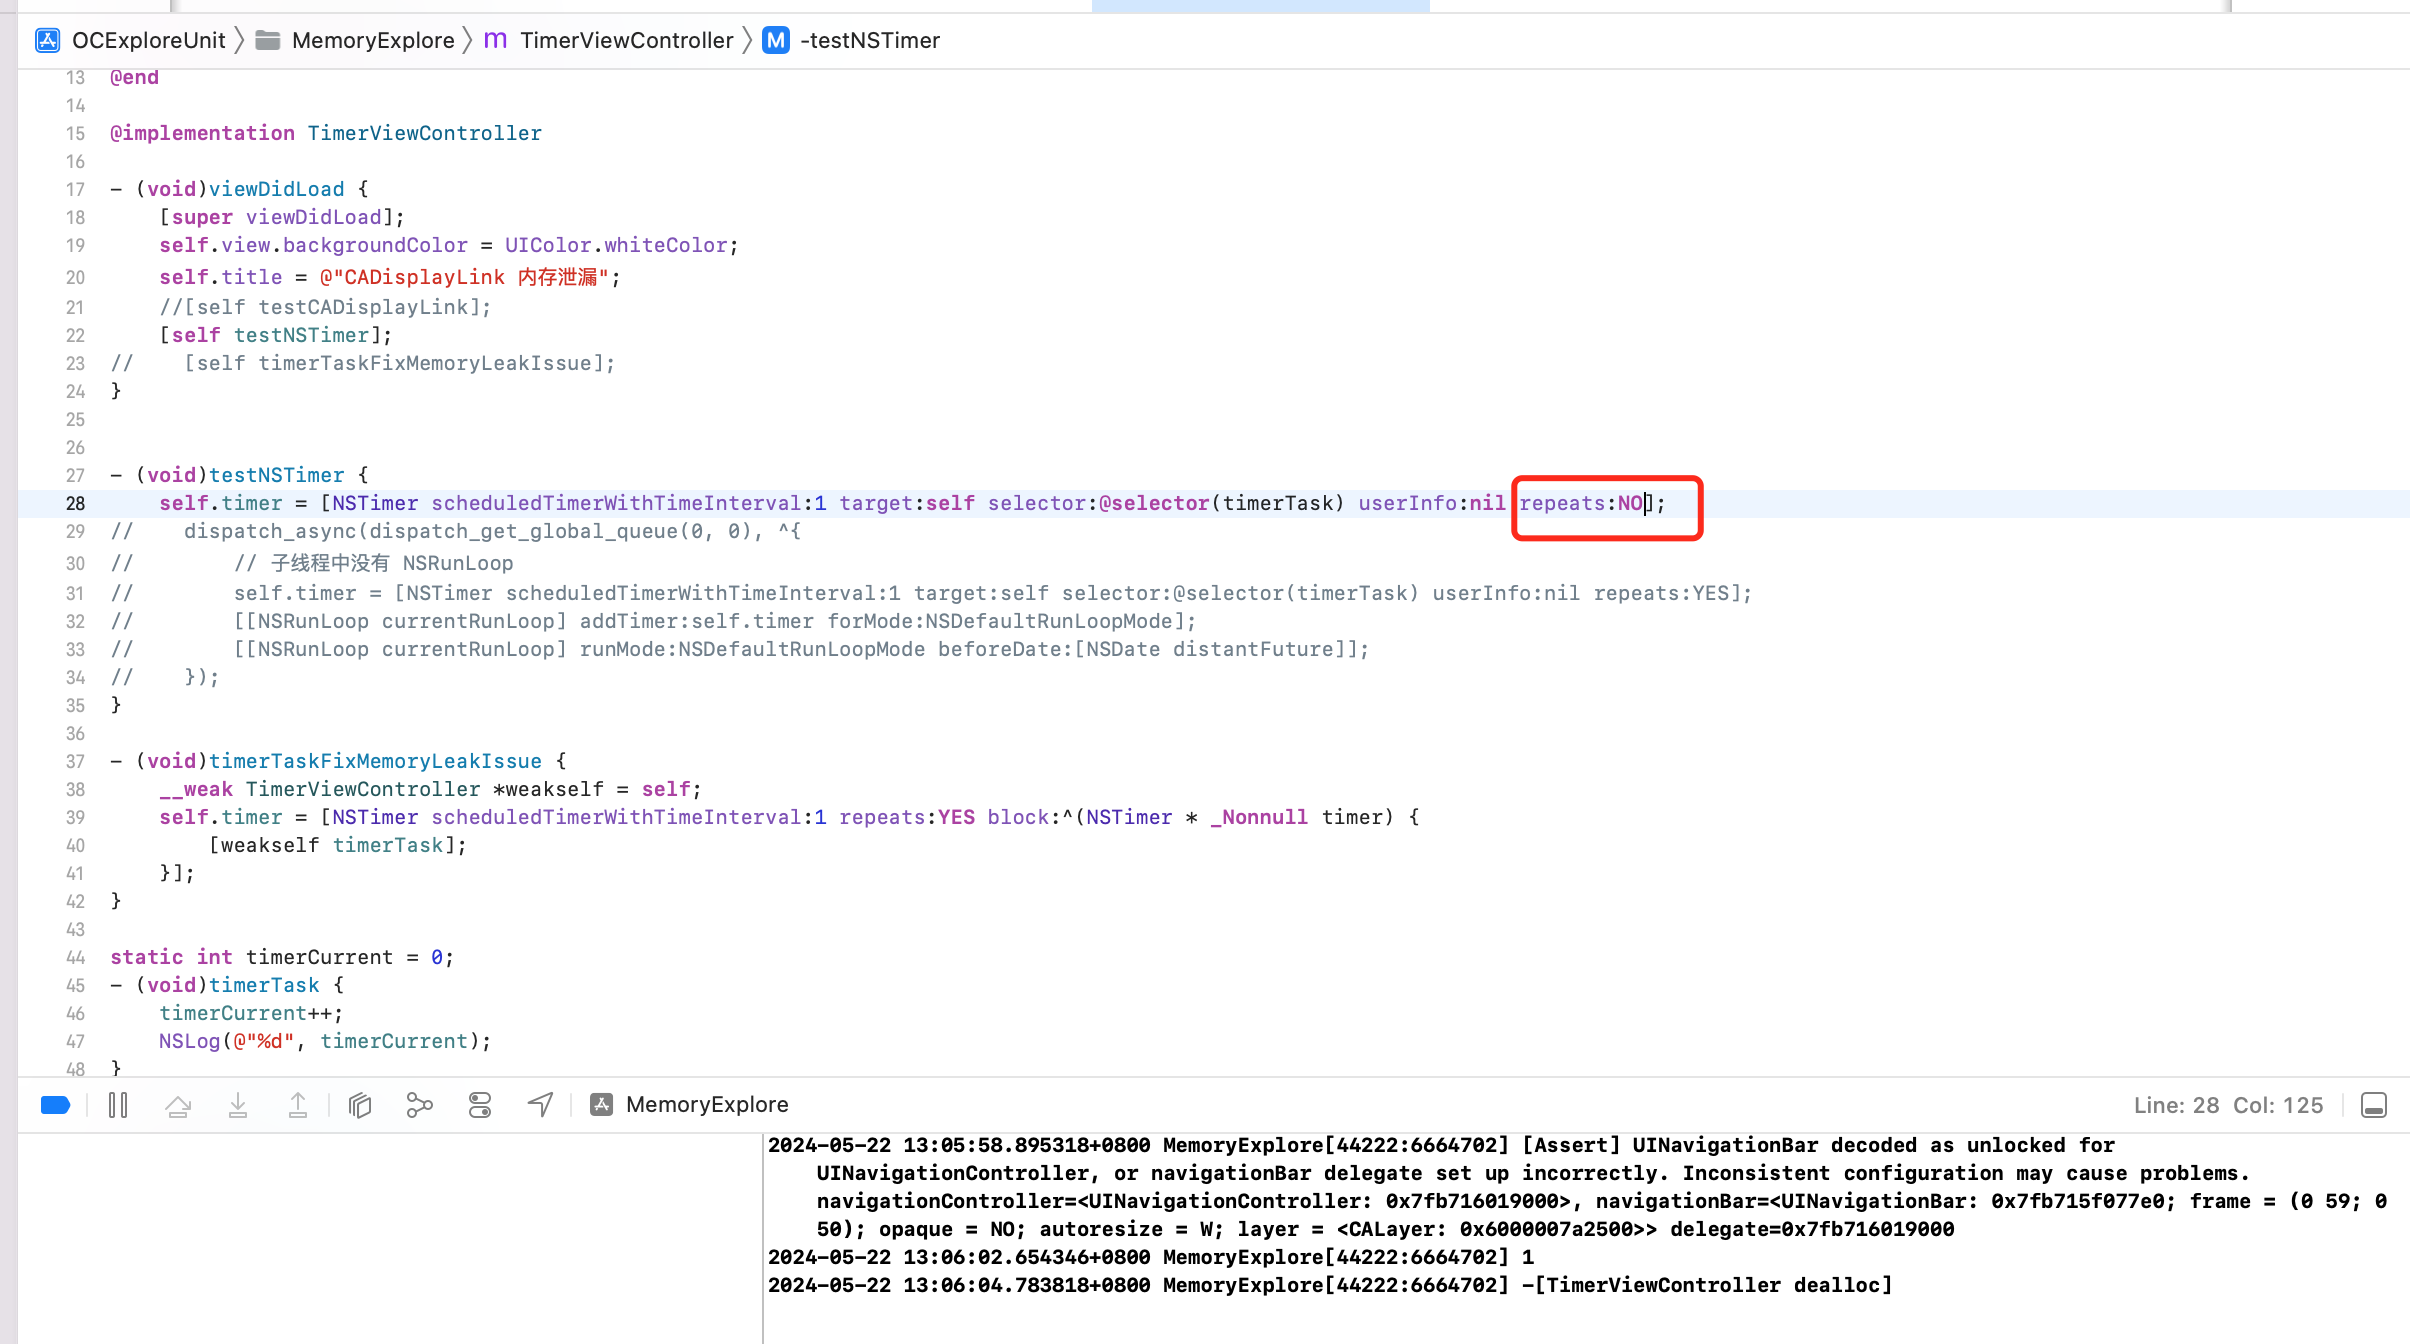
源码分析
查看 gnu 源码发现
// NSTimer.m
+ (NSTimer*) timerWithTimeInterval: (NSTimeInterval)ti
			    target: (id)object
			  selector: (SEL)selector
			  userInfo: (id)info
			   repeats: (BOOL)f
{
  return AUTORELEASE([[self alloc] initWithFireDate: nil
					   interval: ti
					     target: object
					   selector: selector
					   userInfo: info
					    repeats: f]);
}
内部调用下面的函数
- (id) initWithFireDate: (NSDate*)fd
	       interval: (NSTimeInterval)ti
		 target: (id)object
	       selector: (SEL)selector
	       userInfo: (id)info
		repeats: (BOOL)f
{
  if (ti <= 0.0)
    {
      ti = 0.0001;
    }
  if (fd == nil)
    {
      _date = [[NSDate_class allocWithZone: NSDefaultMallocZone()]
        initWithTimeIntervalSinceNow: ti];
    }
  else
    {
      _date = [fd copyWithZone: NSDefaultMallocZone()];
    }
  _target = RETAIN(object);
  _selector = selector;
  _info = RETAIN(info);
  if (f == YES)
    {
      _repeats = YES;
      _interval = ti;
    }
  else
    {
      _repeats = NO;
      _interval = 0.0;
    }
  return self;
}
外面的 repeat 根据传递的布尔值,内部赋值给 _repeats 参数。
内部会自动调用 fire
- (void) fire
{
  /* We check that we have not been invalidated before we fire.
   */
  if (NO == _invalidated) {
      if ((id)_block != nil) {
          CALL_BLOCK(_block, self);
      } else {
          id	target;

          /* We retain the target so it won't be deallocated while we are using
           * it (if this timer gets invalidated while we are firing).
           */
          target = RETAIN(_target);

          if (_selector == 0) {
              NS_DURING {
                  [(NSInvocation*)target invoke];
              }
              NS_HANDLER {
                  NSLog(@"*** NSTimer ignoring exception '%@' (reason '%@') "
		    @"raised during posting of timer with target %s(%s) "
		    @"and selector '%@'",
		    [localException name], [localException reason],
		    GSClassNameFromObject(target),
		    GSObjCIsInstance(target) ? "instance" : "class",
		    NSStringFromSelector([target selector]));
            }
              NS_ENDHANDLER
	    } else {
              NS_DURING {
                  [target performSelector: _selector withObject: self];
              }
              NS_HANDLER {
                  NSLog(@"*** NSTimer ignoring exception '%@' (reason '%@') "
		    @"raised during posting of timer with target %p and "
		    @"selector '%@'",
		    [localException name], [localException reason], target,
		    NSStringFromSelector(_selector));
            }
              NS_ENDHANDLER
            }
          RELEASE(target);
        }

      if (_repeats == NO) {
          [self invalidate];
      }
  }
}
可以看到如果 repeat 为 NO ,则会执行 [target performSelector: _selector withObject: self]; 调用1次方法,然后会执行 invalidate 函数,invalidate 实现如下
- (void) invalidate
{
  /* OPENSTEP allows this method to be called multiple times. */
  _invalidated = YES;
  if (_target != nil)
    {
      DESTROY(_target);
    }
  if (_info != nil)
    {
      DESTROY(_info);
    }
}
可以看到当 target 和 info 存在的时候,都会在 invalidate 方法中被 destory,也就是释放。
#define	DESTROY(object) 	({ \
  void *__o = (void*)object; \
  object = nil; \
  [(id)__o release]; \
})
#endif
结论:通过 gnu 可以看到,NSTimer 会对传入的 target、info 对象进行持有强引用,当 repeat 参数为 NO 的时候,则会立马通过 performSelector 的方式执行定时器任务,然后执行 invalidate 方法,对其内部引用的 object、info 进行释放。
上面的代码主要是利用定时器重复执行 p_doSomeThing 方法,在合适的时候调用 p_stopDoSomeThing 方法使定时器失效。
能看出问题吗?在开始讨论上面代码问题之前,需要对 NSTimer 做一点说明。NSTimer 的 scheduledTimerWithTimeInterval:target:selector:userInfo:repeats: 方法的最后一个参数为 YES 时,NSTimer 会保留目标对象,等到自身失效才释放目标对象。执行完任务后,一次性的定时器会自动失效;重复性的定时器,需要主动调用 invalidate 方法才会失效。
当前的 VC 和 定时器互相引用,造成循环引用。所以思路如下:
如果能在合适的时机打破循环引用就不会有问题了
- 控制器不再强引用定时器
- 定时器不再保留当前的控制器
解决方案
改用 block 的方式替换 API,不再持有 target
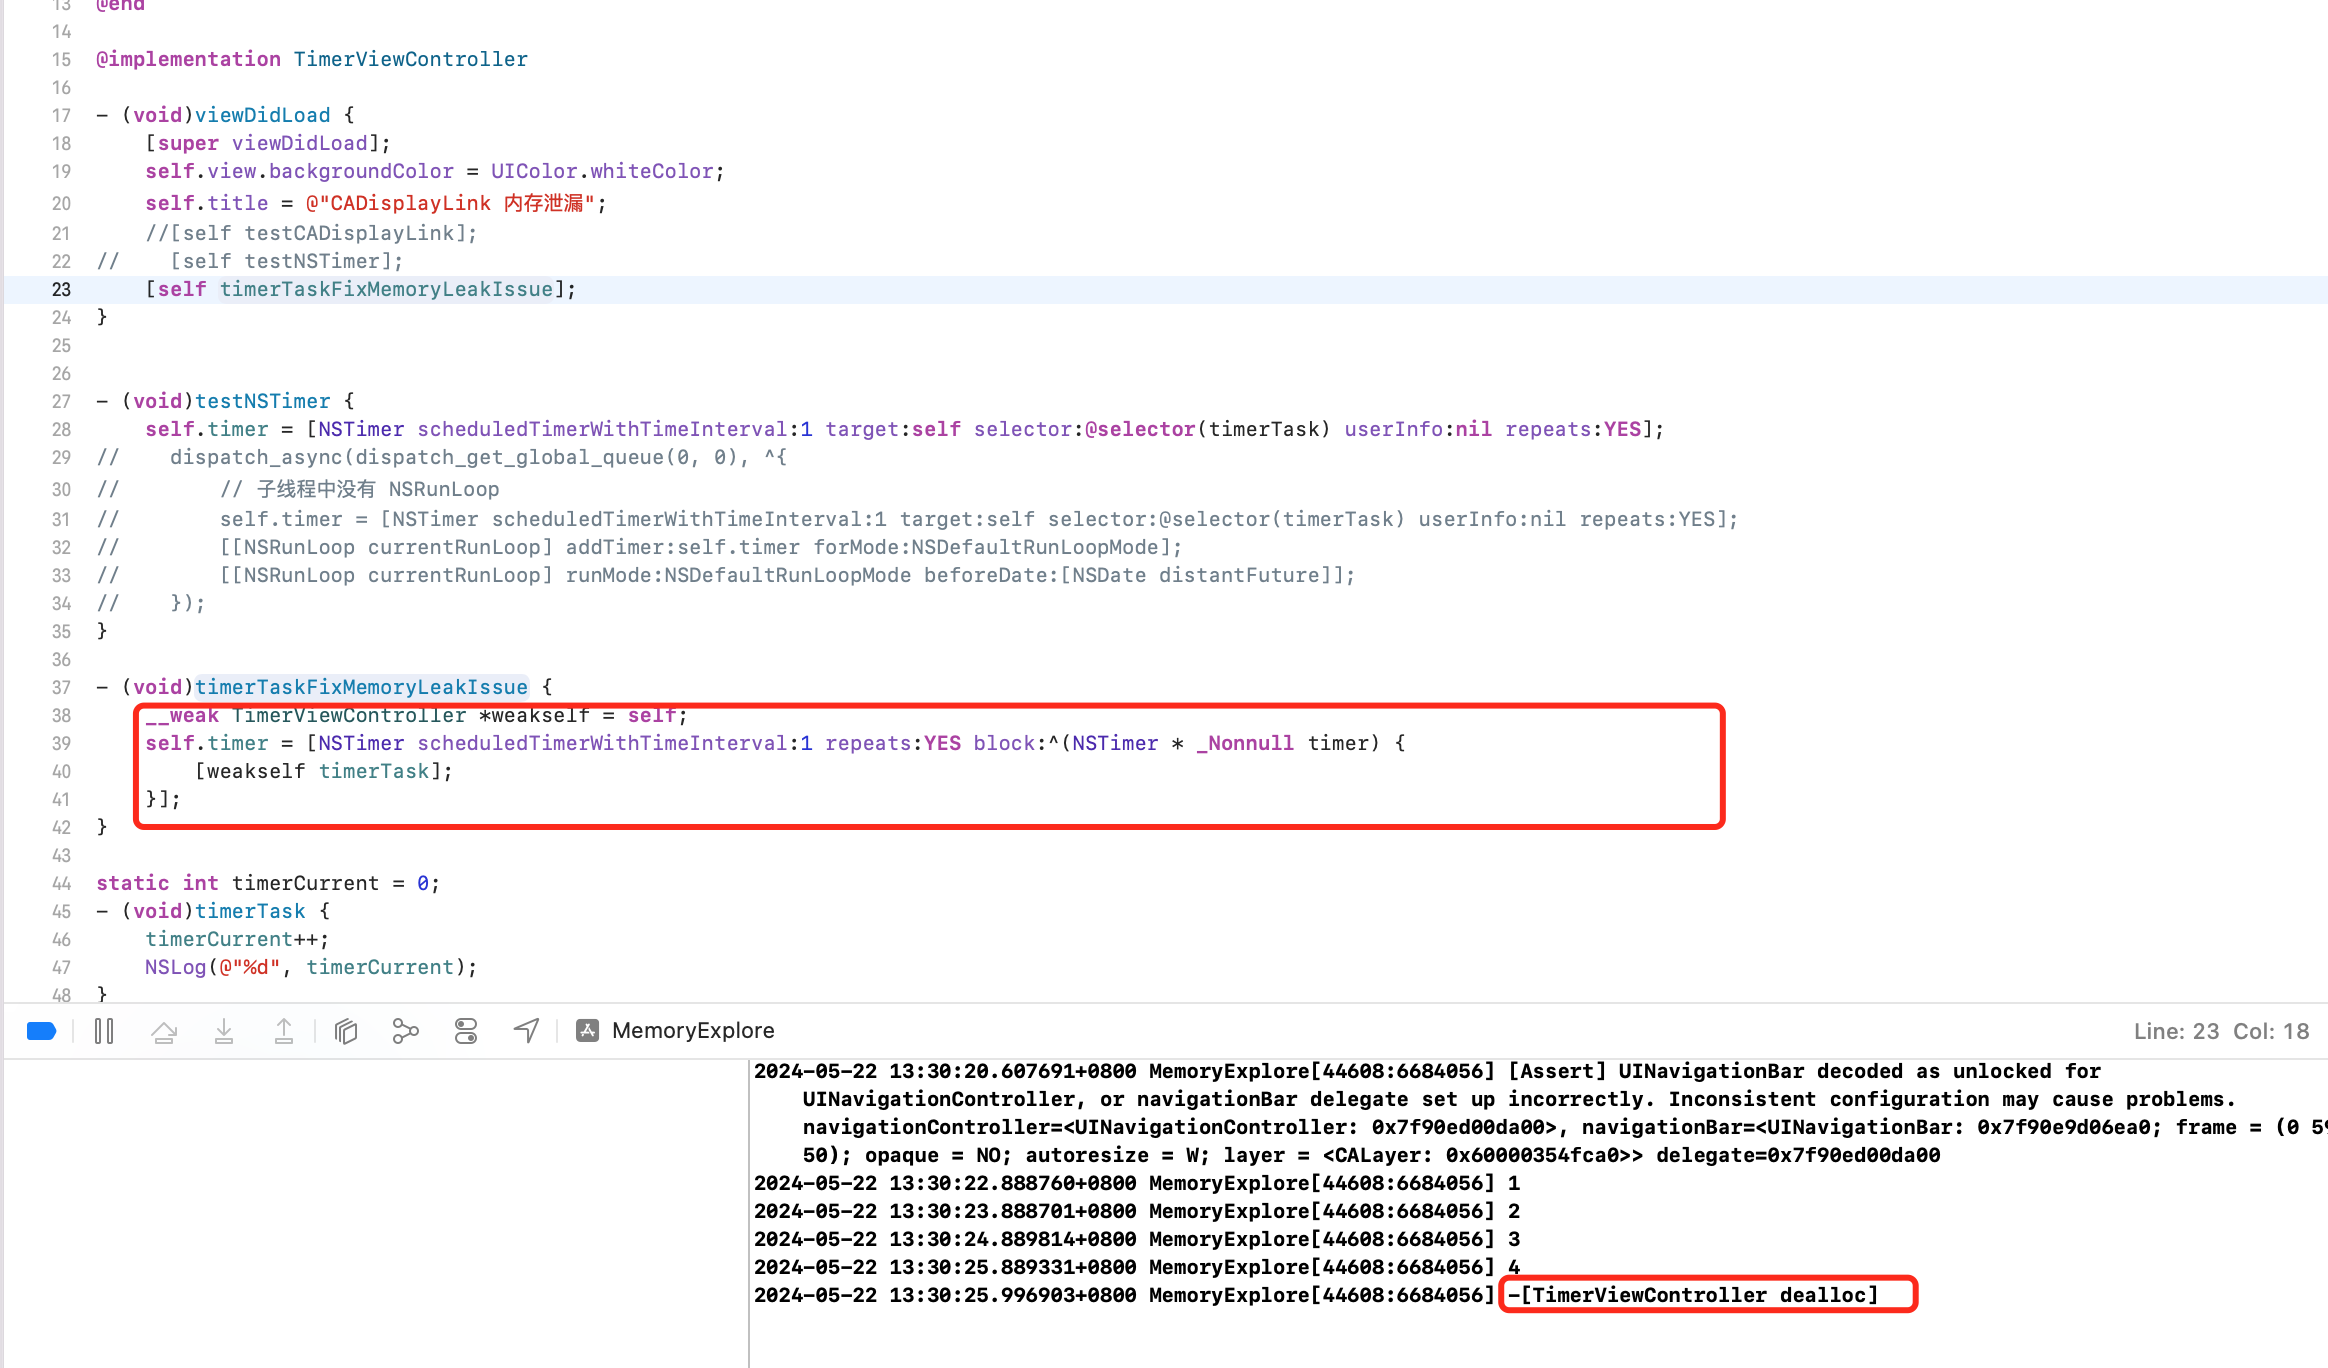
该种方式,控制器 (self)强引用 timer,timer 强引用 block,block 弱引用 self,3者没有形成环。
采用系统 NSProxy 代替自定义的中间类
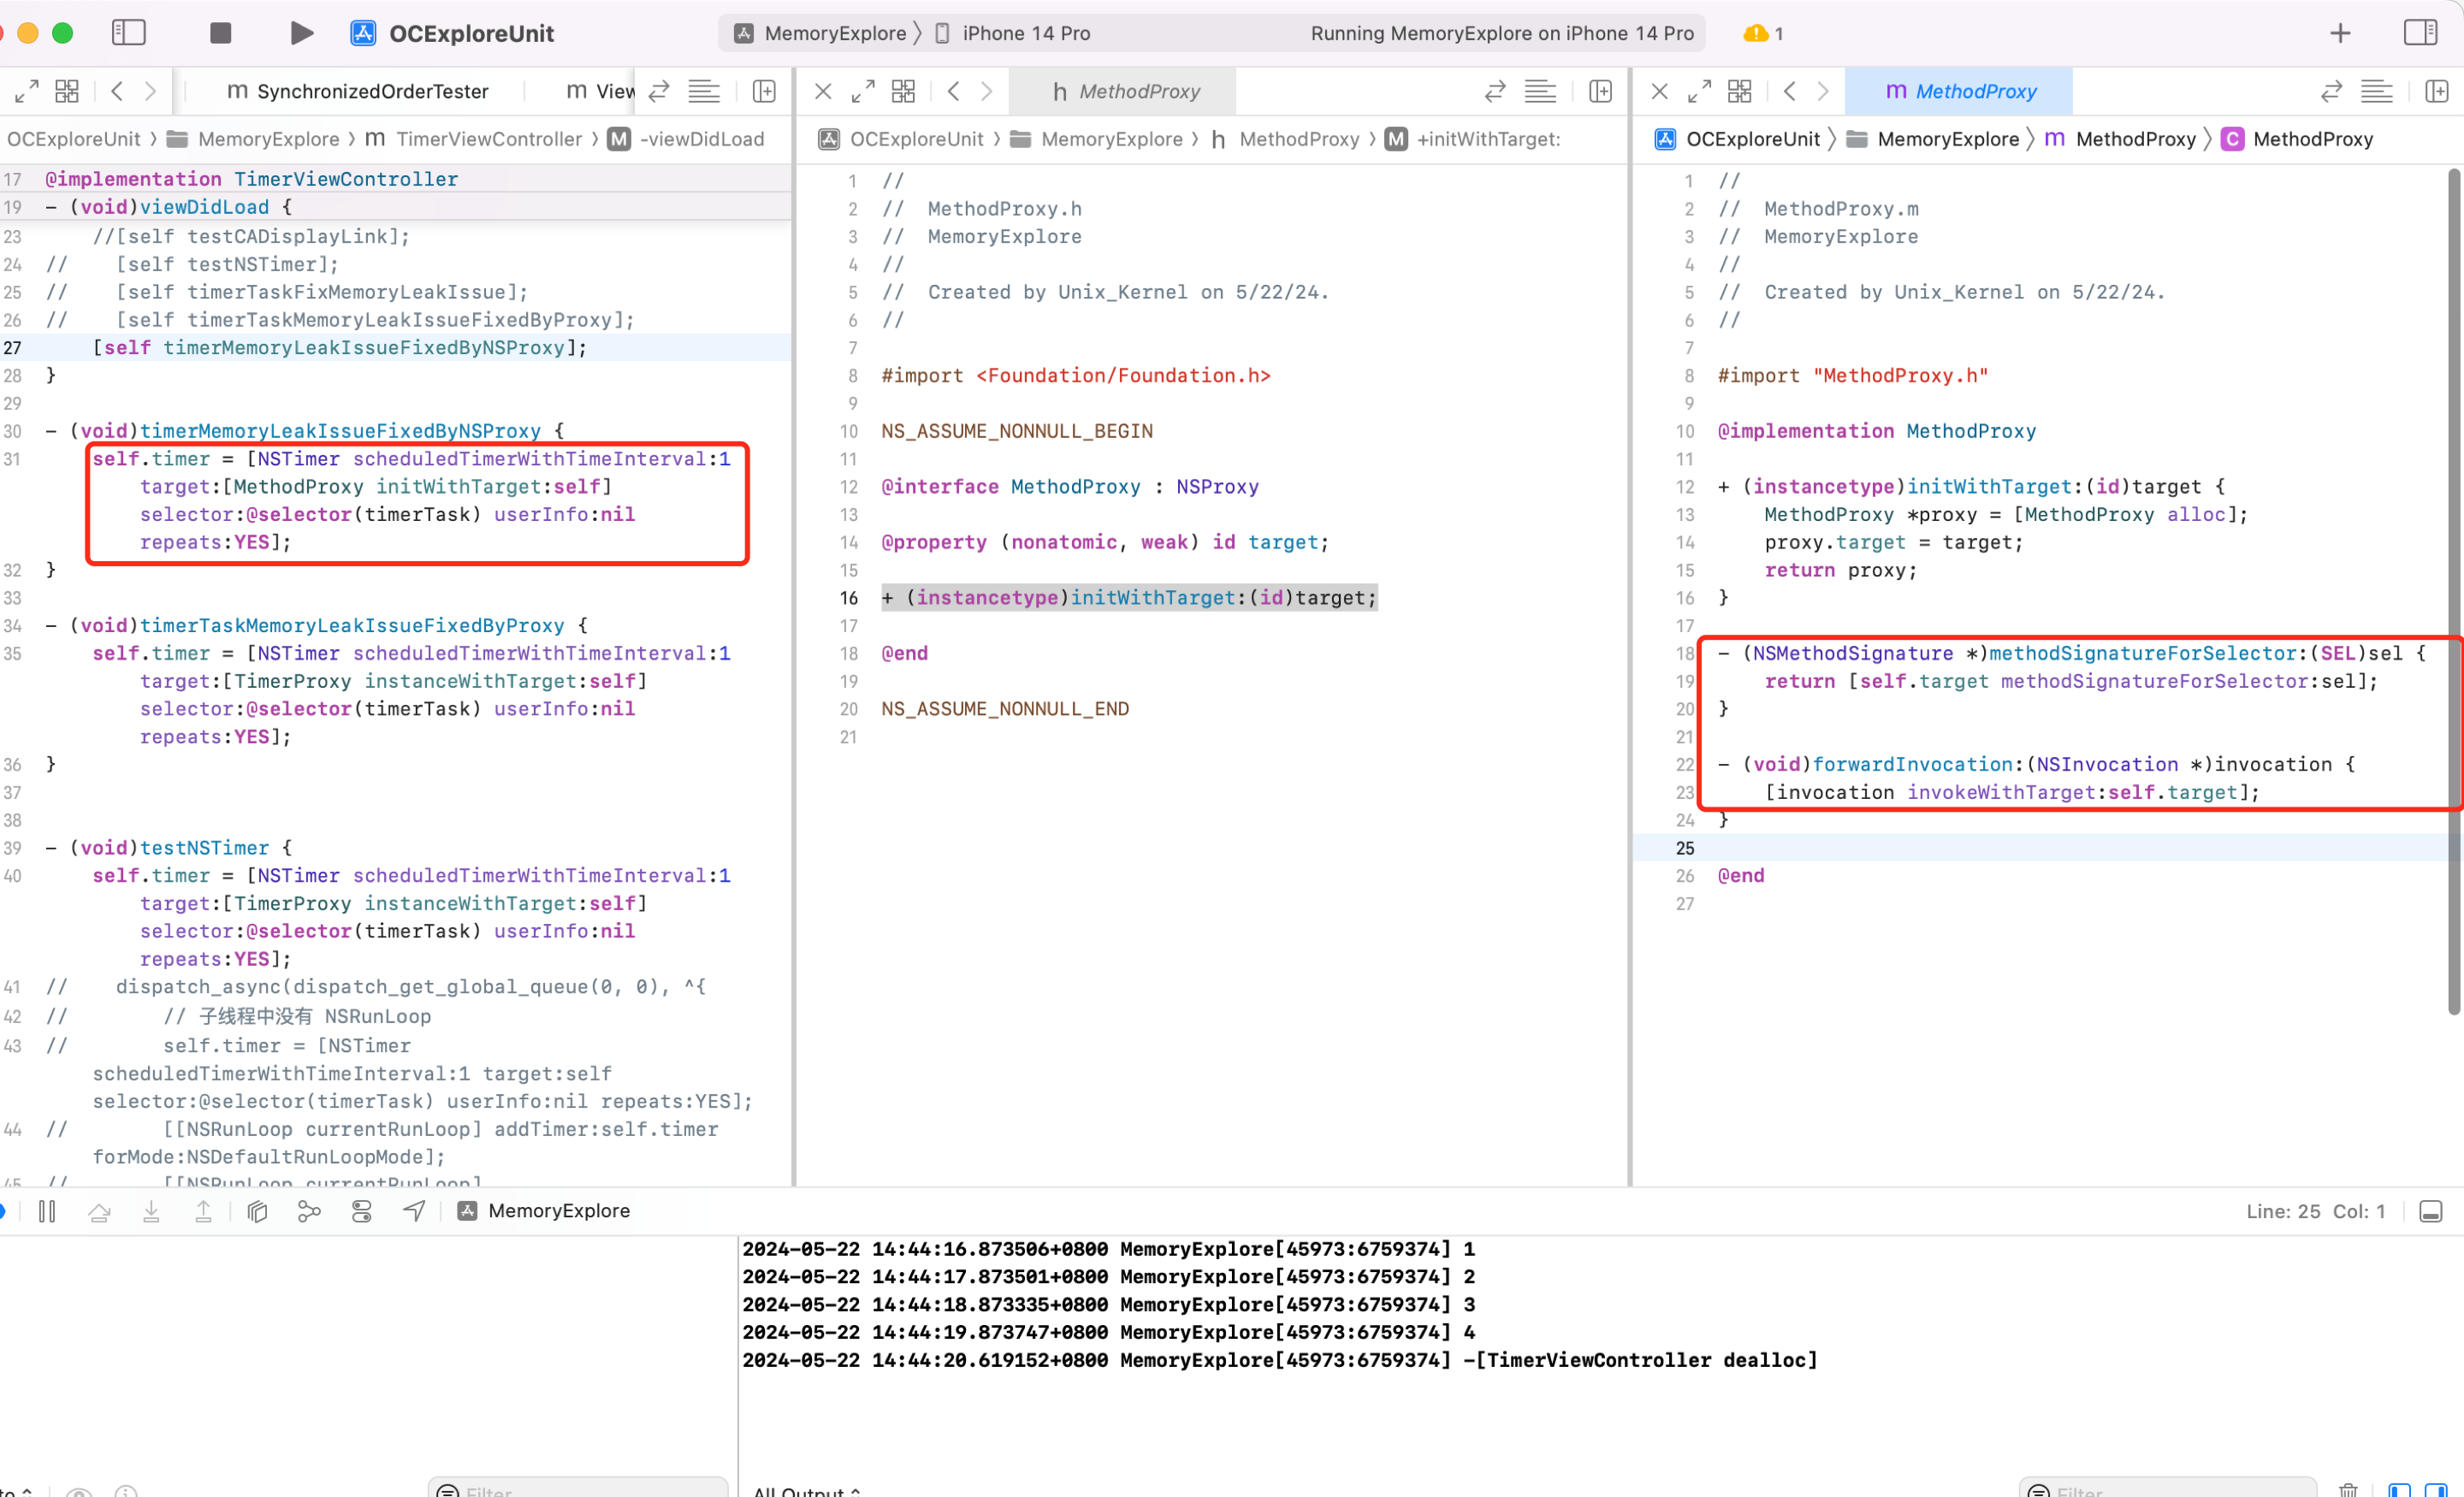
注意:继承自 NSProxy 的类,不能 init。
QA:自己写的继承自 NSObject 的代理对象和继承自 NSProxy 的代理有何区别?看上去反而是自定义的 NSObject 使用更简单呀?
答:NSProxy 效率更高。NSProxy 的主要作用是为消息转发提供一个通用的接口,是一个继承自 NSObject 的对象,虽然看上去 API 更简单,写法简单,但内部运行的时候还是基于 isa 去查找类对象、元类对象的 cache 中查找,找不到再去 class_rw_t 中查找,找不到再从 superclass 找父类的类对象、元类对象...流程,最后还是找不到,则走 runtime 的动态方法解析、消息转发阶段。
看一段神奇的代码
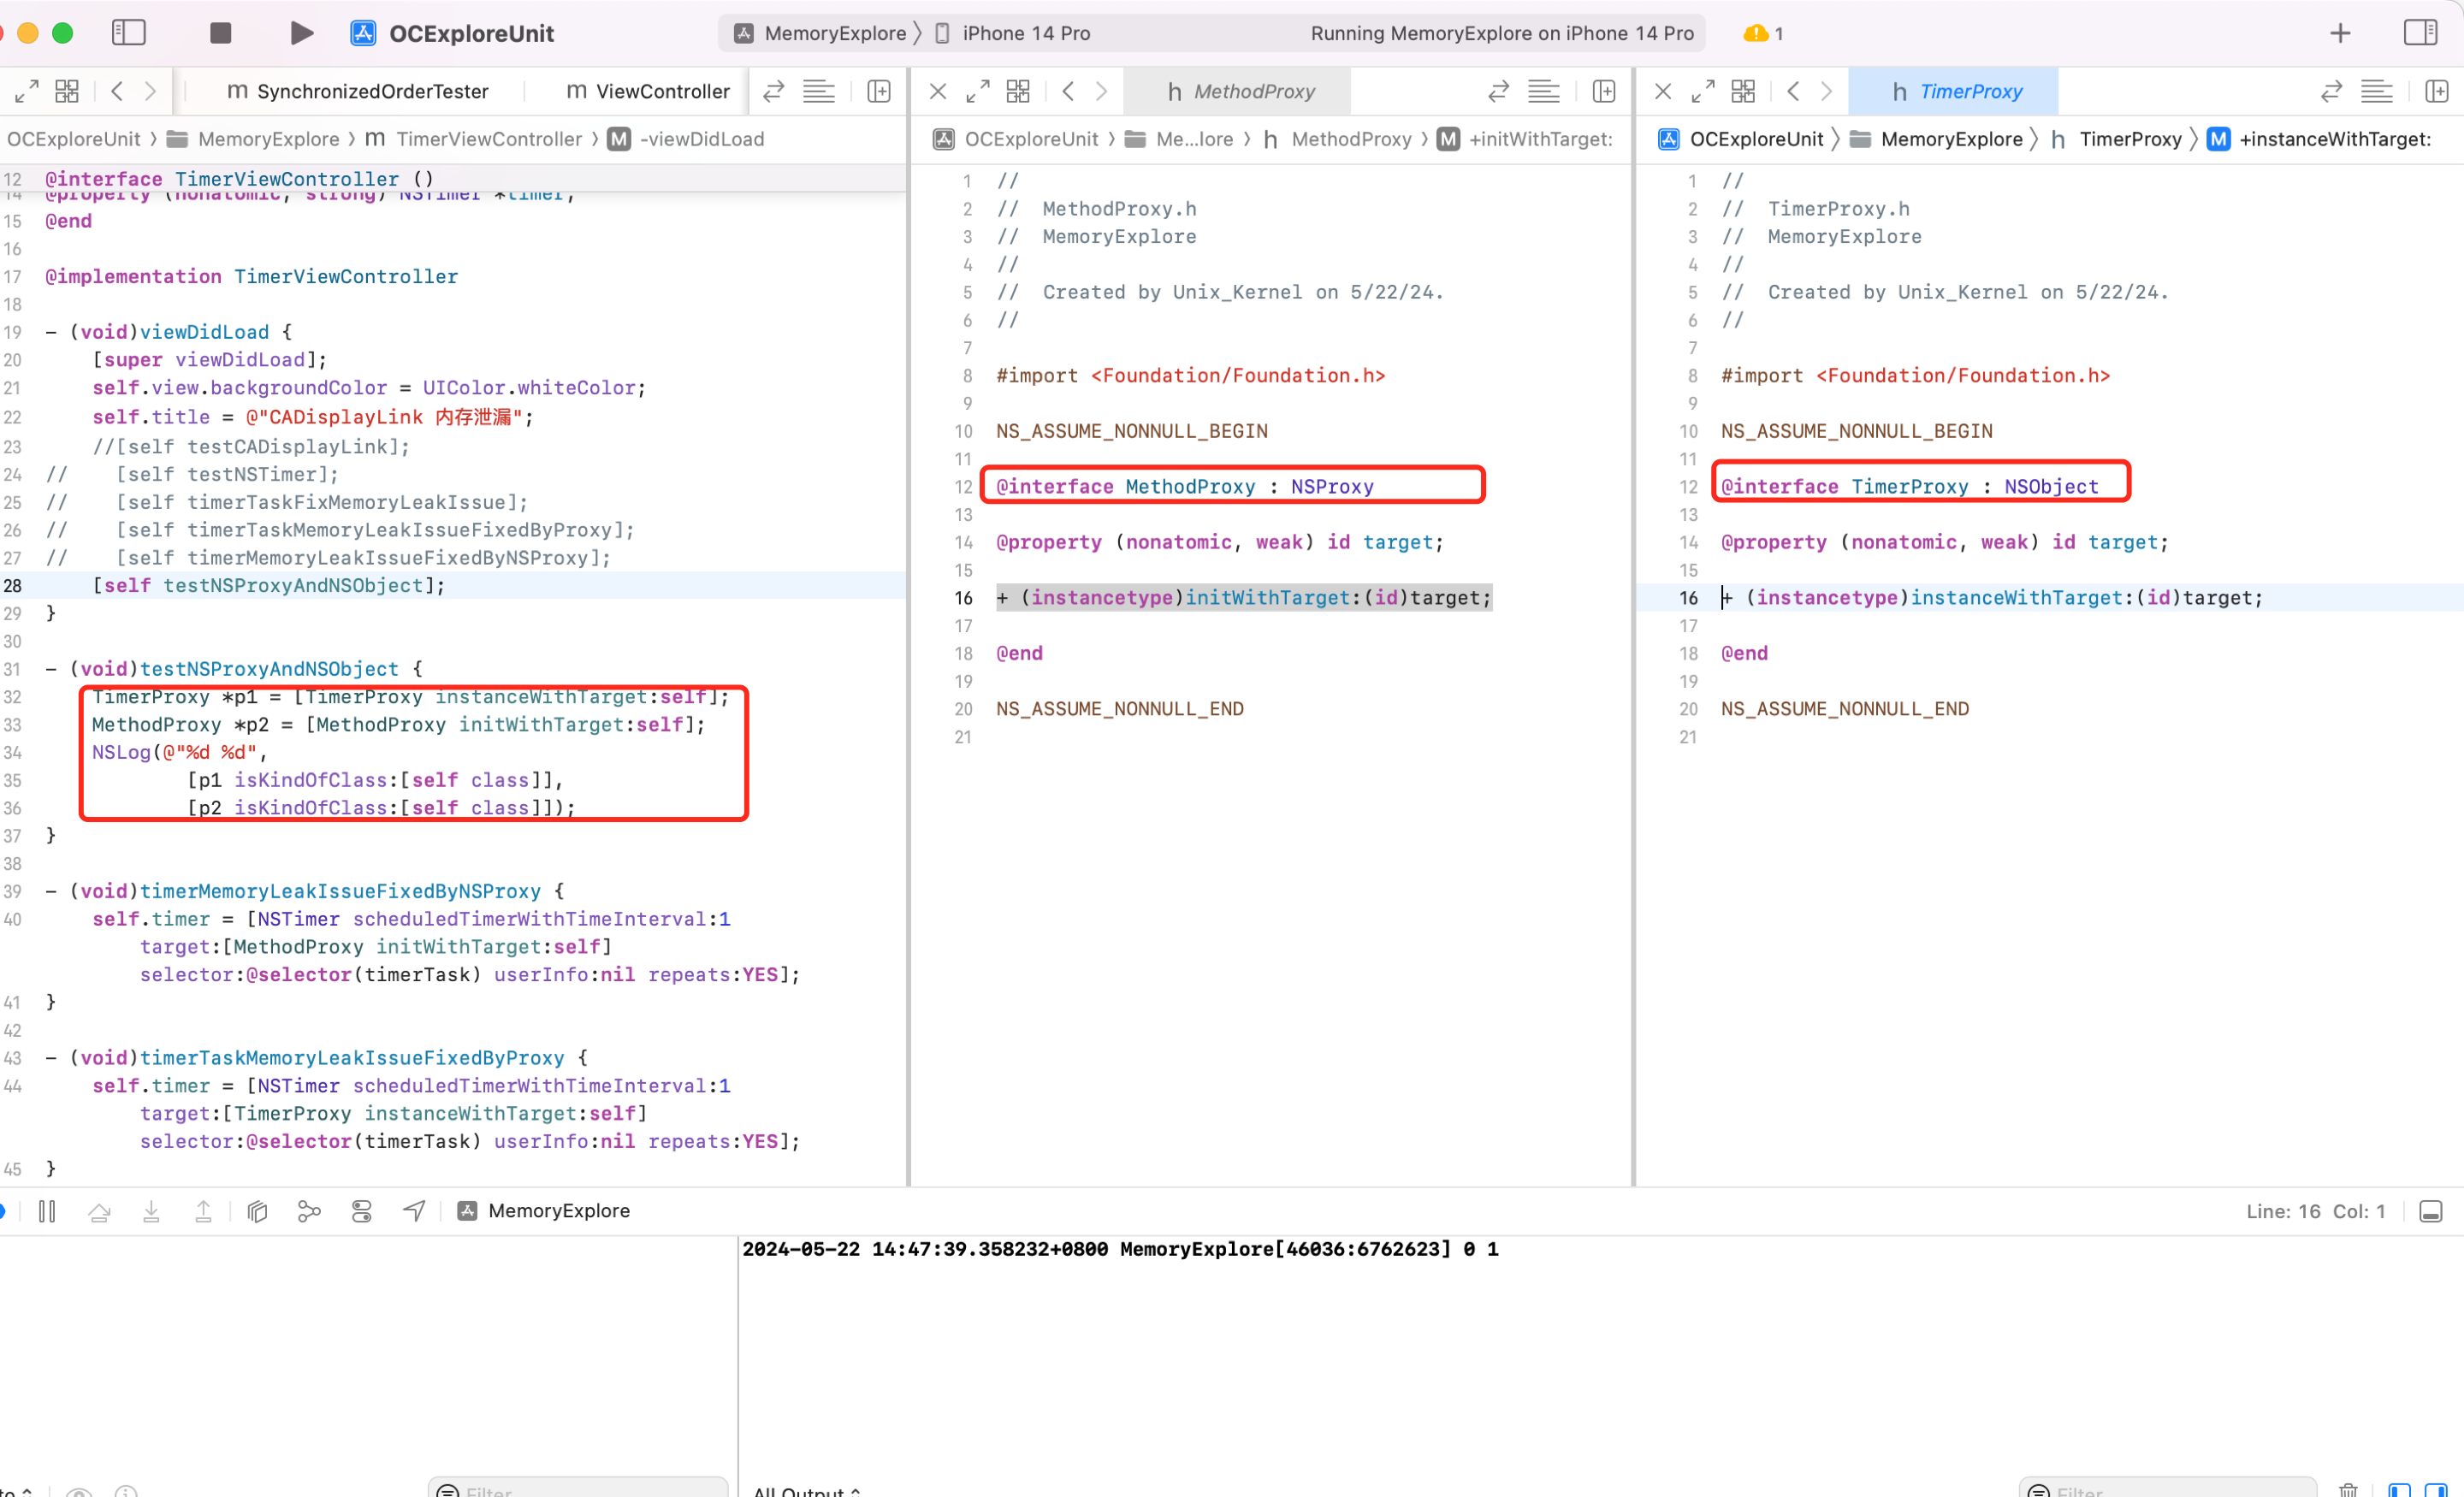
为什么打印出 0 1?
分析:
-
p1 是
TimerProxy类,继承于 NSObject 所以就不是 UIViewController 类型。 -
p2 是
MethodProxy类,继承自 NSProxy,当调用 isKindOfClass 这个方法的时候,也会进行消息转发,即调用forwardInvocation方法,其内部实现[invocation invokeWithTarget:self.target];则触发 self.target 的逻辑。此时 self.target 就是 self,所以上面的[p2 isKindOfClass:[self class]]等价于[self isKindOfClass:[self.class]],所以为 1。
也就是说继承自 NSProxy 类的对象,调用方法的时候,会自动走消息转发的流程。
这一点可以查看 GUN 查看下源码印证。NSProxy.m
- (BOOL) isKindOfClass: (Class)aClass
{
  NSMethodSignature    *sig;
  NSInvocation        *inv;
  BOOL            ret;
  sig = [self methodSignatureForSelector: _cmd];
  inv = [NSInvocation invocationWithMethodSignature: sig];
  [inv setSelector: _cmd];
  [inv setArgument: &aClass atIndex: 2];
  [self forwardInvocation: inv];
  [inv getReturnValue: &ret];
  return ret;
}
可以看到内部直接调用了消息转发。
GCD Timer
CADisplayLink、NSTimer 都是依靠 RunLoop 实现的,所以当 RunLoop 任务繁重的时候,定时器可能不准。
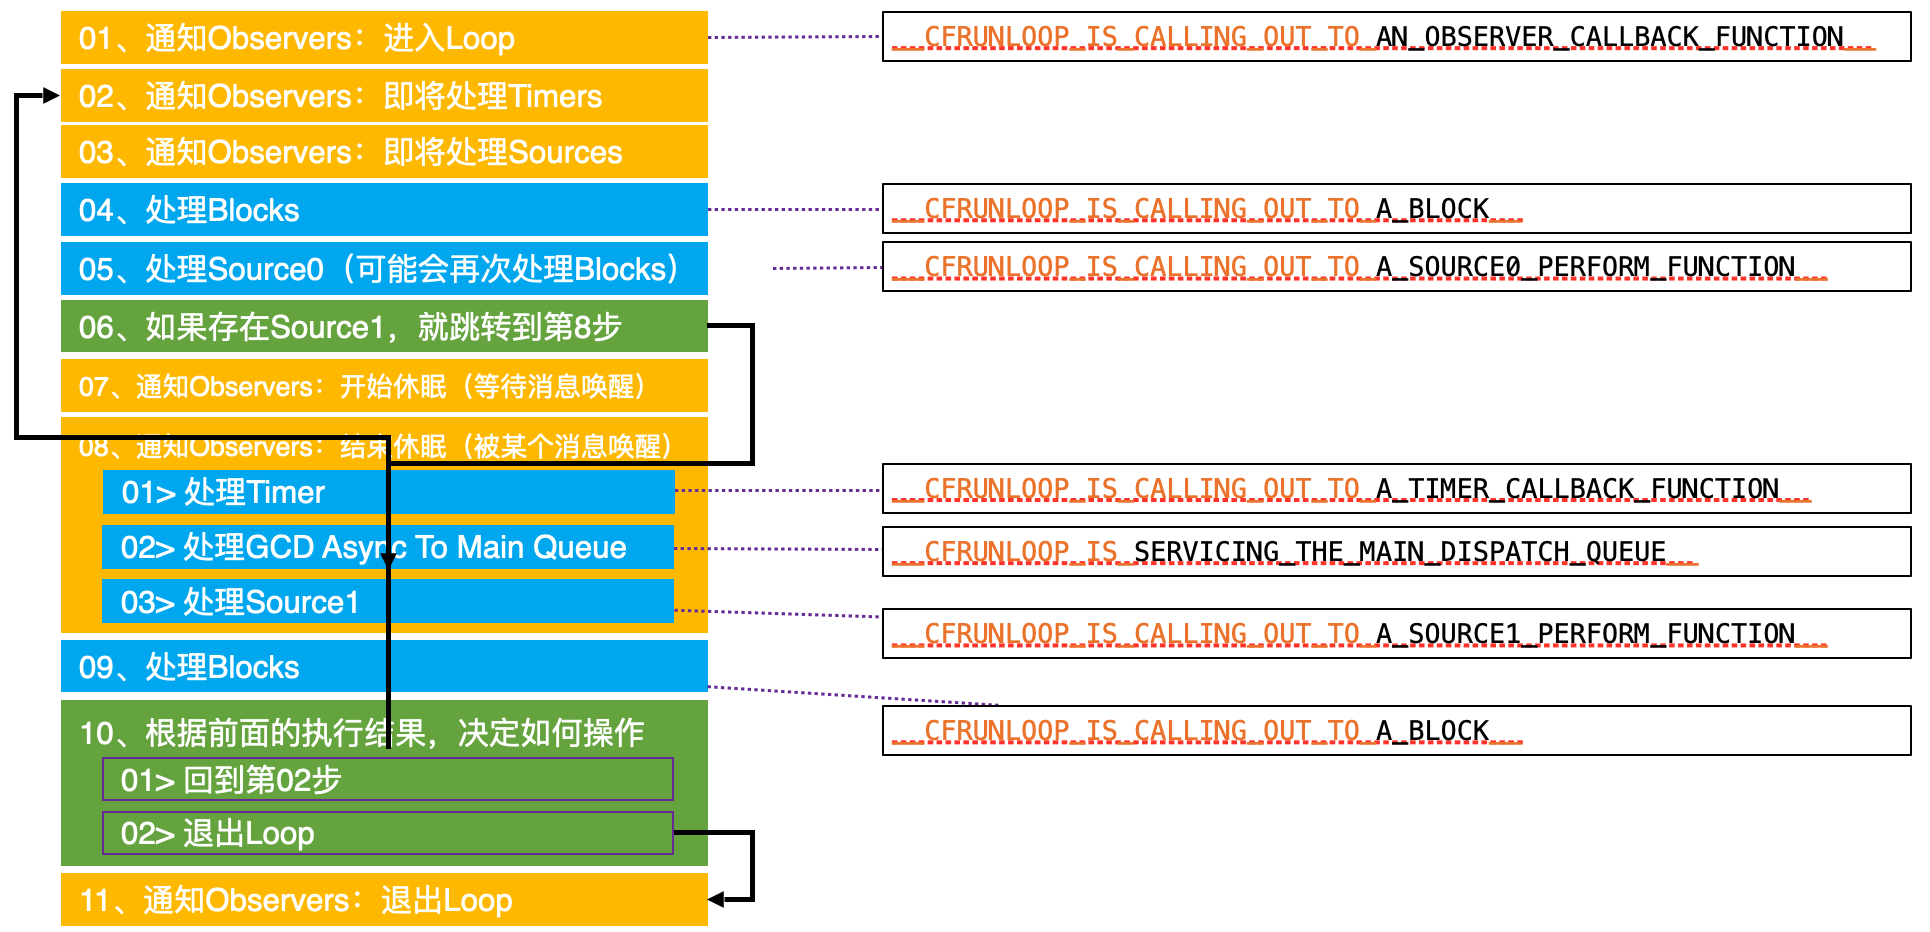
假设一个 NSTimer 被加到 RunLoop 开头,NSTimer 执行周期为1s,RunLoop 前面任务繁重,第一次走完一个完整的 RunLoop 需要0.4s,然后从头检测 NSTimer 有没有到时间,发现还没到继续执行 RunLoop 后续逻辑。后面遇到卡顿任务了,第二次 RunLoop 用了0.5s,然后从头检测 NSTimer 有没有到时间,0.4+0.5还不到时间,继续跑,第三次 RunLoop 比较轻松,耗时0.2s,再判断定时器时间有没有到,则此次已经0.4+0.5+0.2=1.1s了,此时 NSTimer 的事件被执行,此时精确度已经不够了(每次 RunLoop 的执行时间不固定)
如果 NSTimer 被添加到了一个特定的模式,当滚动视图时, RunLoop 会切换到 UITrackingRunLoopMode,如果 NSTimer 没有被添加到这个模式,它就不会触发。
当 RunLoop 没有事件可处理时,它会进入休眠状态。这意味着即使定时器的时间间隔到了,但 RunLoop 可能还在休眠中,因此定时器不会立即触发。
网上有些针对 FPS 帧率的检测是基于 CADisplayLink 计算的,所以这种方案不准确。具体可以查看文章:带你打造一套 APM 监控系统
GCD 的 timer 会更加准时,底层依赖系统内核,不依赖 RunLoop。
@property (nonatomic, strong) dispatch_source_t timer;
// 创建队列
dispatch_queue_t queue = dispatch_get_main_queue();
// 创建 GCD 定时器
dispatch_source_t timerSource = dispatch_source_create(DISPATCH_SOURCE_TYPE_TIMER, 0, 0, queue);
uint64_t start = 2.0;
uint64_t interval = 1.0;
// 设置定时器周期
dispatch_source_set_timer(timerSource, dispatch_time(DISPATCH_TIME_NOW, start * NSEC_PER_SEC), interval * NSEC_PER_SEC, 0);
// 设置定时器任务
dispatch_source_set_event_handler(timerSource, ^{
    NSLog(@"tick tock");
});
// 启动定时器
dispatch_resume(timerSource);
self.timer = timerSource;
为什么 GCD timer 会更准确?因为普通定时器运行依赖 RunLoop,RunLoop 一个运行周期内的任务繁忙程度是不确定的。当某次任务繁重,那么定时器调度就不准时。
GCD timer 不依赖 RunLoop,系统底层驱动,所以会更加准确。因为和 RunLoop 无关,所以和 UI 滚动,RunLoop mode 切换到 UITrackingMode 也不影响 GCD timer。
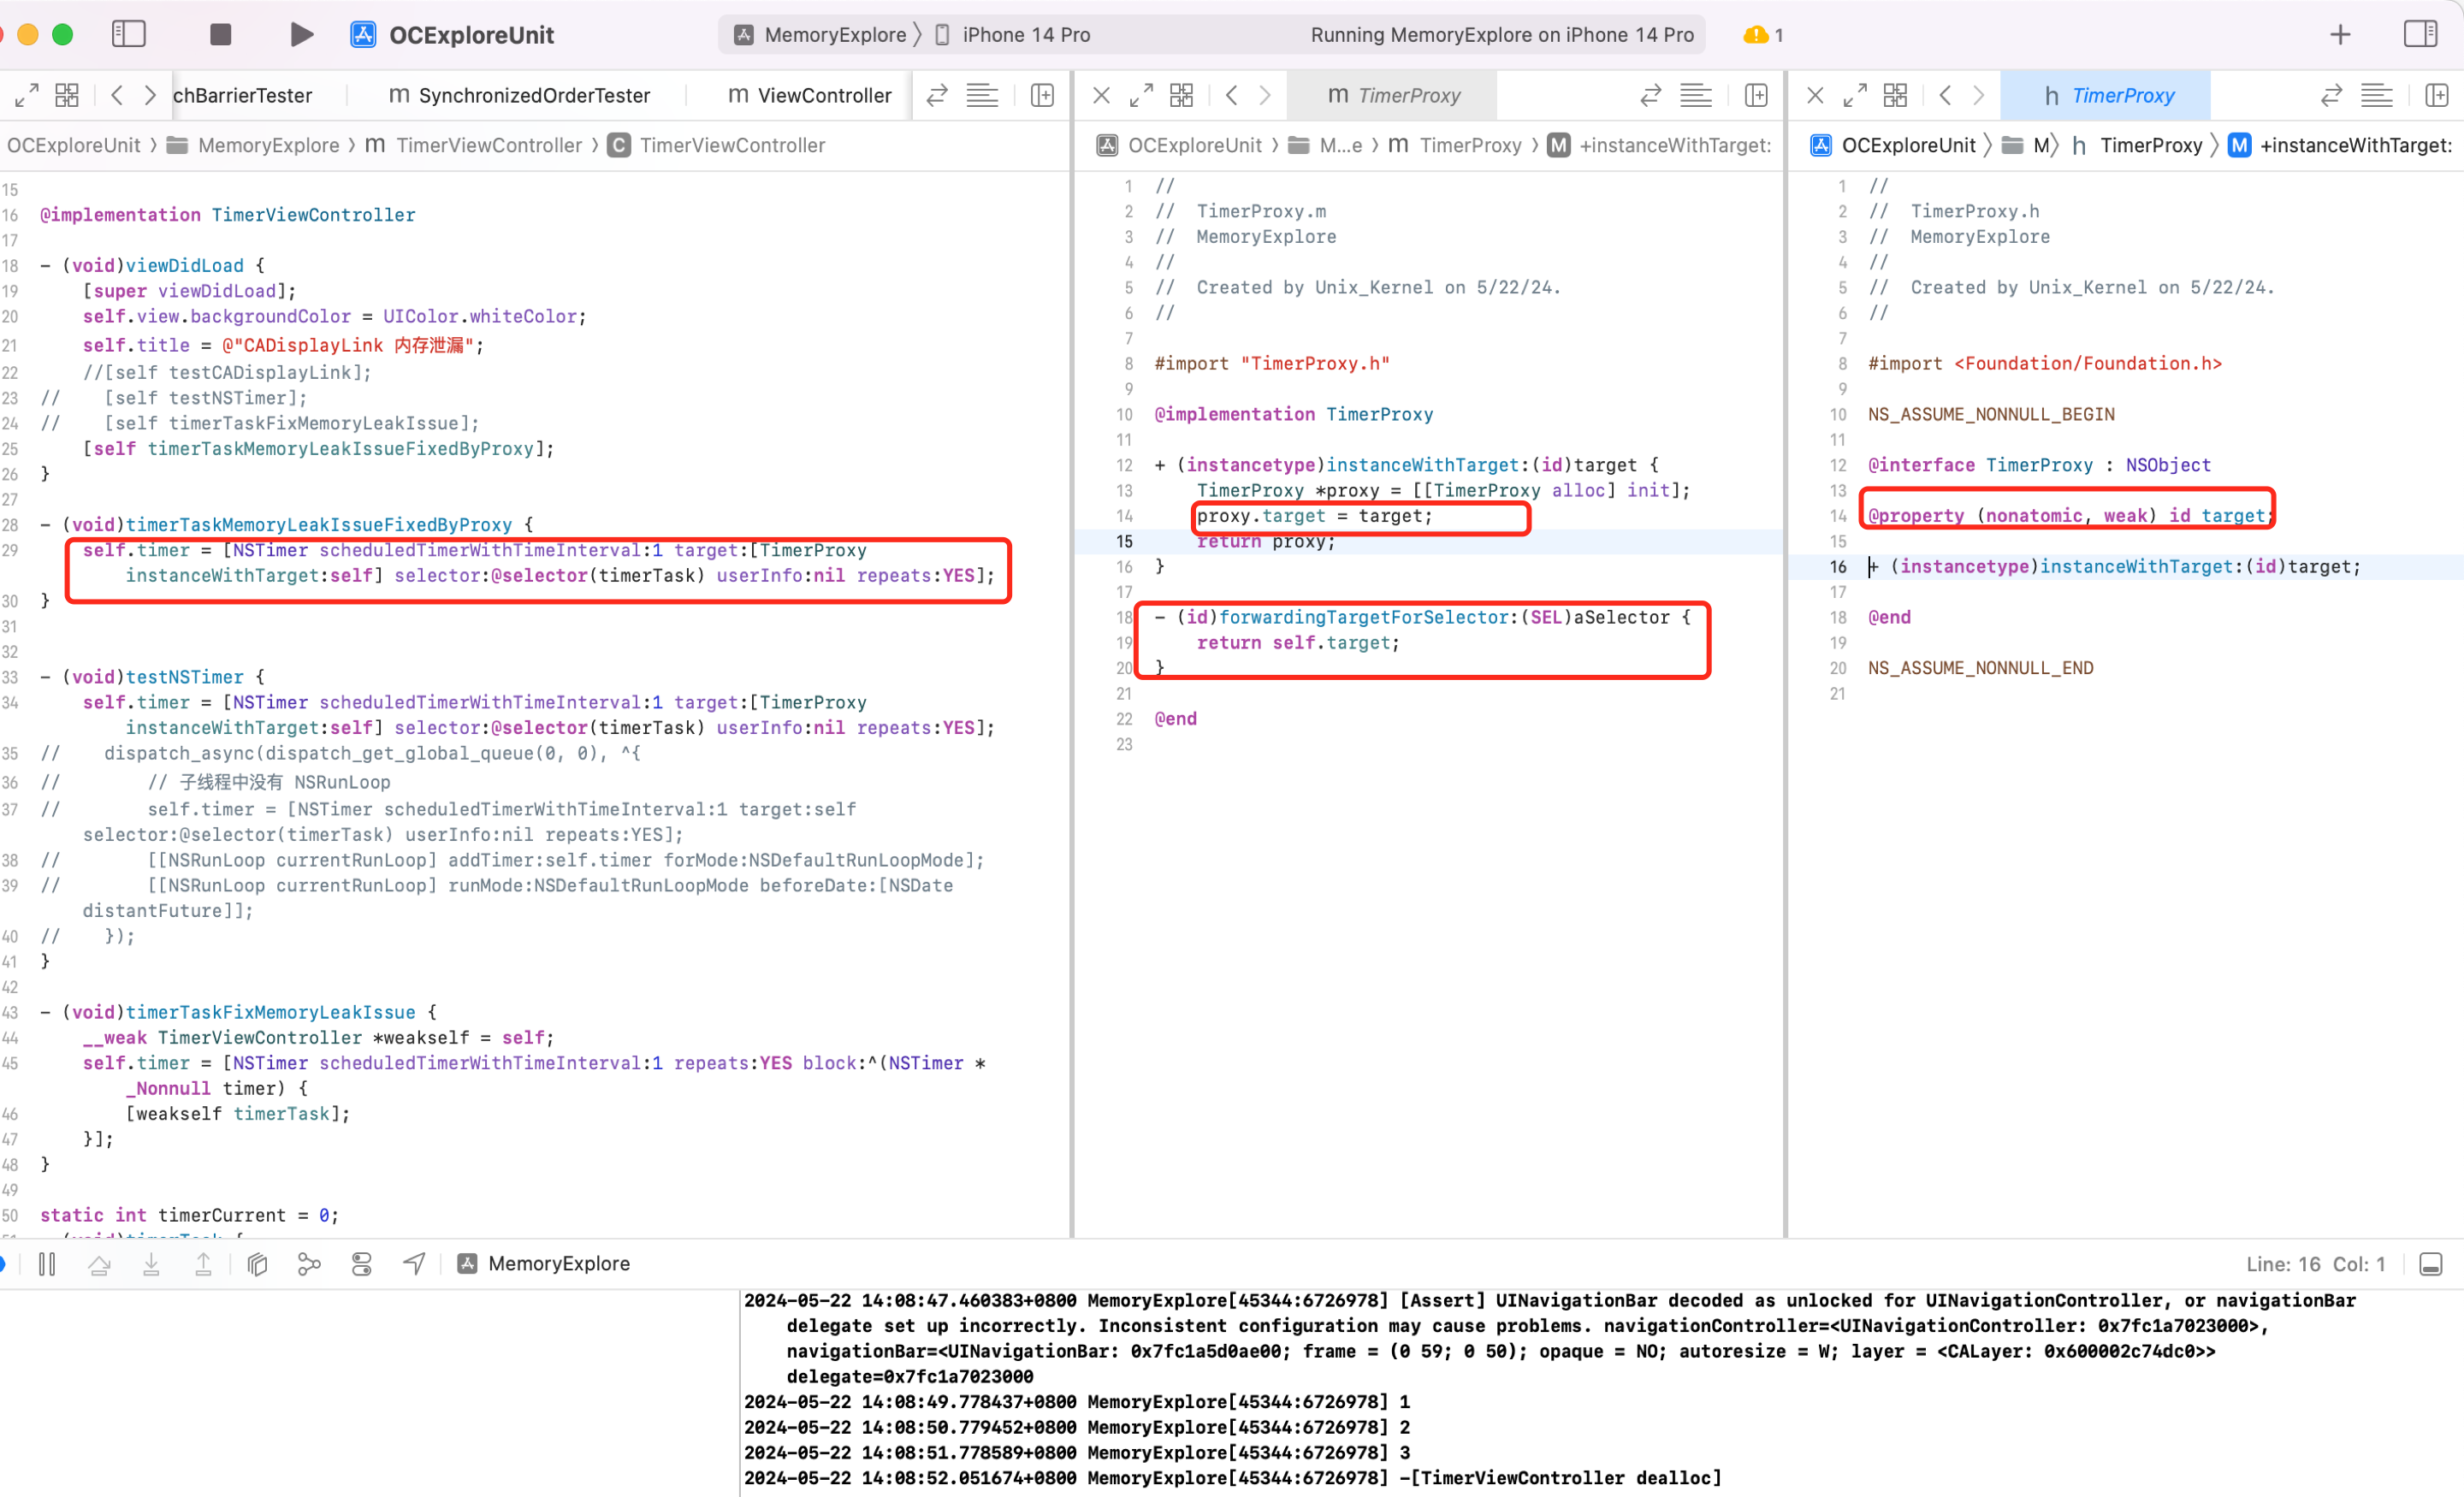
打破循环引用,NSTimer target 自定义
高精度定时器封装
项目中经常使用定时器,普通定时器存在精度丢失的问题、循环引用的问题,为了使用方法我们封装一个定时器
#import <Foundation/Foundation.h>

@interface PreciousTimer : NSObject

+ (NSString *)execTask:(void(^)(void))task
           start:(NSTimeInterval)start
        interval:(NSTimeInterval)interval
         repeats:(BOOL)repeats
           async:(BOOL)async;

+ (NSString *)execTask:(id)target
              selector:(SEL)selector
                 start:(NSTimeInterval)start
              interval:(NSTimeInterval)interval
               repeats:(BOOL)repeats
                 async:(BOOL)async;

+ (void)cancelTask:(NSString *)name;

@end

#import "PreciousTimer.h"

@implementation PreciousTimer

static NSMutableDictionary *timers_;
dispatch_semaphore_t semaphore_;
+ (void)initialize
{
    static dispatch_once_t onceToken;
    dispatch_once(&onceToken, ^{
        timers_ = [NSMutableDictionary dictionary];
        semaphore_ = dispatch_semaphore_create(1);
    });
}

+ (NSString *)execTask:(void (^)(void))task start:(NSTimeInterval)start interval:(NSTimeInterval)interval repeats:(BOOL)repeats async:(BOOL)async
{
    if (!task || start < 0 || (interval <= 0 && repeats)) return nil;

    // 队列
    dispatch_queue_t queue = async ? dispatch_get_global_queue(0, 0) : dispatch_get_main_queue();

    // 创建定时器
    dispatch_source_t timer = dispatch_source_create(DISPATCH_SOURCE_TYPE_TIMER, 0, 0, queue);

    // 设置时间
    dispatch_source_set_timer(timer,
                              dispatch_time(DISPATCH_TIME_NOW, start * NSEC_PER_SEC),
                              interval * NSEC_PER_SEC, 0);


    dispatch_semaphore_wait(semaphore_, DISPATCH_TIME_FOREVER);
    // 定时器的唯一标识
    NSString *name = [NSString stringWithFormat:@"%zd", timers_.count];
    // 存放到字典中
    timers_[name] = timer;
    dispatch_semaphore_signal(semaphore_);

    // 设置回调
    dispatch_source_set_event_handler(timer, ^{
        task();

        if (!repeats) { // 不重复的任务
            [self cancelTask:name];
        }
    });

    // 启动定时器
    dispatch_resume(timer);

    return name;
}

+ (NSString *)execTask:(id)target selector:(SEL)selector start:(NSTimeInterval)start interval:(NSTimeInterval)interval repeats:(BOOL)repeats async:(BOOL)async
{
    if (!target || !selector) return nil;

    return [self execTask:^{
        if ([target respondsToSelector:selector]) {
#pragma clang diagnostic push
#pragma clang diagnostic ignored "-Warc-performSelector-leaks"
            [target performSelector:selector];
#pragma clang diagnostic pop
        }
    } start:start interval:interval repeats:repeats async:async];
}

+ (void)cancelTask:(NSString *)name
{
    if (name.length == 0) return;

    dispatch_semaphore_wait(semaphore_, DISPATCH_TIME_FOREVER);

    dispatch_source_t timer = timers_[name];
    if (timer) {
        dispatch_source_cancel(timer);
        [timers_ removeObjectForKey:name];
    }

    dispatch_semaphore_signal(semaphore_);
}

@end
使用 Demo
- (void)viewDidLoad{
    [super viewDidLoad];
    NSLog(@"now");
    self.timerId = [PreciousTimer execTask:^{
        NSLog(@"tick tock %@", [NSThread currentThread]);
    } start:2 interval:1 repeats:YES async:YES];
}
- (void)touchesBegan:(NSSet<UITouch *> *)touches withEvent:(UIEvent *)event
{
    [PreciousTimer cancelTask:self.timerId];
}
说明:直接 performSelector 存在警告,可以告诉编译器忽略警告。可以在 Xcode 点开警告,查看详情,复制 [] 里面的字符串去忽略警告

采用 Block 的形式为 NSTimer 增加分类
//.h文件
#import <Foundation/Foundation.h>

@interface NSTimer (UnRetain)
+ (NSTimer *)lbp_scheduledTimerWithTimeInterval:(NSTimeInterval)inerval
                                        repeats:(BOOL)repeats
                                          block:(void(^)(NSTimer *timer))block;
@end

//.m文件
#import "NSTimer+SGLUnRetain.h"

@implementation NSTimer (SGLUnRetain)

+ (NSTimer *)lbp_scheduledTimerWithTimeInterval:(NSTimeInterval)inerval repeats:(BOOL)repeats block:(void (^)(NSTimer *timer))block{

    return [NSTimer scheduledTimerWithTimeInterval:inerval target:self selector:@selector(lbp_blcokInvoke:) userInfo:[block copy] repeats:repeats];
}

+ (void)lbp_blcokInvoke:(NSTimer *)timer {

    void (^block)(NSTimer *timer) = timer.userInfo;

    if (block) {
        block(timer);
    }
}
@end

//控制器.m

#import "ViewController.h"
#import "NSTimer+UnRetain.h"

//定义了一个__weak的self_weak_变量
#define weakifySelf  \
__weak __typeof(&*self)weakSelf = self;

//局域定义了一个__strong的self指针指向self_weak
#define strongifySelf \
__strong __typeof(&*weakSelf)self = weakSelf;

@interface ViewController ()

@property(nonatomic, strong) NSTimer *timer;

@end

@implementation ViewController
- (void)viewDidLoad {
    [super viewDidLoad];

    __block NSInteger i = 0;
    weakifySelf
    self.timer = [NSTimer lbp_scheduledTimerWithTimeInterval:0.1 repeats:YES block:^(NSTimer *timer) {
        strongifySelf
        [self p_doSomething];
        NSLog(@"----------------");
        if (i++ > 10) {
            [timer invalidate];
        }
    }];
}

- (void)p_doSomething {

}

- (void)dealloc {
      // 务必在当前线程调用invalidate方法,使得Runloop释放对timer的强引用(具体请参阅官方文档)
     [self.timer invalidate];
}
@end
上面的方法之所以能解决内存泄漏的问题,关键在于把保留转移到了定时器的类对象身上,这样就避免了实例对象被保留。
当我们谈到循环引用时,其实是指实例对象间的引用关系。类对象在 App 杀死时才会释放,在实际开发中几乎不用关注类对象的内存管理。下面的代码摘自苹果开源的 NSObject.mm 文件,从中可以看出,对于类对象,并不需要像实例对象那样进行内存管理。
+ (id)retain {
    return (id)self;
}

// Replaced by ObjectAlloc
- (id)retain {
    return ((id)self)->rootRetain();
}

+ (oneway void)release {
}

// Replaced by ObjectAlloc
- (oneway void)release {
    ((id)self)->rootRelease();
}

+ (id)autorelease {
    return (id)self;
}

// Replaced by ObjectAlloc
- (id)autorelease {
    return ((id)self)->rootAutorelease();
}

+ (NSUInteger)retainCount {
    return ULONG_MAX;
}

- (NSUInteger)retainCount {
    return ((id)self)->rootRetainCount();
}
iOS 10 中,定时器 api 增加了 block 方法,实现原理与此类似,这里采用分类为 NSTimer 增加 block 参数的方法,最终的行为一致
检测
根据 Instrucments 提供的工具的工作原理,写一个野指针探针工具去发现并定位问题。具体见野指针监控工具