mirror of
https://github.com/NohamR/knowledge-kit.git
synced 2026-05-25 04:17:17 +00:00

316 lines
9.3 KiB
Markdown
316 lines
9.3 KiB
Markdown
# Mac 终端效率神技
|
||
|
||
## 增强各种预览的插件
|
||
|
||
- 预览查看图片分辨率&大小
|
||
- 代码语法高亮
|
||
- 快速预览zip压缩包内容
|
||
- 快速预览markdown格式内容
|
||
|
||
```powershell
|
||
brew cask install qlcolorcode betterzipql qlimagesize qlmarkdown
|
||
```
|
||
|
||
## iTerm2
|
||
|
||
具体的配置网上一大堆。贴一个本人亲身操刀操作过的[教程](https://www.jianshu.com/p/7de00c73a2bb)
|
||
|
||
程序员经常与终端操作打交道,所以很多命令便是做成了命令行模式,在自带的 Terminal 命令都保存在 `.bash_profile` 文件中,使用了 iterm2,命令都保存在 `.zshrc` 中。
|
||
|
||
所以我们将很多命令保存且编辑。这里也是分享出我个人常用的配置。不断更新,喜欢的同学可以拿去直接使用
|
||
|
||
```Shell
|
||
# 输入自己常用的命令
|
||
# finder 相关指令
|
||
alias co='code ./'
|
||
alias fo='open ./'
|
||
|
||
# pod 和 xcode 工程相关指令
|
||
alias o='open *.xcodeproj'
|
||
alias po='open *.xcworkspace'
|
||
alias pru='pod repo update'
|
||
alias pi='pod install'
|
||
alias pu='pod update'
|
||
alias piu='pod install --repo-update'
|
||
alias repoanalysis='specbackwarddependency /Users/liubinpeng/.cocoapods/repos/XXCompany_specs'
|
||
alias plint='pod lib lint --sources=git@git.***-inc.com:client/App-Specs.git,git@git.***-inc.com:client/CocoaPods-Specs.git --allow-warnings --verbose --use-libraries'
|
||
alias errorShow=' >1.log 2>&1'
|
||
# git 相关指令
|
||
alias gck='git checkout'
|
||
alias gm='git merge'
|
||
alias gb='git branch'
|
||
alias gbr='git branch -a'
|
||
alias gs='git status'
|
||
alias gc='git clone'
|
||
alias gl='git log'
|
||
alias ga='git add .'
|
||
alias gpull='git pull'
|
||
alias gpush='git push'
|
||
alias gcm='git commit -m'
|
||
alias glocalbranchPush='git push --set-upstream origin '
|
||
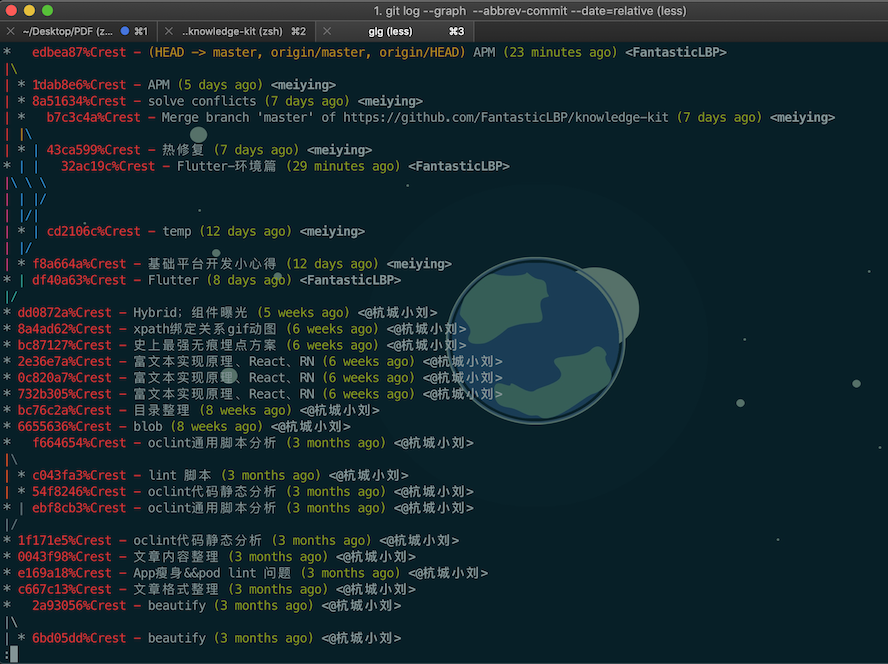
alias glg="git log --graph --pretty=format:'%Cred%h%Crest -%C(yellow)%d%Creset %s %Cgreen(%cr) %C(bold blue)<%an>%Creset' --abbrev-commit --date=relative"
|
||
# npm 相关指令
|
||
alias ns='npm start'
|
||
alias ni='npm install'
|
||
alias nb='npm run build'
|
||
alias nig='npm install -g '
|
||
alias nt='npm test'
|
||
|
||
# Vue 相关命令
|
||
alias vc='vue-init webpack' # (vue-init webpack test1)用法 vc test1
|
||
|
||
# React
|
||
alias rc='create-react-app' #(create-react-app todolist)用法 rc todolist
|
||
|
||
# React Native 命令
|
||
alias rnc='react-native init' #(react-native init todolist)用法 rnc todolist
|
||
|
||
|
||
# 终端打开应用程序
|
||
## 浏览器打开
|
||
alias OpenWithSafari='open -a "/Applications/Safari.app" '
|
||
alias OpenWithChrome='open -a "/Applications/Google Chrome.app" '
|
||
## 用 Typora 打开 markdown 文件预览写作效果。
|
||
alias OpenMDPreview='open -a "/Applications/Typora.app" '
|
||
## 用 DB Browser for SQLite 打开 db 文件
|
||
alias OpenDB='open -a "/Applications/DB Browser for SQLite.app" '
|
||
## 用 SourceTree 打开工程
|
||
alias openSourceTree='open -a "/Applications/Sourcetree.app/" '
|
||
# Flutter 环境变量
|
||
|
||
export PUB_HOSTED_URL=https://pub.flutter-io.cn
|
||
export FLUTTER_STORAGE_BASE_URL=https://storage.flutter-io.cn
|
||
export PATH=/Users/liubinpeng/flutter/bin:$PATH
|
||
|
||
|
||
# Android SDK 路径
|
||
|
||
export ANDROID_HOME=~/Library/Android/sdk
|
||
export PATH=${PATH}:${ANDROID_HOME}/emulator
|
||
export PATH=${PATH}:${ANDROID_HOME}/tools
|
||
export PATH=${PATH}:${ANDROID_HOME}/platform-tools
|
||
|
||
|
||
# iOS 模拟器开启
|
||
alias iOSSimulator='open -a Simulator'
|
||
|
||
export NVM_DIR="$HOME/.nvm"
|
||
[ -s "$NVM_DIR/nvm.sh" ] && \. "$NVM_DIR/nvm.sh" # This loads nvm
|
||
[ -s "$NVM_DIR/bash_completion" ] && \. "$NVM_DIR/bash_completion" # This loads nvm bash_completion
|
||
|
||
|
||
# Node Version Manager
|
||
export NVM_DIR="$HOME/.nvm"
|
||
[ -s "$NVM_DIR/nvm.sh" ] && \. "$NVM_DIR/nvm.sh" # This loads nvm
|
||
[ -s "$NVM_DIR/bash_completion" ] && \. "$NVM_DIR/bash_completion" # This loads nvm bash_completion
|
||
# Add RVM to PATH for scripting. Make sure this is the last PATH variable change.
|
||
export PATH="$PATH:$HOME/.rvm/bin"
|
||
|
||
export N_PREFIX=/usr/local/bin/node #根据你的安装路径而定
|
||
export PATH=$N_PREFIX/bin:$PATH
|
||
export PATH=/Users/liubinpeng/Desktop/Github/GitWorkflow/bin:$PATH
|
||
|
||
|
||
# chrome 源码探究
|
||
# export PATH=/Users/liubinpeng/Desktop/Tech-Research/iOS/depot_tools:$PATH
|
||
|
||
|
||
# 指定 pyhton 版本
|
||
# Setting PATH for Python 2.7
|
||
PATH="/System/Library/Frameworks/Python.framework/Versions/2.7/bin:${PATH}"
|
||
export PATH
|
||
# Setting PATH for Python 3.7.4
|
||
PATH="/usr/local/Cellar/python/3.7.4/bin:${PATH}"
|
||
|
||
alias python='/System/Library/Frameworks/Python.framework/Versions/2.7/bin/python2.7'
|
||
alias python3='/usr/local/Cellar/python/3.7.4/bin/python3'
|
||
|
||
|
||
|
||
# 禁止终端利用 homebrew 安装插件时候的自动更新
|
||
|
||
alias disableHomebrewUpdate="export HOMEBREW_NO_AUTO_UPDATE=true"
|
||
|
||
|
||
# 终端翻墙相关的设置(开关开启后稍微有点延迟)
|
||
|
||
function proxy_off(){
|
||
unset ALL_PROXY
|
||
echo -e "已关闭代理"
|
||
}
|
||
|
||
function proxy_on(){
|
||
export ALL_PROXY=socks5://127.0.0.1:1081
|
||
echo -e "已开启代理"
|
||
}
|
||
|
||
|
||
# PHP 包管理工具,composer
|
||
export PATH="~/.composer/vendor/bin:$PATH"
|
||
|
||
# python 版本切换工具,全局生效
|
||
export PYENV_ROOT=~/.pyenv
|
||
export PATH=$PYENV_ROOT/shims:$PATH
|
||
|
||
|
||
# 效率
|
||
# 统计当前文件夹下文件的数量
|
||
alias showFilesCount='ls -l |grep "^-"|wc -l'
|
||
```
|
||
|
||
退出编辑,执行 `source .zshrc`
|
||
|
||
|
||
|
||
验证:在你的 git 项目所在的目录的终端下输入 `glg`
|
||
|
||
|
||
|
||
## 为你的终端添加常用快捷键
|
||
|
||
我们经常在终端做着一些纯指令的事情,天天敲、月月敲这个时间的很浪费的,一天节约5分钟,一年节约365*5/60 = 30H。一算吓一跳。我们每年在一些终端的指令上浪费了这么多时间。今天记录下如何给自己的 Mac 终端添加快捷键。
|
||
|
||
如果是 zsh 的话,可以编辑 `.zshrc` 文件里面的内容。自带的终端则编辑 `bash_profile`
|
||
脚本具体看上一条。
|
||
|
||
|
||
## 输出文件目录结构
|
||
|
||
```powershell
|
||
brew install tree
|
||
```
|
||
|
||
用法:
|
||
|
||
1. 我们可以在目录遍历时使用 -L 参数指定遍历层级
|
||
|
||
```powershell
|
||
tree -L 2
|
||
```
|
||
|
||
2. 如果你想把一个目录的结构树导出到文件 Readme.md ,可以这样操作
|
||
|
||
```powershell
|
||
tree -L 2 >README.md //然后我们看下当前目录下的 README.md 文件
|
||
```
|
||
|
||
3. 只显示文件夹
|
||
|
||
```powershell
|
||
tree -d
|
||
```
|
||
|
||
4. 显示项目的层级,n表示层级数。例:显示项目三层结构,tree -l 3
|
||
|
||
```powershell
|
||
tree -L n
|
||
```
|
||
|
||
5. tree -I pattern 用于过滤不想要显示的文件或者文件夹。比如要过滤项目中的node_modules文件夹
|
||
|
||
```powershell
|
||
tree -I “node_modules”
|
||
```
|
||
|
||
|
||
## 浏览器相关
|
||
|
||
1. 搜索
|
||
|
||
在指定的站点下搜索 `inurl: jobbole.com intitle:Hybrid`
|
||
|
||
## 百度云盘破解
|
||
|
||
1. 会员体验一般为60秒,通过本代码可以一直以会员的速度下载。
|
||
|
||
```
|
||
git clone https://github.com/CodeTips/BaiduNetdiskPlugin-macOS.git && ./BaiduNetdiskPlugin-macOS/Other/Install.sh
|
||
```
|
||
|
||
2. 百度网盘全速下载
|
||
|
||
- 先将你需要下载的地址复制进浏览器
|
||
- 然后在域名 baidu 后面拼接 wp
|
||
- 回车。访问页面,选择下载地址1即可全速下载。
|
||
|
||
```
|
||
// 之前
|
||
https://pan.baidu.com/s/1ubcQH34m69hIjYu3CD2S2g
|
||
// 之后
|
||
https://pan.baiduwp.com/s/1ubcQH34m69hIjYu3CD2S2g
|
||
```
|
||
|
||
## 「安全与隐私」中系统不显示「任何来源」
|
||
|
||
在终端执行下面的命令
|
||
```
|
||
sudo spctl --master-disable
|
||
```
|
||
|
||
## 系统错误信息的集中展示
|
||
|
||
```Shell
|
||
pod spec lint *** 2>&1|tee 1.log
|
||
```
|
||
|
||
经常在终端做操作,有个情况就是在 iOS 的组件库维护的时候去检测合法性。你会发现满屏幕都是信息,甚至好几页,但是事实上错了问题后我们去翻页的时候发现很不方便定位问题,所以想到的就是将该过程产生的任何输出,集中打印到一个地方去查看。代码如上。
|
||
|
||
几个概念:
|
||
- 0 stdin,1 stdout,2 stderr
|
||
- |:管道。管道的作用是提供一个通道,将上一个程序的标准输出重定向到下一个程序作为下一个程序的标准输入。
|
||
- tee:从标准输入中读取,并将内容写到标准输出以及文件中。
|
||
|
||
|
||
## 终端查找文件
|
||
|
||
1. 终端查找以‘.log’结尾的文件
|
||
|
||
```Shell
|
||
find . -name '*.log'
|
||
```
|
||
|
||
2. 安装 **ack** 包.
|
||
```shell
|
||
brew install ack
|
||
```
|
||
|
||
使用起来很简单,比如 `ack + 你要查找的关键词`,它可以将查到的结果展示在下面,有完整的文件路径.
|
||
|
||

|
||
|
||
|
||
### 终端每次执行 brew install 都会更新,非常耗时,如何禁止更新。
|
||
```shell
|
||
export HOMEBREW_NO_AUTO_UPDATE=true
|
||
```
|
||
|
||
## Mac 翻墙环境和终端翻墙环境
|
||
|
||
强烈安利一个我用过最快速、最便宜也就是性价比最高的科学上网工具。[链接](http://su.nseducloud.com/aff.php?aff=362) 个人使用的也就是一年120元不到,一个月 60G 流量足够了,打开一些网站秒开。
|
||
|
||
另外很多开发都需要终端下载一些资源,但是终端走的通道和浏览器不一样,所以浏览器可以翻墙,终端还是不可以,所以可以在 `.zshrc` 或者 `.bash_profile` 下加下面的脚本
|
||
|
||
```shell
|
||
function proxy_off(){
|
||
unset ALL_PROXY
|
||
echo -e "已关闭代理"
|
||
}
|
||
|
||
function proxy_on(){
|
||
export ALL_PROXY=socks5://127.0.0.1:1081
|
||
echo -e "已开启代理"
|
||
}
|
||
```
|
||
|
||
使用 proxy_on 开启终端翻墙模式、proxy_off 关闭终端翻墙模式。
|
||
|
||
|
||
## 终端快捷键
|
||
|
||
很多情况下,我们会在终端编辑文件,为了提交效率就有了以下快捷键。
|
||
|
||
- ESC + dd:删除当前一行的数据
|
||
|
||
|
||
持续更新中...
|